
What Is a Construction Takeoff? Complete Guide for Trades
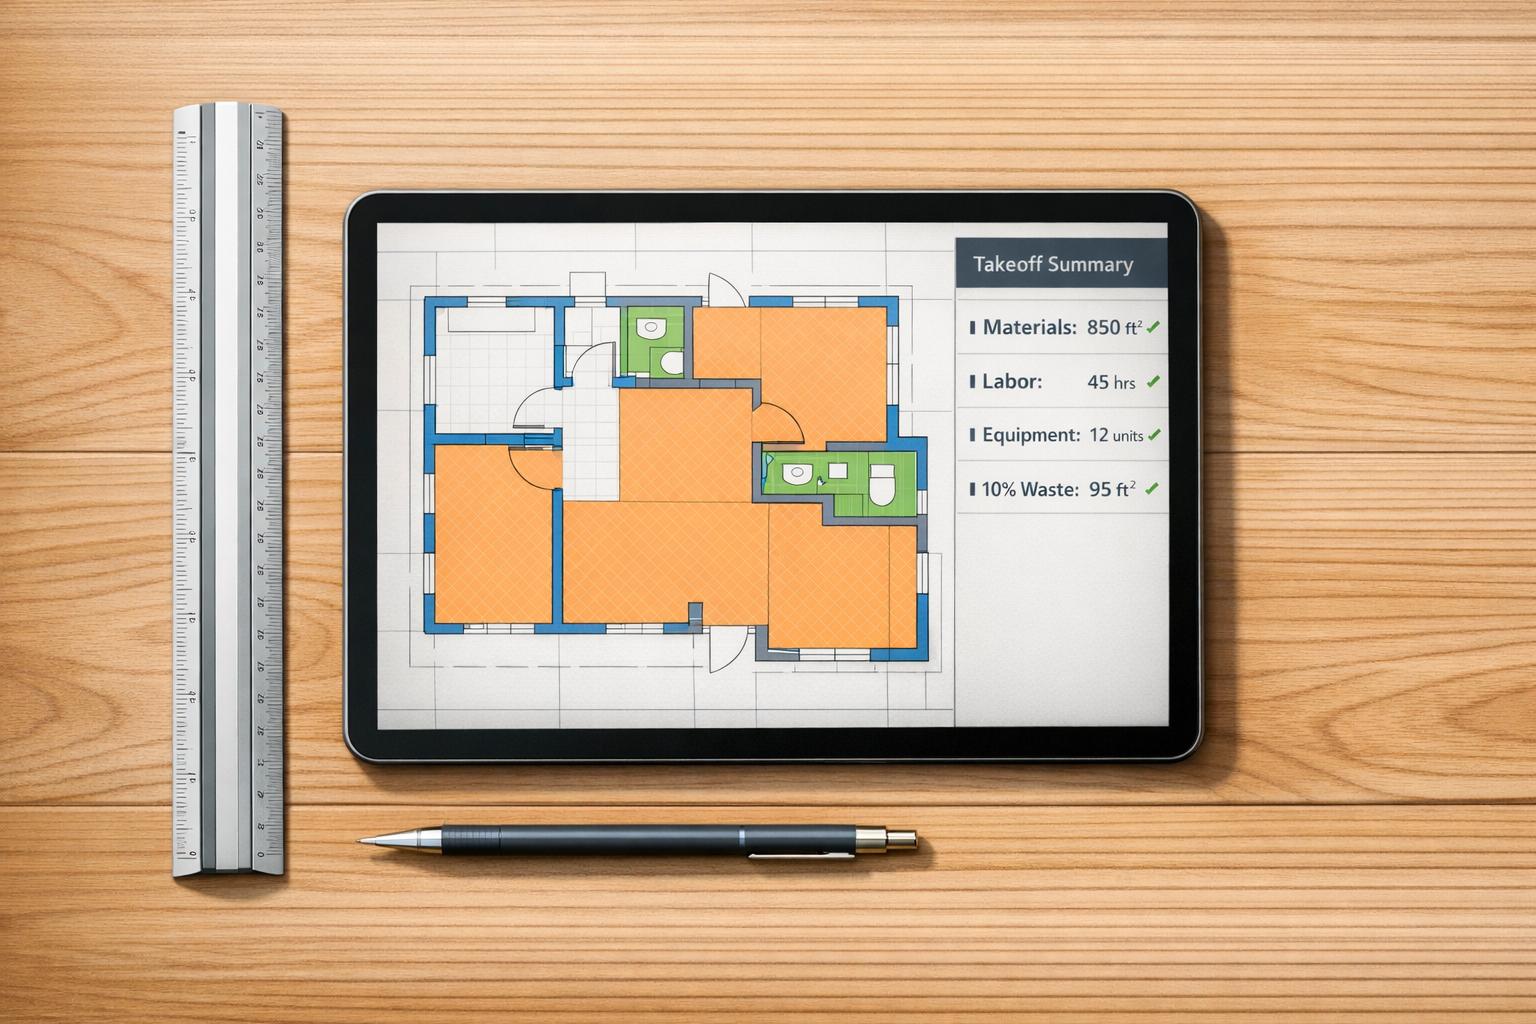
Construction takeoffs are the backbone of accurate project bids. They involve measuring and calculating all materials, labor, and equipment required for a construction project based on plans and specifications. This process ensures precise cost estimates, prevents over- or under-ordering, and helps subcontractors win profitable jobs while avoiding costly mistakes.
Key Points:
- A takeoff determines quantities (e.g., square feet of drywall, cubic yards of concrete) from blueprints.
- It differs from estimating, which applies costs, overhead, and profit margins to those quantities.
- Errors in takeoffs can lead to budget overruns – 84% of over-budget projects trace back to takeoff mistakes.
- Digital tools reduce takeoff time from 20+ hours to 2–3 hours and improve accuracy to ±1%.
Why It Matters:
- Bid Accuracy: Accurate takeoffs prevent underbidding or overpricing.
- Efficiency: Digital tools streamline the process, allowing more bids with fewer resources.
- Risk Management: Precise quantities protect against unexpected costs and disputes.
How It Works:
- Review Plans: Understand the scope, verify scales, and check material specs.
- Quantify Materials: Measure items (linear feet, square footage, cubic yards).
- Account for Waste: Add 5–15% for cutting losses or breakage.
- Calculate Costs: Factor in labor, equipment, and contingencies.
Switching to trade estimating software like ScopeTakeoff can save time, improve accuracy, and simplify project management, making them a smart choice for subcontractors handling complex bids.
Construction Quantity Take-Offs – COMPLETE Guide
sbb-itb-4ee4ad4
Why Takeoffs Matter for Subcontractors
For subcontractors, takeoffs are the backbone of financial and operational planning for every project. By translating blueprints into material quantities, you create a detailed guide that directly impacts profitability and efficiency. Accurate takeoffs ensure you’re bidding competitively while keeping your projects on track.
When quantities are precise, you avoid tying up money in unused materials or scrambling to cover shortfalls with last-minute supply runs. Those emergency trips don’t just cost extra in rush fees – they also lead to crew downtime and scheduling setbacks, all of which eat into your profit margins. Beyond materials, takeoffs also determine project timelines. Assemble Pro highlights this connection, stating, "Duration is proportional to quantity, just like cost is". With accurate counts, you can set realistic schedules, assign the right crew sizes, and steer clear of penalties for late completions or back-charges from general contractors.
Takeoffs also act as a safeguard in your contracts. They provide a solid reference point for verifying the general contractor’s quantities and can serve as evidence if the actual scope of work exceeds what was originally agreed upon. These benefits show up across three critical areas: bid accuracy, workflow efficiency, and risk management.
How Takeoffs Affect Bid Accuracy
Accurate takeoffs are the difference between submitting a winning bid that’s profitable and one that undercuts your margins. Underestimating materials might help you win a job, but it could lead to losses on every invoice. On the other hand, overestimating can price you out of the competition. Professional takeoffs account for real-world conditions by including waste factors – typically 5% to 10% for drywall and 3% to 5% for concrete – to ensure bids align with actual field needs rather than just theoretical calculations.
Improving Workflow Efficiency
A well-organized takeoff process doesn’t just save time – it transforms how efficiently you can work. By using digital tools, you can cut estimating time from over 20 hours a week to just 2 or 3 hours. This allows you to bid on more projects without needing additional estimators.
But it’s not just about speed. Systematic takeoffs reduce errors that lead to costly rework. For example, assembly-based approaches – where related items are grouped together instead of being counted individually – help ensure you don’t overlook small but critical accessories. Plus, when plans change, these systems make updates simple: adjusting one measurement automatically recalculates all related materials. The result? Faster bids, fewer mistakes, and smoother project execution.
Reducing Risk and Protecting Profit
Thorough takeoffs help you identify potential problems before signing a contract. Accurate measurements can reveal conflicts – like a structural beam blocking planned ductwork – that need clarification through RFIs before work begins. Catching these issues early protects your profit margins from unexpected change orders, which can strain relationships and harm your reputation.
Trust also plays a big role here. Construction companies with strong levels of trust are twice as confident in meeting deadlines. When your takeoffs consistently align with on-site conditions, general contractors see you as reliable, increasing your chances of securing future work. In this way, takeoffs aren’t just about numbers – they’re a financial safeguard and a mark of quality that strengthens your professional standing.
How to Perform a Construction Takeoff
Subcontractors handle takeoffs by breaking down blueprints into measurable quantities to ensure accurate pricing and scheduling. Andy Boyd, Vice President at Galindo & Boyd Wall Systems LLC, describes the process well:
"Estimating still requires an experienced individual to sit down and peel the project apart, piece by piece, detail by detail and page by page to get a handle on what all will be required to build the project".
To begin, focus only on the blueprint pages relevant to your trade. If you’re working on a specific scope, there’s no need to sift through all 200 pages of a plan set. Before taking measurements, confirm the scale by comparing it to a known dimension, like a door width or gridline spacing. Digital plans can sometimes display incorrectly, and this step ensures your measurements stay accurate.
When it’s time to quantify materials, use these four basic methods:
- Count individual items: This works for fixtures, outlets, or other single units.
- Measure linear feet: Ideal for piping, trim, or similar materials.
- Calculate square footage: Useful for surfaces like drywall, flooring, or roofing.
- Determine volume in cubic yards: Necessary for materials like concrete.
Work methodically – left-to-right or top-to-bottom – and use color coding to mark areas as you go. For instance, when calculating drywall, assign a unique color to each wall section to avoid measuring the same area twice.
Don’t forget to factor in waste. For example, add 3–5% for concrete or 10–15% for lumber. Then, convert material quantities into labor hours using established productivity rates. Also, account for equipment costs, which typically range from 8–15% of the total project cost. Once you’ve done this, assign unit prices and include a 5–10% contingency to cover unexpected conditions.
Before wrapping up, cross-check your figures against the project’s scope of work to ensure nothing has been overlooked. Compare your quantities with historical data from similar projects to identify any discrepancies. If something doesn’t add up, investigate further. This final review helps prevent costly errors and sets you up for a smoother estimating process.
Step 1: Review Plans and Understand the Scope
The first step in any takeoff is to carefully examine the entire set of drawings to fully grasp what the project involves. This means reviewing everything – floor plans, elevations, sections, engineering details, and cross-sections – not just the pages that seem immediately relevant. Skipping this step can lead to costly mistakes later.
Start by verifying the scale using a known dimension, like a standard door width (usually 36 inches) or gridline spacing. Always confirm you’re using the latest revision by checking for revision clouds or addenda. Double-check PDF plan scales against known dimensions to avoid measurement errors. Using outdated or incorrect plans wastes time and results in inaccurate quantities.
Pay extra attention to material specifications, as they often override details shown in the drawings. These specs outline material grades, quality standards, thicknesses, and even specific brands the architect may require. Matching these details with your contract is essential to avoid scope mismatches. Be mindful of abbreviations like "TYP" (typical), which indicates the detail applies to multiple locations, and "NIC" (not in contract), which flags items you shouldn’t include in your count.
This review phase is also the time to spot potential red flags. Look out for unusual dimensions like vaulted ceilings, intricate engineering details, or discrepancies between what the client describes (e.g., "premium fixtures") and what the written specs actually include (e.g., "builder-grade"). Identifying these issues early helps ensure the takeoff process runs smoothly.
Once you’ve reviewed the plans and specifications, it’s crucial to confirm alignment across all disciplines. Cross-reference architectural, structural, and site plans to ensure dimensions match. For example, the overall building length should be consistent across all documents. If you notice any conflicts or missing details, submit a Request for Information (RFI) to the architect or general contractor instead of making assumptions. This upfront effort ensures the project aligns with your team’s skills, timeline, and capacity, setting the stage for an accurate estimate.
Step 2: Count Materials, Labor, and Equipment
Once you’ve reviewed the project scope, the next step is to create a detailed list of all the materials, labor, and equipment you’ll need. This means translating the plans and drawings into a comprehensive inventory – everything from large items like drywall sheets to smaller components like fasteners and underlayment.
To make sure you don’t miss anything, mentally walk through the project step by step – from demolition all the way to the finishing touches. Breaking the material list into categories, such as by trade or project phase (e.g., foundations, framing, interior finishes), can simplify purchasing and staging. For each phase, decide whether you need a quantity takeoff (counting individual items like fixtures or outlets) or a material takeoff (measuring dimensions such as square footage or volume to calculate product needs).
When you have raw measurements, convert them into purchasing units. For example, if you measure 5,000 square feet of wall area, calculate how many 4×8 drywall sheets you’ll need, factoring in a waste buffer. This buffer, usually 5% to 10%, accounts for cutting losses and breakage but avoids inflating numbers so much that your bid becomes uncompetitive. Digital tools can streamline this process by using assemblies – automatically generating a material list (e.g., studs, drywall, screws, tape) and labor hours from a single measurement like wall length. After determining material quantities, translate these into labor requirements.
Labor estimation involves converting material quantities into crew hours based on installation rates. This depends on the complexity of the project. For instance, new builds are typically more straightforward and take less time per unit than remodels, where workers need to navigate existing structures. Using industry-standard productivity databases or your own company’s historical data ensures your labor estimates align with real-world conditions, including regional skill levels and site accessibility.
Lastly, assess your equipment needs. Create a clear list of required equipment and site support, including items like scaffolding (around $25–$50 per day), skip bins, concrete pumps, or cranes (approximately $1,000 per day). Equipment costs often make up 8% to 15% of the total project cost. Overlooking these items can lead to unexpected expenses that could eat into your project’s profitability.
Step 3: Measure Quantities and Calculate Costs
Now that you have your detailed list, it’s time to break everything down into measurable quantities for pricing. Use specific units like linear feet for trim, gutters, and piping; square feet for drywall, flooring, roofing, and insulation; cubic yards for concrete and fill; and unit counts for items like doors, windows, fixtures, and appliances.
Double-check the scale of your plans if needed. Once confirmed, measure each item systematically to avoid any overlap or double-counting.
For roofing, calculate using the pitch area, which accounts for the slope. For example, a roof with a 6:12 pitch requires more materials than the flat dimensions of the building suggest. This means you’ll need extra shingles and underlayment to cover the additional surface area. When calculating concrete, determine the volume by multiplying the length, width, and depth (in inches) and then divide by 324 to convert to cubic yards. Always round up – if you calculate 10.2 cubic yards, plan for 10.5 or even 11 cubic yards. Keep in mind, delivered concrete typically costs around $165 per cubic yard.
Don’t forget to include a waste factor in your calculations. This is usually 5–10% for concrete, 10–15% for framing lumber, and 10–12% for drywall. After determining the final quantities in orderable units – like the number of 4×8 drywall sheets or 80-lb concrete bags – multiply these by the current material prices to calculate your material costs. Then, add labor hours (based on your crew’s productivity), equipment rental costs, and indirect expenses like permits and site utilities to build a complete estimate.
"Square meter measurements get worked out for tasks like plastering, insulation, and painting, and contractor labor and overhead costs for things like equipment rentals get layered on top to build complete estimates." – Steve Griffin, Estimator, Just Building Group
Once you’ve measured all quantities and calculated costs, you’ll be ready to verify and finalize your takeoff.
Step 4: Verify and Finalize Your Takeoff
Before hitting "submit" on your bid, double-check every measurement and calculation to avoid costly mistakes. Start by confirming the scale on each drawing sheet. Digital files can sometimes misrepresent scales when zoomed in or printed incorrectly. A quick way to verify accuracy is by measuring a standard doorway or grid spacing. Then, cross-check quantities across different drawing sets. For instance, the structural steel quantities should match the architectural floor plans and foundation drawings. If they don’t, you’ve likely uncovered an inconsistency that needs to be resolved.
It’s also a good idea to have another estimator review key, high-cost quantities. According to McKinsey, 84% of projects that go over budget trace back to errors in takeoff calculations. A fresh set of eyes can make all the difference. Once the review is complete, document every assumption and exclusion clearly to establish a solid foundation for your bid.
Prepare a detailed scope of work document to outline all assumptions, exclusions, and clarifications. Be specific about what’s included in your bid, and list exclusions like refuse containers, site utilities, or prep work from other trades. This clarity not only protects you during contract negotiations but also helps prevent scope creep once the project begins.
After you’ve documented your approach, compare your quantities to historical data from similar projects. Ratios – like linear feet of conduit per square foot or tons of steel per floor – can help you spot any irregularities that might signal an error. Keep your color-coded markups and note all measurement methods. This audit trail serves as your "source of truth" if any disputes arise during construction.
Takeoff Examples by Trade
Accurate measurement techniques are crucial across all trades, and the following examples show how precision plays out in various fields. Each trade uses specific units to measure materials, tailored to the scope of their work.
Concrete and Masonry takeoffs rely on volume and surface area. For concrete, you’ll measure in cubic yards for elements like footings, slabs, and walls, accounting for a 3–5% waste factor to cover spillage and over-excavation. Formwork is calculated in square feet, while rebar is measured in linear feet or tonnage, with extra length factored in for lap overlaps. Surface finishes, such as broom or trowel work, are measured in square feet, and embedded items like anchor bolts and sleeves are counted individually. Each component – forming, reinforcement, placement, and finishing – uses distinct units and waste factors to ensure accurate estimates.
Drywall and Framing takeoffs focus on square footage and linear dimensions. Wall and ceiling areas are calculated from floor plans and building sections, then converted into quantities for drywall sheets, studs, corner beads, and fasteners. Ceiling plans help establish wall heights, and only openings larger than 32 square feet are deducted. A waste factor of 10–15% is typically included to account for cutting and fitting.
For trades involving mechanical systems, precision is just as important. HVAC and Plumbing takeoffs combine counts and linear measurements. You’ll tally fixtures, valves, sprinkler heads, and HVAC units, while measuring pipe runs, ductwork, and conduit in linear feet. To avoid double-counting, use a zone or grid approach. Referring to MEP drawings and equipment schedules ensures proper coordination with other trades, especially where ducts or pipes intersect walls and ceilings.
Roofing and Flooring takeoffs are primarily based on surface area but require specific adjustments. For roofing, it’s not enough to use the building’s flat footprint – you’ll need to calculate the actual surface area by factoring in the roof’s pitch and slope. Steeper pitches increase the need for materials like shingles, underlayment, and flashing. Flooring takeoffs involve measuring total square footage and converting it into boxes or cartons, depending on the product packaging. A 10% waste factor for tile is recommended to address issues like subfloor irregularities or unusual room shapes.
"At the end of the day, estimating still requires an experienced individual to sit down and peel the project apart, piece by piece, detail by detail and page by page to get a handle on what all will be required to build the project." – Andy Boyd, Vice President at Galindo & Boyd Wall Systems LLC.
Concrete and Masonry Takeoffs
When it comes to concrete and masonry takeoffs, precision is key. These trades require detailed measurements, often using different units depending on the component.
For concrete, the volume is typically calculated in cubic yards. To find this, multiply the length, width, and thickness (all in feet) and then divide by 27. For example, a 20×30-foot slab with a thickness of 4 inches would first require converting 4 inches to 0.33 feet. The volume calculation would then follow. It’s also a good idea to account for a 5–10% waste factor for accuracy.
Rebar is measured by its total linear footage or tonnage. Start by measuring the length of the structural element and multiplying it by the number of bars required per spacing interval. Be sure to include lap lengths for overlapping bars as specified in the project plans.
For masonry, count the number of blocks or bricks based on the total wall surface area. Formwork, used to contain wet concrete, is measured in square feet, as are surface finishes like broom or trowel work. Items embedded in the concrete, such as anchor bolts or inserts, are counted individually. The table below summarizes the components and their typical units of measurement.
| Material / Component | Typical Unit | Application |
|---|---|---|
| Concrete | Cubic Yards | Slabs, footings, walls |
| Rebar | Linear Feet / Tonnage | Structural reinforcement |
| Masonry Blocks/Bricks | Piece Count | Walls, facades |
| Formwork | Square Feet | Temporary containment |
| Surface Finish | Square Feet | Broom, trowel, polished finishes |
| Gravel / Fill Dirt | Cubic Yards | Site preparation and sub-base |
| Embedded Items | Piece Count | Anchor bolts, sleeves, inserts |
To ensure accuracy, always calibrate your scale against a known dimension on the drawing, such as a door width. Work methodically through the project, starting with footings, moving to walls, and finishing with slabs. Using these standard units across your estimates ensures consistency and reliability.
Drywall and Framing Takeoffs
After concrete and masonry takeoffs, the next step often involves drywall and framing, which demand just as much precision in measurement and estimation. These takeoffs focus on both structural components and finish materials. On the framing side, you’ll account for items like wall studs, top and bottom plates, headers, and sheathing. For drywall, you’ll need to include sheets, corner beads, joint compound, tape, and fasteners.
When calculating wall studs, multiply the total wall length by 0.75 to reflect 16-inch on-center spacing. Then, add three studs for every 90-degree corner, four for 45-degree corners, and two for each intersecting wall. For openings, add one stud for openings over five feet wide and two for those under five feet. To cover waste due to cutting or poor-quality lumber, apply a 15% waste factor to the final count. For plates, multiply the wall length by three (one bottom plate and two top plates for standard load-bearing walls), and add 10% for waste.
For drywall sheets, calculate the total wall and ceiling area in square feet, then divide by 32 (the area of a standard 4×8 sheet). Subtract the area of any large openings, such as windows and doors, before dividing, and round up to the nearest whole number. If drywall is required on both sides of a wall, double the linear wall length in your calculations. Corner beads are counted by tallying all external corners where they’ll be installed.
To make the process more efficient, consider using longer studs (e.g., 12-foot or 14-foot lengths) and cutting them to size instead of relying on multiple shorter pieces. Before starting, confirm the blueprint scale to avoid errors in measurements. For even greater accuracy and time savings, best construction estimating software can apply wall multipliers, automatically accounting for both sides of a partition.
| Material | Measurement Unit | Common Formula/Method |
|---|---|---|
| Wall Studs | Count (Each) | (Wall Length × 0.75) + Corner/Opening Additions + 15% Waste |
| Plates | Linear Feet | Wall Length × 3 (1 bottom, 2 top) + 10% Waste |
| Drywall Sheets | Count (Each) | (Total Wall & Ceiling Area) ÷ 32 (for 4×8 sheets) |
| Sheathing | Count (Each) | (Net Wall Area) ÷ 32 |
| Corner Beads | Count (Each) | Tally of all vertical and horizontal external corners |
| Headers | Linear Feet | Opening Width + 7 inches |
HVAC and Plumbing Takeoffs
When it comes to HVAC and plumbing takeoffs, precision is everything. These takeoffs focus on three main areas: piping, ductwork, and equipment. For piping, you’ll need to measure the linear footage of supply, waste, and vent lines, making sure to differentiate between materials like copper (Type K, L, M), PVC, PEX, and cast iron. For ductwork, calculate the required cross-sectional area using the formula: Area = Flow Rate / Maximum Velocity. Don’t overlook the smaller components – every fixture, valve, tee, elbow, and coupling needs to be accounted for, as these can collectively have a big impact on your budget.
One common oversight in mechanical takeoffs is forgetting vertical rises. While 2D floor plans typically show horizontal runs, it’s crucial to include vertical measurements – such as those from the basement to the roof. For larger buildings, keep in mind that labor costs can increase by 1% to 2% for every floor above the fourth due to the added complexity of material handling and access.
Accurate vertical measurements aren’t just a nice-to-have – they’re essential. As Ari Aarniovuori, Deployment & Support at Fondion, explains:
"If your HVAC takeoff isn’t accurate, you’re setting yourself up for trouble before the job even starts. Too much material? That’s wasted money. Too little? You’re delaying the project."
To streamline your process, use color coding – blue for cold water and red for hot water – to avoid accidentally double-counting overlapping systems. Always confirm the blueprint scale to ensure your duct and pipe measurements are accurate. And when sizing ducts, double-check for pressure drop (typically no more than 1 Pa/m) to guarantee efficient system performance.
Digital tools can help simplify your work by automating calculations for fasteners, solder, and hangers based on your linear measurements. When pricing materials, refer to manufacturer lists from suppliers like Mueller or Charlotte Pipe. Apply your specific discount multiplier (usually between 0.4 and 0.5) to get the actual cost. Finally, don’t forget to add a waste percentage to account for off-cuts and potential damage on the jobsite.
Roofing and Flooring Takeoffs
Roofing and flooring takeoffs require their own specific measurement techniques to ensure accurate estimates. For flooring, calculate the area in square feet by multiplying the room’s length by its width at the widest points. Roofing, however, involves a more detailed process. Instead of relying on the building’s footprint, calculate the sloped surface area using trigonometric formulas to account for the incline. This is essential because steeper pitches demand more materials like shingles, underlayment, and flashing.
Both roofing and flooring estimates must factor in material waste. For typical installations, plan for about 10% waste. However, diagonal layouts (e.g., 45° angles) may require 15–20% extra. For specific materials:
- Hardwood often needs a 7–10% allowance.
- Luxury vinyl plank (LVP) and laminate usually require around 10%.
- Broadloom carpet and sheet vinyl may need 10–15%, depending on seam placement and room shape.
- Large-format tiles (like 24"x24") may also require additional self-leveling compounds to meet flatness standards.
Don’t forget associated materials like adhesives, underlayment, moisture barriers, cement boards, baseboards, and air vents. For roofing, measure linear feet for hips, ridges, gables, and valleys to ensure all necessary components are included. These steps are crucial for preparing accurate material orders, which directly impact the success of bids in both trades.
"Square meter measurements get worked out for tasks like plastering, insulation, and painting, and contractor labor and overhead costs for things like equipment rentals get layered on top to build complete estimates." – Steve Griffin, Estimator, Just Building Group
Once you’ve calculated the gross square footage (net area plus waste), convert it into purchase units like bundles of shingles, cartons of tile, or square yards of carpet (1 square yard equals 9 square feet). Always round up to the next full unit to avoid shortages. For irregularly shaped areas, break them into smaller rectangles, calculate each separately, and then add them together. This ensures every detail is covered and materials are ordered in adequate quantities.
Manual vs Digital Takeoff Methods
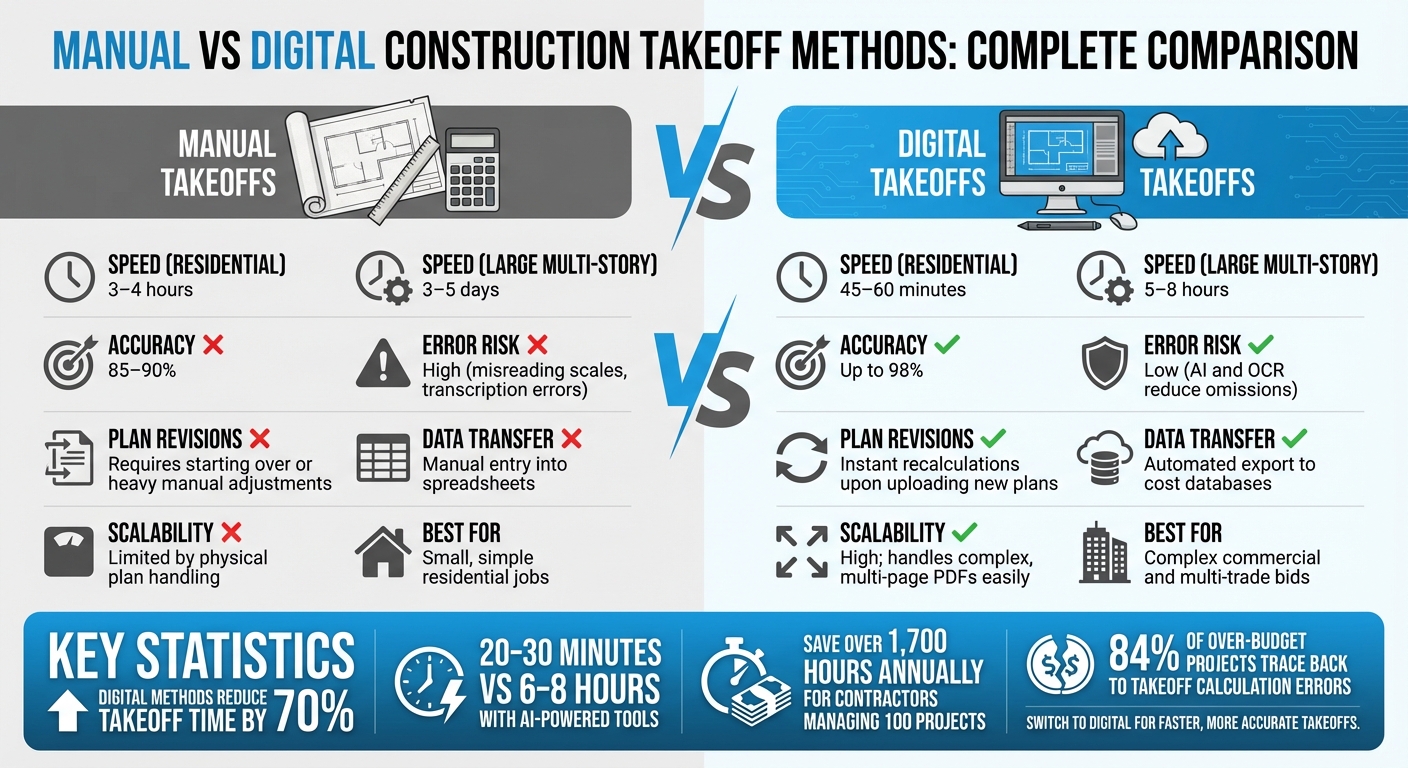
Manual vs Digital Construction Takeoff Methods Comparison
The choice between manual and digital takeoff methods can drastically affect the speed and accuracy of project estimates. With manual takeoffs, estimators rely on printed blueprints, scale rulers, and spreadsheets to tally measurements. While this method may feel familiar, it is highly susceptible to human error – whether from misreading scales, miscounting repetitive elements, or struggling with frequent plan revisions. On the flip side, digital takeoffs leverage software to work directly with files like PDFs, CAD, or BIM, automating calculations for areas, lengths, and counts. These tools also integrate smoothly with estimating systems.
The time savings are staggering. Digital methods can slash takeoff times by as much as 70%. For instance, AI-enabled tools can complete tasks that might take 6–8 hours manually in just 20–30 minutes. If a project typically requires 25 hours of manual work, switching to digital tools reduces that to about 8 hours. For a contractor managing 100 projects annually, this could save over 1,700 hours. On larger commercial projects, manual takeoffs might take 1–2 days, while digital tools can handle the same workload in just 2–4 hours.
Digital methods also deliver higher accuracy. Manual takeoffs generally achieve 85% to 90% accuracy, but AI-powered software can push that figure up to 98%. These tools minimize errors that often arise from measurement or rounding issues in complex plans. Another advantage is how they handle plan revisions – a frequent challenge in construction. While manual methods often require starting from scratch, digital tools instantly recalculate quantities when updated plans are uploaded.
Scalability is another area where digital solutions shine. Manual methods, with their time-consuming processes, make it difficult to handle multiple bids simultaneously. In contrast, digital tools often come with cloud-based collaboration features, allowing multiple estimators to work on the same project in real time. This capability is especially valuable for large commercial or multi-trade bids, where speed and coordination can make or break competitiveness.
Here’s a quick comparison of the two approaches:
Comparison Table
| Factor | Manual Takeoffs | Digital Takeoffs |
|---|---|---|
| Speed (Residential) | 3–4 hours | 45–60 minutes |
| Speed (Large Multi-story) | 3–5 days | 5–8 hours |
| Accuracy | 85–90% | Up to 98% |
| Error Risk | High (misreading scales, transcription errors) | Low (AI and OCR reduce omissions) |
| Plan Revisions | Requires starting over or heavy manual adjustments | Instant recalculations upon uploading new plans |
| Data Transfer | Manual entry into spreadsheets | Automated export to cost databases |
| Scalability | Limited by physical plan handling | High; handles complex, multi-page PDFs easily |
| Best For | Small, simple residential jobs | Complex commercial and multi-trade bids |
Tools and Software for Takeoffs
Modern takeoff software has revolutionized the industry, replacing the old paper-and-ruler method with digital tools that allow users to trace walls, count fixtures, and calculate areas directly from PDF or CAD files. By adopting digital solutions, contractors can reduce takeoff time by 62% and minimize errors by 84%.
Key features to look for include scale calibration, which ensures accurate conversions from pixels to real-world dimensions, and support for the four primary measurement types:
- Area: Useful for calculating square footage for tasks like flooring or roofing.
- Linear: Measures lengths, such as walls or pipes.
- Count: Tracks discrete items like doors or light fixtures.
- Volume: Calculates cubic measurements for materials like concrete or excavation.
Some advanced platforms also offer material assemblies, which link one measurement to multiple components. For instance, tracing a wall can automatically calculate the required studs, drywall, fasteners, and even labor hours.
AI-powered tools are further streamlining takeoff processes. Features like "Autocount" use AI to scan plans for matching symbols, while computer vision can identify and tag walls, doors, and windows without manual input. Early adopters of these tools have reported reducing takeoff time by up to 67% on large commercial projects.
When selecting software, think about whether a cloud-based platform or a desktop solution better suits your needs.
- Cloud-based platforms offer browser access, real-time collaboration, and are ideal for teams working across multiple sites.
- Desktop solutions provide offline functionality and are great for high-volume estimators who need extensive customization.
Integration is another important factor – opt for tools that can transfer quantities directly into estimating software or Excel, eliminating the need for manual data entry.
Pricing varies widely. Entry-level tools start at approximately $29/month, while professional solutions for multi-user licenses can cost up to $1,999/year. For those handling 1–10 takeoffs per month, lightweight browser tools are often a cost-effective choice. However, if you’re managing high-volume commercial bids, investing in a platform with advanced assembly capabilities will likely provide better long-term value.
These tools not only save time but also enhance accuracy, making them an essential part of any efficient takeoff workflow.
ScopeTakeoff Features and Benefits
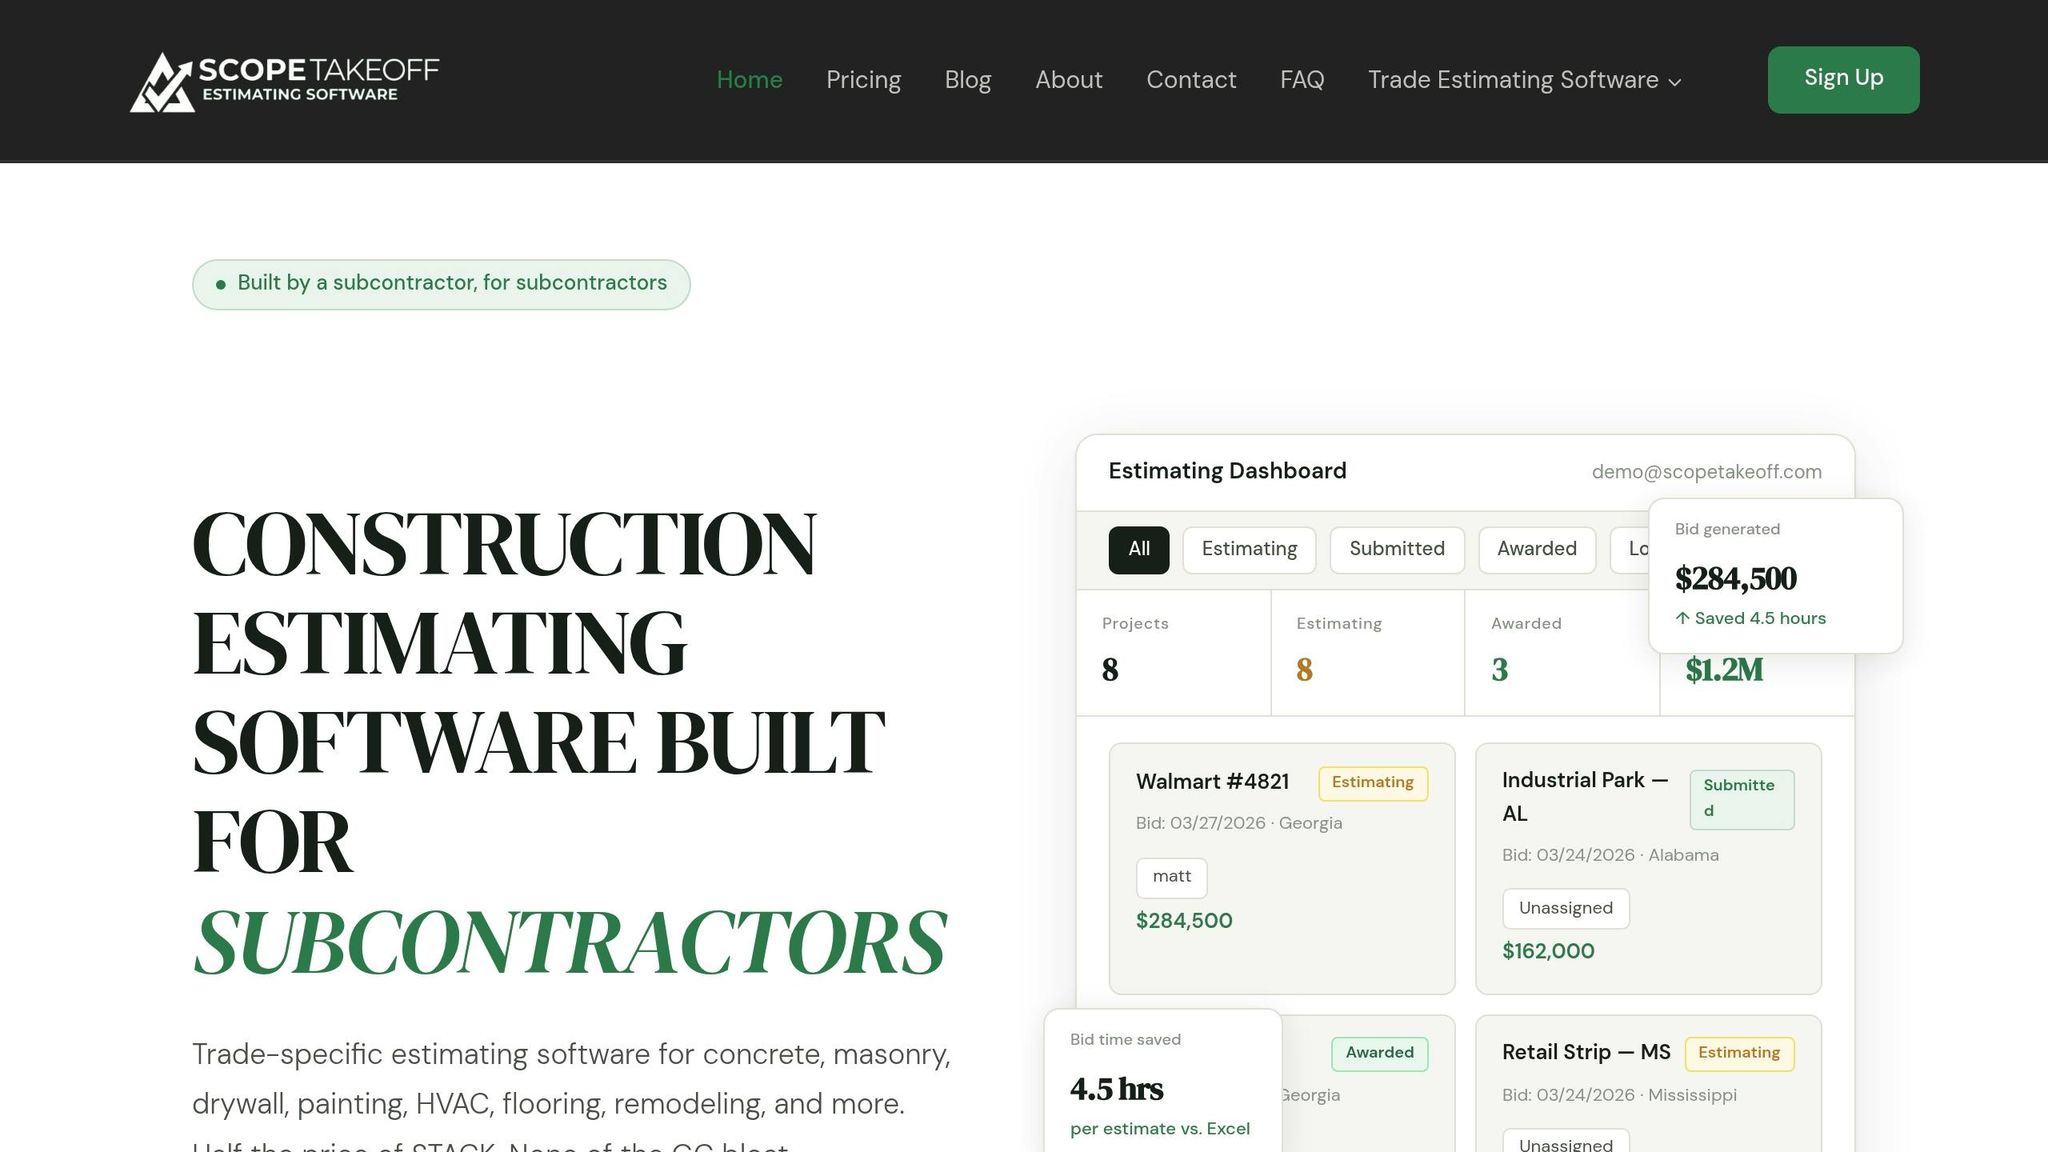
ScopeTakeoff is tailored for subcontractors who require specialized estimating tools for their trades. It comes equipped with pre-built assembly libraries covering over 10 trades, including concrete, masonry, drywall, painting, HVAC, flooring, remodeling, landscaping, roofing, and asphalt. These libraries let you measure once and instantly generate detailed material lists, complete with labor hours.
The platform allows you to import PDF construction drawings, calibrate scales using labeled dimensions, and trace quantities directly on-screen with tools for area, linear, count, and volume measurements – all accessible through your browser. As you trace sections like walls or floors, ScopeTakeoff converts your digital measurements into real-world values such as square footage, linear feet, or cubic yards. This seamless conversion forms the basis for precise and automated material calculations.
From there, the software uses trade-specific assemblies to calculate materials and labor automatically. For instance, when you measure a wall’s linear footage, ScopeTakeoff determines the number of studs, drywall sheets, fasteners, and labor hours needed – based on your trade’s standards. This automation not only simplifies the takeoff process but also improves the accuracy of your bids.
Once your takeoff is finalized, the platform generates Schedules of Values (SOV) and client-ready proposals with detailed cost breakdowns. Reports can be exported to Excel or HTML, making it easy to share with general contractors or suppliers. Additionally, you can organize data by description, consolidating all "Interior Walls" across multiple plan pages into a single line item for cleaner, more streamlined reporting.
ScopeTakeoff offers all these features at a straightforward price of $100 per person per month. This includes unlimited projects and estimates, access to all trade assembly libraries, multi-entity profile management for handling different business units, and team estimating features with bid review workflows. There’s no annual contract, and you can cancel anytime. With its robust tools and transparent pricing, ScopeTakeoff is designed to simplify and improve your estimating process.
How ScopeTakeoff Improves Efficiency
ScopeTakeoff transforms the way teams handle measurements and calculations, cutting bid preparation time from over 20 hours to just 2–3 hours. This significant time reduction lays the groundwork for smoother project management across your entire team.
Its cloud-based collaboration ensures everyone has access to the most up-to-date plans, no matter where they are. Senior estimators can easily assign tasks to junior team members and review their work using built-in workflows, ensuring every bid is accurate. Plus, automated data transfers reduce mistakes and speed up report creation.
With multi-entity profiles, you can manage projects across various business units from a single login. Whether you’re handling a local renovation or a project spanning multiple states, this centralized system eliminates the need to switch between accounts or manually adjust assemblies for each entity. This unified setup keeps your estimating process consistent and helps you maintain competitive bids.
By centralizing data and automating calculations, ScopeTakeoff also minimizes manual errors. For example, when you measure a wall or floor area on-screen, the quantities automatically populate your reports and spreadsheets – removing the risk of transcription mistakes.
The platform’s automated workflows and real-time collaboration allow your team to concentrate on what they do best: crafting estimates that win bids. As STACK puts it:
"A slow, manual takeoff process limits the time your team has to apply their expertise in building estimates that win bids".
How to Improve Takeoff Accuracy and Speed
Boosting accuracy and efficiency in takeoffs doesn’t have to be overly complex. It often comes down to following a few essential steps. Start by verifying the scale on every page before you begin measuring. Avoid relying solely on the stated scale – instead, calibrate using two known reference points, like a door width or grid line. This simple step can save you from major measurement errors that could throw off your bid.
Stick to a consistent pattern when reviewing plans, such as working left-to-right or top-to-bottom. This methodical approach helps you avoid missing details or accidentally counting the same items twice. Before diving into measurements, review the legend and specifications to ensure you correctly understand symbols and abbreviations like "TYP" (typical) or "NIC" (not in contract).
Rather than counting items individually, group related materials into assemblies. For instance, when measuring the linear feet of a wall, let your assembly calculation account for everything – studs, plates, fasteners, drywall, and even labor. This not only saves time but also ensures you don’t overlook smaller components. When accounting for waste, adjust percentages based on material type: around 3–5% for concrete and 10–15% for lumber. Avoid applying a flat rate across all materials. Once you’ve grouped assemblies and factored in waste, review your quantities to ensure they’re accurate and reliable.
Incorporate a peer review process where another estimator double-checks high-value quantities. According to McKinsey research, 84% of projects that exceed their budgets can be linked to errors in takeoff calculations. Compare your current quantities with historical data to identify any unusual discrepancies. Documenting and benchmarking your results against past projects not only validates your numbers but also helps refine your process and protects against scope-related disputes in the future.
"Estimating still requires an experienced individual to sit down and peel the project apart, piece by piece, detail by detail and page by page to get a handle on what all will be required to build the project." – Andy Boyd, Vice President at Galindo & Boyd Wall Systems LLC.
Standardize Your Takeoff Process
Streamlining your takeoff process isn’t just about working faster; it’s about ensuring reliability and consistency across all your projects. By setting clear measurement protocols – like deciding in advance whether to measure electrical conduit to the nearest inch or concrete to the nearest foot – you create a system that keeps your data organized and comparable, even months after submitting a bid. This level of consistency becomes crucial when clients have questions or change orders come into play.
Using trade-specific checklists is another way to bring order to your process. For example, a pre-takeoff checklist can confirm important details like drawing revision dates, project scope, and material specifications before you start measuring. By applying the same checklist to every job, you reduce the chances of missing critical elements, even when working under tight deadlines.
A standardized cost library is another tool that strengthens your process. Instead of letting each estimator rely on their own material rates, maintain a shared cost library updated with current market prices. This ensures that every quote is consistent and based on accurate data, regardless of who prepares it. Plus, having a clear audit trail makes it much easier to address client concerns about pricing.
Digital tools can also simplify repetitive tasks. For instance, assembly-based templates allow you to group related components – like studs, plates, and fasteners for a wall – so you don’t have to calculate each item individually. This approach not only saves time but also reduces errors. Standardizing file naming conventions, such as using formats like "ProjectName_Trade_PlanType_RevisionDate", helps with easy retrieval and ensures proper version control, adding another layer of efficiency.
The results of standardization can be game-changing. Digital workflows alone can significantly cut down takeoff times, and when paired with AI-assisted tools, accuracy improves dramatically – often to within ±1%, compared to the ±5–10% range typical of manual methods. For high-value projects, consider adding a "fresh eyes" review, where a second estimator double-checks the takeoff using the established protocols. These standardized practices not only enhance your efficiency but also set you up for long-term success in managing bids and takeoffs.
Use Technology to Automate Calculations
Modern takeoff software takes the hassle out of manual calculations, letting you focus on strategy rather than crunching numbers. Manual methods are not only time-consuming but also prone to errors that could chip away at your profit margins. With takeoff software, you can simply trace a wall on your screen, and the system instantly calculates square footage, linear feet, and cubic yards – no calculator needed. This automation seamlessly integrates with the digital workflows already in use.
The software goes a step further by converting raw measurements into detailed material assemblies. For example, after tracing a wall section, it can generate an exact list of drywall sheets, studs, fasteners, and even labor hours required. This eliminates multiple manual steps and significantly reduces the risk of errors from transferring numbers by hand.
Advanced tools powered by AI now take automation to the next level. These systems can detect and count symbols like outlets, windows, and doors from an entire plan set in seconds, achieving an accuracy rate of ±1%. Plus, cloud-based platforms ensure your team is always working with the latest plan revisions, preventing costly mistakes caused by outdated information.
Considering that 84% of construction projects that exceed their budgets can be traced back to inaccurate takeoff calculations, automation isn’t just about saving time – it’s about safeguarding your profits. Additionally, digital tools can export quantities directly into estimating systems, reducing transcription errors and keeping your bids as accurate as possible.
Train Your Team on Takeoff Methods
No matter how advanced your software is, it won’t deliver results if your team isn’t prepared to use it effectively. Plan to dedicate 20–40 hours of initial training per user when introducing masonry estimating software or other new takeoff tools, with ongoing education as the software updates and evolves. Most estimators can achieve basic proficiency within 2–4 weeks and reach full productivity in 3–6 months. For a mid-sized contractor, the savings can be significant – digital takeoffs can reduce costs by an estimated $120,000–$240,000 per estimator annually. Investing in training upfront not only speeds up efficiency but ensures your team gets the most out of these tools.
Once your team has the basics down, it’s critical to establish standardized procedures. This includes setting consistent guidelines for measurement units, symbols, and legends. A phased rollout is often the best approach – start by testing the software on smaller projects with real bids to make the training practical and immediately relevant. Designate a lead estimator or project manager as an in-house expert to guide the team and share best practices.
Peer reviews are another essential part of the process. Experienced estimators should regularly review the work of newer team members, providing feedback to catch mistakes and improve accuracy. These reviews help ensure that every team member produces reliable and competitive bids. While technology can streamline workflows, human judgment and expertise remain irreplaceable.
To minimize errors, emphasize core practices during training. Teach your team to double-check key dimensions – like verifying a door width for accuracy – and use checklists to ensure no critical details are missed. Additionally, track your "bid-hit" rate and evaluate individual estimator performance to identify areas where further training might be needed. These steps help refine skills and improve overall team performance.
Conclusion
Accurate takeoffs are the backbone of profitable bids and smooth project execution. One small mistake, like an incorrect blueprint scale, can snowball into larger miscalculations and unreliable quantity estimates, so double-checking scales is a must.
Switching from manual to digital takeoffs can save subcontractors a significant amount of time – cutting processing hours from over 20 to just 2–3. With such efficiency gains, investing in digital tools isn’t just helpful; it’s a smart move to protect your bottom line.
Tools like ScopeTakeoff take this a step further. They offer trade-specific assembly libraries, PDF plan takeoff features, and automatic calculations tailored to your specialty. For $100 per person per month, with no annual contract, you get unlimited projects and estimates, SOV export capabilities, client-facing proposal tools, multi-entity profiles, and team estimating features. This ensures your team works with consistent, standardized data.
However, software alone isn’t enough. Standardizing processes and training your team are equally important. Use consistent checklists, create a company-wide assembly library, and adopt color-coded digital markups to streamline quality control. Don’t forget to factor in waste (typically 3–15%, depending on the material) and contingency allowances, especially for remodel projects. By combining digital tools, standardized workflows, and proper training, you’ll be set to win bids and deliver successful projects.
FAQs
What should I do when plans and specs don’t match?
When plans and specifications don’t align, it’s crucial to address these inconsistencies carefully to maintain accurate estimates and project planning. Here’s how to tackle the issue effectively:
- Thoroughly review plans and specifications: Take the time to carefully examine all documents to pinpoint any conflicts or mismatches. Overlooking these can lead to costly errors down the line.
- Seek clarification from stakeholders or designers: If something doesn’t add up, reach out to the relevant parties for clarification. Clear communication can resolve misunderstandings early.
- Document all changes: Keep a detailed record of any modifications or clarifications made to reconcile the discrepancies. This ensures everyone stays on the same page.
- Update your takeoff software: Adjust quantities, materials, or other details in your software to reflect the changes. This step helps keep your estimates accurate and up-to-date.
By following these steps, you can avoid potential errors, control your budget, and prevent project delays, ensuring your takeoff process stays on track.
How do I choose the right waste percentage for each material?
To determine the appropriate waste percentage for your project, you need to take industry-standard waste factors into account, along with the unique conditions of your job. Waste levels can vary based on factors like material type, installation methods, and site conditions. For instance, concrete typically has a waste factor of about 5%, while materials like lumber or roofing may require 10% or more. You should adjust these percentages if your project involves complex designs, limited site access, or custom sizes. For the most accurate estimates, refer to industry guidelines or consult with experienced estimators.
What’s the fastest way to update takeoffs after plan revisions?
The fastest way to handle takeoff updates after plan revisions is by using construction takeoff software that lets you make changes directly on digital plans. These modern tools simplify the process by allowing you to adjust quantities quickly when plan sets are updated. They can even recalculate materials and labor automatically. Many of these platforms also include version control, which minimizes manual work, reduces errors, and integrates updates seamlessly into bidding and procurement workflows, saving you time and effort.