
How to Price Drywall Jobs: Calculate Materials and Labor
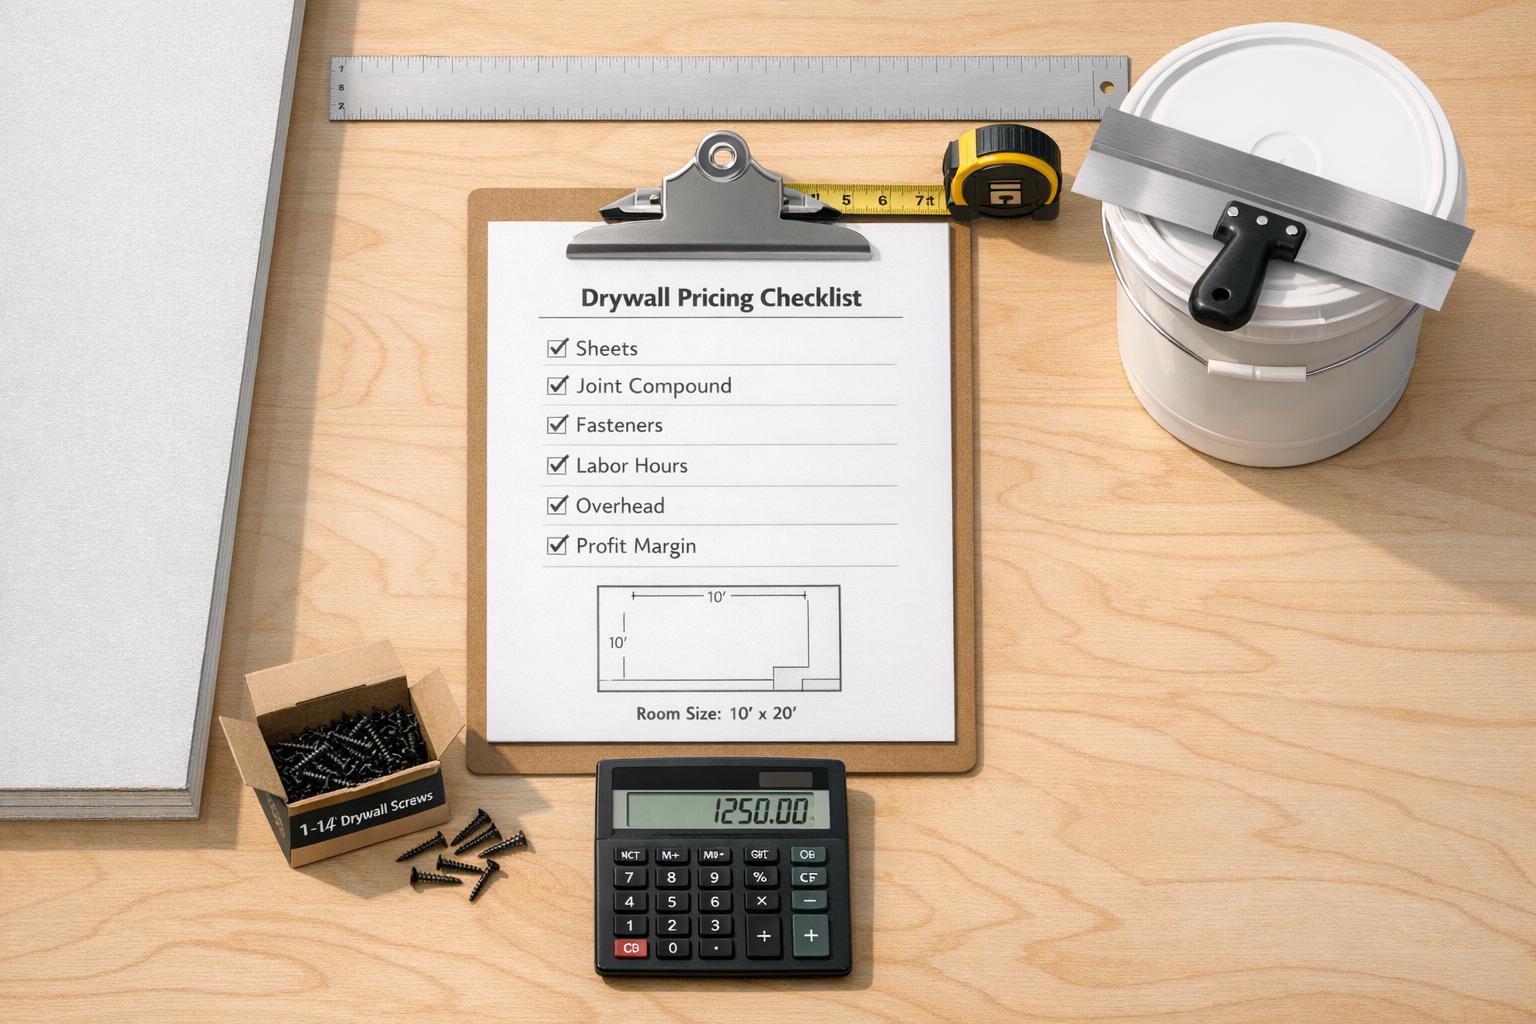
Accurately pricing drywall jobs is key to staying profitable and competitive. Here’s a quick breakdown of the process:
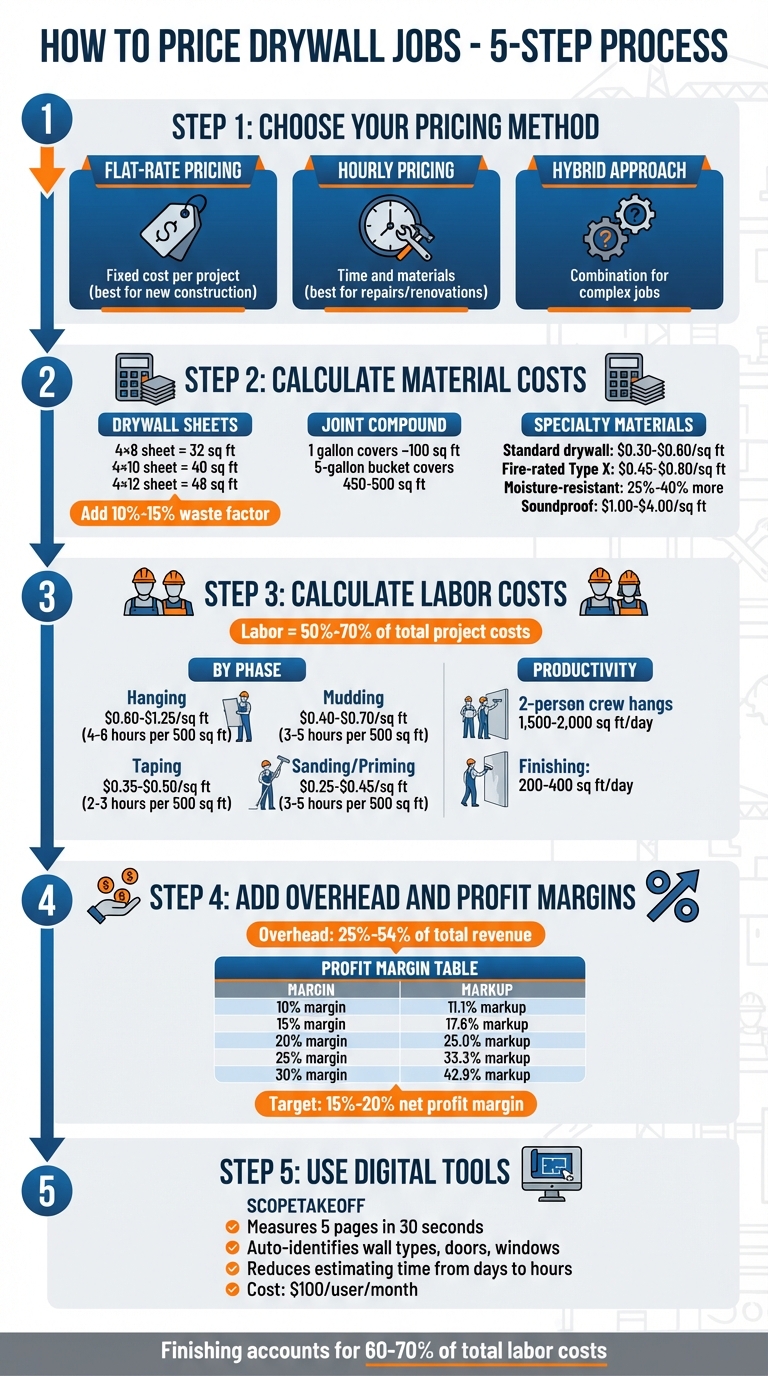
- Choose a Pricing Method: Decide between flat-rate pricing (fixed cost per project), hourly pricing (time and materials), or a hybrid approach for complex jobs.
- Estimate Material Costs: Calculate drywall sheets, joint compound, fasteners, and specialty materials (e.g., fire-rated or moisture-resistant drywall). Factor in waste – 10%-15% for cuts and breakage.
- Calculate Labor Costs: Break down by installation phase (hanging, taping, mudding, sanding). Labor typically accounts for 50%-70% of total costs.
- Add Overhead and Profit Margins: Include business expenses (insurance, tools, etc.) and apply a profit margin (15%-20%) to ensure sustainability.
- Use Digital Tools: Software like ScopeTakeoff can automate estimates, saving time and improving accuracy.
Properly pricing drywall jobs protects your profits, builds trust with clients, and ensures smooth project execution.
5-Step Process for Pricing Drywall Jobs with Cost Breakdown
Step 1: Choose Your Pricing Method
Hourly vs. Flat-Rate Pricing
The pricing method you choose has a big impact on how your bids are structured, how much risk you take on, and how clients view your services.
Flat-rate pricing works best for projects like new construction or jobs with clearly defined plans. With this approach, you give clients a fixed cost upfront – often calculated based on square footage or sheet count. This makes budgeting straightforward for the client. However, if the project runs over schedule, you bear the additional costs and time commitment.
Hourly pricing, also known as time and materials billing, is better suited for repairs, renovations, or custom projects where the scope of work may change. This method protects you from undercharging on complex or unpredictable tasks but can result in higher-than-expected costs for the client.
For larger, multi-day jobs, many contractors use a hybrid approach. This combines flat rates for straightforward tasks with hourly billing for more uncertain work, like blending patches into existing walls or waiting for materials to dry (which can take 12–24 hours).
Factors That Affect Your Pricing
Several factors should be considered when determining your rates to ensure you’re covering all your costs.
For example, if your annual overhead is $42,000 and you plan to work 4,800 billable hours in a year, your overhead cost per hour comes out to about $8.75. This overhead cost needs to be built into every estimate. Accounting for these costs early helps maintain consistency in your pricing.
Project complexity also plays a major role. For standard residential work, like a Level 4 finish, pricing per square foot is typically a good fit. But for more specialized tasks – like installing drywall on curved walls or coffered ceilings – you might need to apply a premium multiplier of 1.25× to 2×. Similarly, a Level 5 finish (which includes a full skim coat) can add $0.30 to $0.60 per square foot in labor costs compared to a Level 4 finish. For smaller patch jobs, it’s smart to set a minimum fee or an hourly rate to cover travel, setup time, and the multiple trips often required for drying coats.
Once you’ve chosen your pricing method and factored in these key considerations, you’re ready to move on to calculating material costs with precision.
sbb-itb-4ee4ad4
Step 2: Calculate Material Costs
How to Estimate Drywall Sheets
To estimate drywall sheets, start by calculating the gross area. Multiply the wall length by its height or, for ceilings, the length by the width. From this total, subtract 21 square feet for each door and 15 square feet for each window to determine the net square footage.
Next, convert the net area into the number of drywall sheets needed. Divide the net square footage by the coverage of your chosen sheet size. For reference:
- A 4×8 sheet covers 32 square feet.
- A 4×10 sheet covers 40 square feet.
- A 4×12 sheet covers 48 square feet.
Always round up to the nearest whole number. Add a waste factor to account for cuts and breakage – 10% for simple layouts, 15% for complex ones, and 14% for ceilings.
| Sheet Size | Area Coverage | Common Use |
|---|---|---|
| 4′ × 8′ | 32 sq ft | Standard for residential walls; great for DIYers |
| 4′ × 10′ | 40 sq ft | Ideal for 9-foot ceilings to reduce seams |
| 4′ × 12′ | 48 sq ft | Perfect for long walls or high ceilings; cuts joints by half |
Whenever possible, opt for larger sheets. For example, using 4×12 sheets on walls or ceilings longer than 8 feet reduces the number of joints, saving time on taping and sanding. Over time, tracking how much material you actually waste by job type can help you fine-tune your estimates. Once you’ve determined the number of sheets, you can move on to calculating costs for joint compound and fasteners.
Joint Compound and Fastener Costs
Joint compound needs depend on its coverage per coat. Typically, one gallon covers about 100 square feet for a standard three-coat finish. A 5-gallon bucket generally covers 450–500 square feet. For a 1,000-square-foot project, plan on using about 11 gallons of joint compound. Costs for a 5-gallon bucket usually range from $20 to $30.
Fasteners are another key consideration. For walls, plan for approximately one screw per square foot (spaced 16 inches on center), and for ceilings, about 1.25 screws per square foot (spaced 12 inches on center). A 4×8 sheet requires roughly 32 screws, while a 4×12 sheet needs around 48 screws. Don’t forget drywall tape – industry standards suggest one roll (500 feet) for every 500 square feet of drywall. Additionally, install corner beads at all exterior corners to protect edges and ensure smooth finishes.
Code Requirements and Specialty Materials
Building codes often dictate the type of drywall required for certain areas. For example, 5/8-inch Type X fire-rated drywall is typically required for walls separating attached garages from living spaces or for furnace rooms. In moisture-prone areas like bathrooms, kitchens, and laundry rooms, moisture-resistant "green board" is recommended to help prevent mold and water damage.
Specialty materials can significantly impact costs. Here’s a quick breakdown:
- Standard 1/2-inch drywall: $0.30–$0.60 per square foot.
- Fire-rated 5/8-inch Type X drywall: $0.45–$0.80 per square foot (20%–35% more than standard drywall).
- Moisture-resistant drywall: 25%–40% more than standard drywall.
- Soundproof boards (e.g., QuietRock): $1.00–$4.00 per square foot – 5 to 10 times the cost of standard drywall.
Always check local requirements before purchasing materials. Using the wrong type of drywall could lead to failed inspections and expensive rework. To ensure accuracy, separate your material estimates by board type – standard, moisture-resistant, and fire-rated – as mixing costs could skew your overall calculations.
How To Estimate Drywall – You Get What You Pay For
Step 3: Calculate Labor Costs
Once you’ve nailed down your material estimates, it’s time to focus on labor costs – an essential component for keeping your project profitable. Labor typically accounts for 50%–70% of total drywall project costs. To price labor accurately, break the project into phases and consider how crew productivity impacts both the timeline and your budget.
Labor Costs by Installation Phase
Each phase of drywall installation involves unique labor demands and costs. Here’s a breakdown:
- Hanging: This is the quickest phase, costing $0.60 to $1.25 per square foot and taking about 4 to 6 hours to cover 500 square feet.
- Taping (First Coat): Costs range from $0.35 to $0.50 per square foot, with a time estimate of 2 to 3 hours for the same area.
- Mudding (Second and Third Coats): More time-intensive, this phase runs $0.40 to $0.70 per square foot and takes 3 to 5 hours.
- Sanding and Priming: Costs fall between $0.25 and $0.45 per square foot, requiring another 3 to 5 hours.
"Finishing is the most time-consuming phase and often accounts for 60–70% of total drywall labor costs." – ConstructEM
Project complexity can significantly affect labor costs. For example, a Level 5 finish – which requires a flawless surface – can increase costs by 30% to 60% compared to a standard Level 4 finish. Specialty tasks like curved surfaces or fire-rated assemblies often come with a premium multiplier of 1.25× to 2× the standard labor rate. Commercial projects are also pricier, costing 20% to 40% more than residential jobs due to stricter codes, higher ceilings, and union labor requirements. If the project involves ceiling work, expect a surcharge of $0.50 to $1.00 per square foot, as overhead installation is more physically demanding and time-consuming.
Breaking down these costs by phase helps you better understand the overall labor investment and how to schedule your crew efficiently.
Crew Productivity and Time Estimates
To refine your labor cost estimates, align them with realistic crew productivity rates. A typical two-person crew can hang 1,500 to 2,000 square feet of drywall per day on standard 8-foot walls. Under ideal conditions, experienced crews can install 40 to 50 sheets daily (roughly 1,280 to 1,600 square feet). However, finishing work is slower – skilled finishers handle just 200 to 400 square feet per day, depending on the required finish level.
Drying times for joint compound also extend project timelines. For example, finishing 500 square feet may involve only 8 to 13 hours of active labor, but the total duration stretches to 4 to 5 days due to the 24-hour drying period required between coats. While this doesn’t add to labor costs, it does impact scheduling and cash flow.
To improve future estimates, track actual hours worked on each project. Over time, this builds a database of production rates tailored to your crew’s abilities, helping you create more precise bids. Combining these labor insights with your material costs and overhead gives you the full picture for accurate drywall pricing.
Step 4: Add Overhead and Profit Margins
After nailing down your materials and labor estimates, it’s time to factor in overhead and profit to ensure your bids are both accurate and sustainable. If you skip this step, you risk underpricing your work. Contractor overhead typically falls between 25% and 54% of total revenue, which is far higher than the outdated "10 and 10" rule (10% overhead, 10% profit) that some still use.
How to Calculate Overhead Costs
Overhead includes all the costs that aren’t tied to a specific job. This could mean insurance premiums, vehicle expenses, fuel, tools and equipment depreciation, office rent, administrative salaries, software subscriptions, and even marketing costs. Don’t forget to include the time spent estimating projects as part of your overhead.
To allocate overhead across your projects, use this formula:
Overhead Rate = (Total Annual Overhead ÷ Total Annual Revenue) × 100.
For example, if your yearly overhead is $150,000 and your revenue is $500,000, your overhead rate would be 30%.
"Most contractors price jobs based on materials and labor, then wonder why they are busy but broke."
– BuildFolio Team
Other indirect costs, like credit card fees and administrative time, should also be included. To stay on top of fluctuating costs, make it a habit to review and adjust your pricing every quarter to account for inflation.
Once you have your overhead nailed down, it’s time to determine your profit margin.
Setting Your Profit Margin
It’s important to distinguish between profit margin and markup. While the profit margin represents the percentage of the selling price that’s profit, markup refers to the percentage added to your costs. For instance, achieving a 20% profit margin would require applying a 25% markup to your total costs (materials + labor + overhead).
Here’s the formula:
Required Markup = Target Margin ÷ (1 – Target Margin).
Specialty drywall contractors often aim for net profit margins between 15% and 20%. This range not only ensures sustainability but also allows for covering warranty reserves (typically between 2% and 5% of the bid), replacing equipment, and supporting business growth. Below is a table showing how different target margins translate into markups and final bid prices:
| Target Profit Margin | Required Markup | Impact on $10,000 Cost | Final Bid Price |
|---|---|---|---|
| 10% | 11.1% | +$1,111 | $11,111 |
| 15% | 17.6% | +$1,765 | $11,765 |
| 20% | 25.0% | +$2,500 | $12,500 |
| 25% | 33.3% | +$3,333 | $13,333 |
| 30% | 42.9% | +$4,286 | $14,286 |
Adjust your margins depending on the project. Higher margins are justified for jobs with custom finishes, occupied properties, or tight deadlines. For simpler, high-volume projects, you might lower them. When clients question your pricing, focus on explaining your actual costs – like insurance, safety measures, and the use of quality tools – rather than emphasizing profit margins. This approach helps build trust and professionalism.
With a solid understanding of overhead and profit margins, you’re now ready to streamline your estimates using ScopeTakeoff in the next step.
Step 5: Use ScopeTakeoff to Speed Up Your Estimates
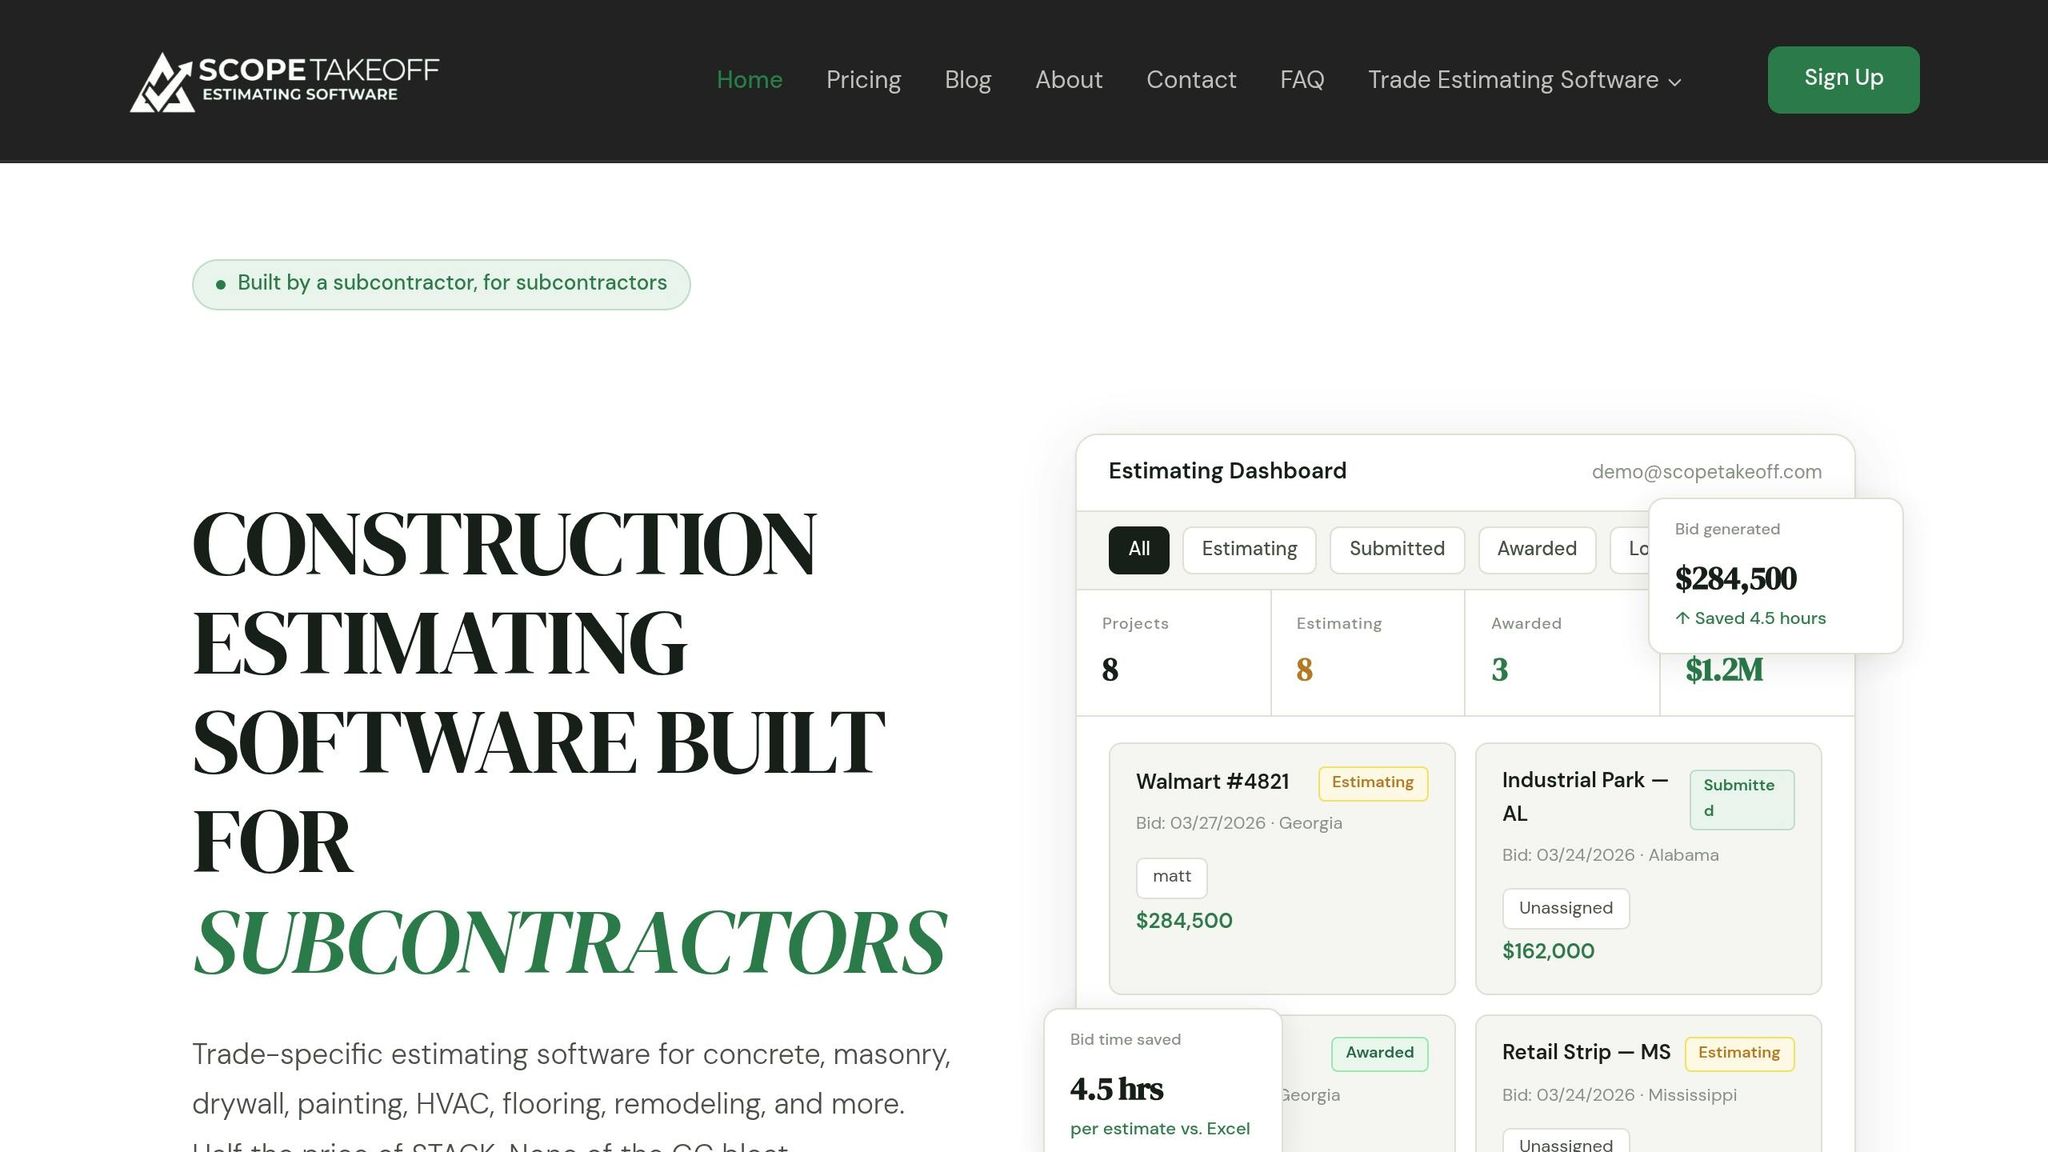
Manually calculating drywall components takes a lot of time and effort. ScopeTakeoff simplifies this process by automating tasks, helping you save hours and improving accuracy.
How ScopeTakeoff Works for Drywall Projects
Once you’ve completed your manual estimates, you can streamline the rest with digital tools. ScopeTakeoff uses AI-assisted technology to automatically identify wall types, calculate perimeters, and detect features like doors and windows. Incredibly, it can measure up to five pages of construction plans in just 30 seconds.
The software includes pre-built assemblies, offering templates for different wall types and finishes. Whether you’re working with standard ½-inch drywall, Type X fire-rated walls, or moisture-resistant boards, ScopeTakeoff has you covered. Simply trace a wall run on your PDF plan, and the tool generates a detailed material list for drywall sheets, joint compound, tape, and fasteners. It even calculates labor time based on your specific production rates.
Its precision snap engine ensures every measurement is exact by reading vector geometry directly from PDF plans. You can also organize your takeoffs using color-coded groups for different wall types. Each measurement comes with editable text labels that can be exported into professional, client-ready proposals.
"It used to take me three to four days to complete a bid for a school. Now it takes me three to four hours." – John Parker
This automation integrates seamlessly into your current estimating workflow, reducing errors and delivering more accurate bids.
Benefits of Automated Estimating
ScopeTakeoff offers several advantages that can transform your estimating process. First, it saves time – what used to take hours can now be done in minutes. With this efficiency, you can handle more bids in a day, increasing your chances of winning new projects through well-prepared and professional proposals.
Another key benefit is improved accuracy. Digital tools help catch errors that might slip through during manual takeoffs. For example, they can identify changes in wall height, double-layer assemblies for fire-rated walls, or overlooked finishing materials. Plus, they help ensure you don’t miss critical line items that could cut into your profit margins. By using localized cost data, ScopeTakeoff helps keep your bids competitive and polished.
ScopeTakeoff also converts your takeoff data into sleek, client-ready proposals. For $100 per user per month with no annual commitment, you get access to over 10 trade libraries, unlimited projects, and team estimating. It’s a smart investment for both solo contractors and growing teams.
Conclusion
Accurately pricing drywall jobs involves following five key steps: selecting a pricing method, calculating material costs (including waste factors), estimating labor for all phases, factoring in overhead and profit margins, and leveraging digital tools to streamline the process. Each step works together to help you create competitive bids while maintaining profitability.
Start by estimating materials, factoring in waste, and including all necessary supplies. Labor costs, which typically account for 60% to 70% of a drywall job’s total price, are especially significant during finishing stages like hanging, taping, mudding, and sanding. Don’t forget to include overhead (usually 10% to 20%) and a profit margin of 15% to 20% to ensure your business remains profitable.
Track labor hours and waste on every job to build a reliable production-rate database. This approach improves the accuracy of future estimates compared to relying solely on industry averages. Additionally, keep material prices up to date since drywall costs can vary with changes in gypsum supply.
For even greater efficiency, consider how digital tools can simplify your estimating process. Automation reduces manual calculations and errors, allowing you to create more bids in less time. For example, ScopeTakeoff offers access to trade libraries, unlimited projects, and team estimating features for $100 per user per month – helping you condense days of work into just hours.
FAQs
What’s the easiest way to turn a floor plan into a drywall sheet count?
To figure out how many drywall sheets you’ll need from a floor plan, start by measuring the total wall and ceiling areas. Convert these measurements into square footage. Once you have that, divide the total square footage by the area of a standard drywall sheet – typically 32 square feet for a 4×8-foot sheet. Be sure to add an extra 10–15% to account for waste and cutting.
The process involves three main steps:
- Measure the dimensions of all walls and ceilings.
- Calculate the total square footage by multiplying height by width for each section.
- Divide the total square footage by the coverage of a single drywall sheet.
This straightforward approach helps you get an accurate estimate without much hassle.
How do I adjust labor pricing for a Level 5 finish or tricky ceilings?
When pricing labor for a Level 5 finish or challenging ceiling work, it’s essential to factor in the extra skill, time, and effort involved. Here’s how to approach it:
- Add more labor hours: Precision work like this takes longer, so adjust the time estimate accordingly.
- Adjust labor rates: Reflect the complexity of the job and align rates with market expectations.
- Account for additional materials or techniques: High-quality finishes often require specialized tools or products, which should be included in the cost.
These elements can significantly influence labor costs. Be sure to apply a premium to your standard rate to ensure your pricing is both accurate and fair.
What overhead items should I include so my drywall bids stay profitable?
To make sure your drywall bids remain profitable, it’s essential to account for overhead costs that cover indirect business expenses. These can include things like office rent, administrative salaries, utilities, vehicles, insurance, and software. For commercial contractors, overhead rates typically fall between 10% and 20% of direct costs. Adding these expenses to your bids ensures you’re covering all indirect costs, which is key to maintaining your profitability.