
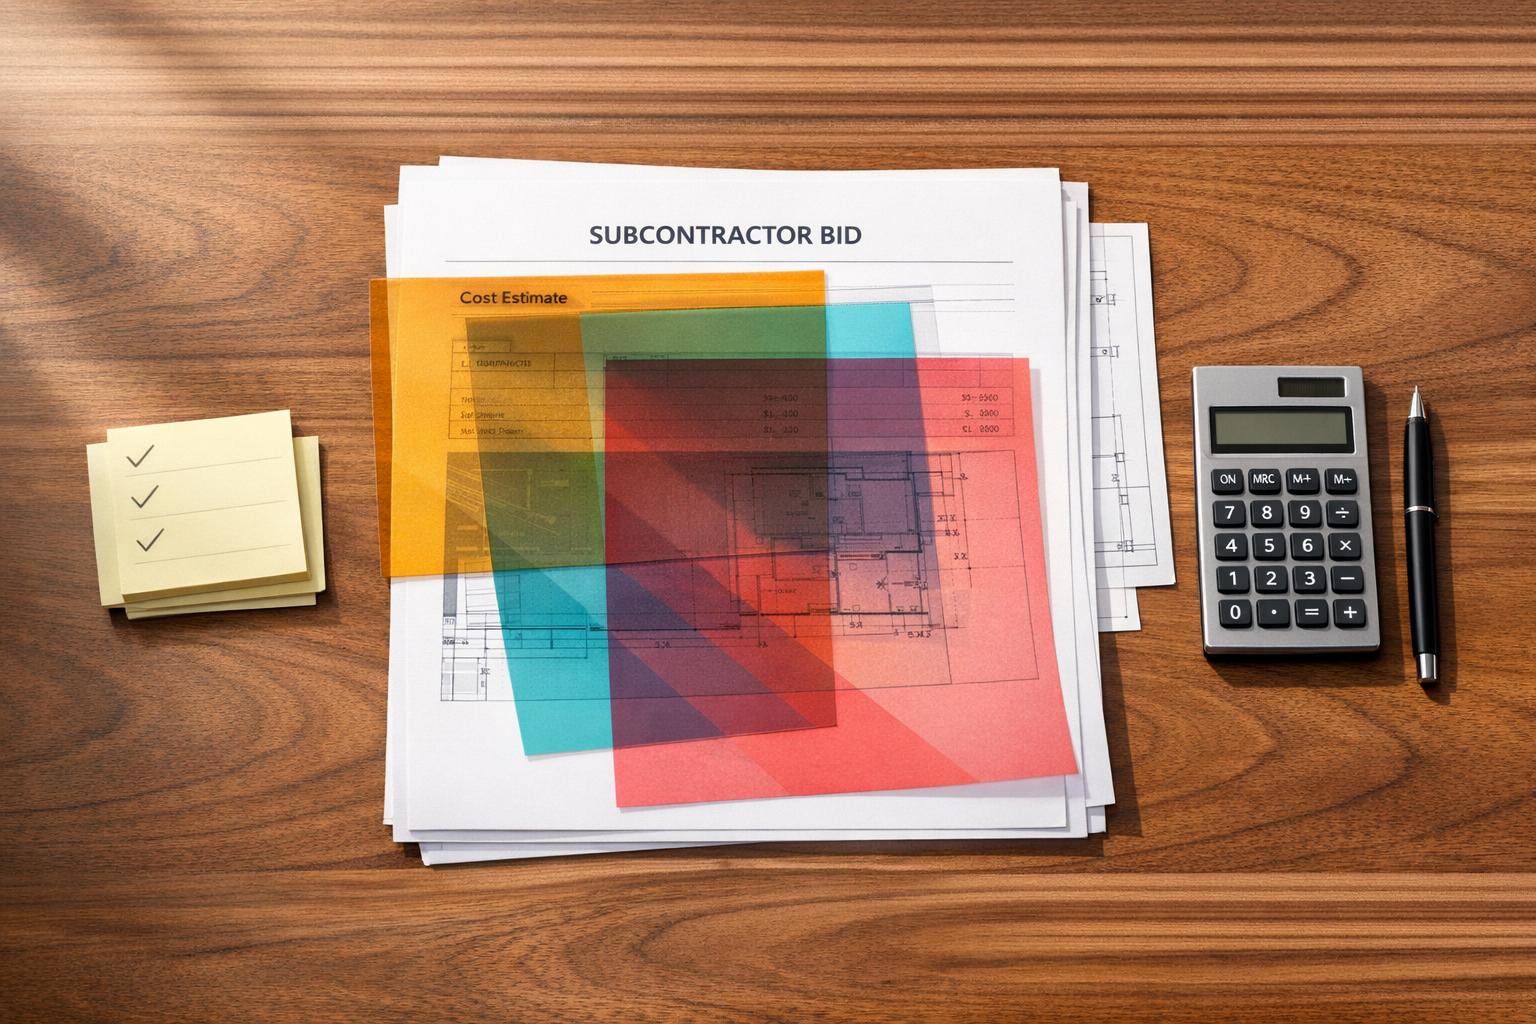
How to Assess Cost Risks in Subcontractor Bids
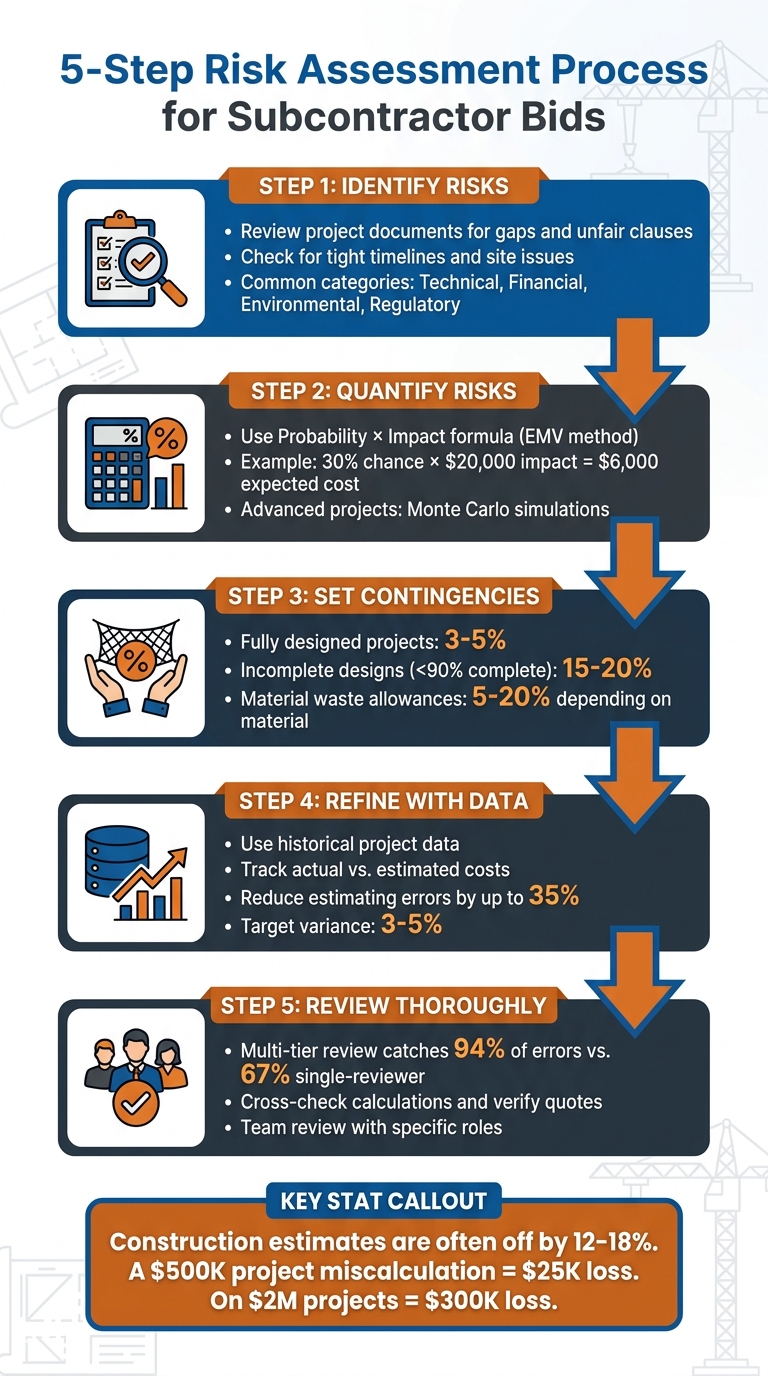
Subcontractor bids can make or break your profits. Misjudging costs in a $500,000 project could mean a $25,000 loss – or worse, $300,000 on a $2 million job. With construction estimates often off by 12–18%, risk assessment is critical to protect your margins and stay competitive.
Here’s the process in a nutshell:
- Identify risks: Review project documents for gaps, unfair clauses, and hidden challenges like tight timelines or site issues.
- Quantify risks: Use methods like the Probability × Impact formula or Monte Carlo simulations to calculate potential costs.
- Set contingencies: Add buffers (e.g., 3–5% for fully designed projects, 15–20% for incomplete designs) to cover unexpected costs.
- Refine with data: Use historical project data to adjust estimates and improve accuracy.
- Review thoroughly: Cross-check calculations, verify quotes, and involve your team to catch errors before submission.
5-Step Process for Assessing Cost Risks in Subcontractor Bids
How to review your construction bids (Never Underquote Again)
sbb-itb-4ee4ad4
1. Identifying Cost Risks in Your Bid
Protecting your profit margin starts with identifying risks before they escalate into costly problems. This requires a detailed review of all project documents to uncover potential pitfalls.
1.1 Review All Project Documentation
Go through plans, specifications, and contract terms line by line. Projects with incomplete designs pose a significant risk – those with less than 90% design completion often need at least a 15% contingency to address design gaps. Look out for vague references like "see architect" or missing details, as these signal scope gaps.
Pay special attention to contract clauses that unfairly shift risks onto you. Watch for provisions like "Pay-When-Paid", "No-Damage-for-Delay", and unlimited indemnification clauses. As ConstructionBids.ai points out:
"A difficult project with fair contract terms beats an easy project with predatory contract language every time".
Don’t overlook Division 01 requirements or last-minute addenda, as they might lead to disqualified bids or unpriced changes. Financial terms also deserve scrutiny – retainage over 10%, payment cycles longer than 45 days, and requirements for unconditional lien waivers can all strain your cash flow. A thorough review of these documents is critical for effective contingency planning, which safeguards your profit margins.
1.2 Recognize Common Risk Categories
Risks can emerge across various project documents. For instance:
- Technical risks: Found in incomplete blueprints or custom material specifications.
- Financial risks: Hidden in payment terms or bonding requirements.
- Environmental risks: Lurking in geotechnical reports or seasonal weather challenges.
- Regulatory risks: Involving permit delays or compliance with prevailing wage laws .
Pay close attention to schedule risks. Tight timelines often carry liquidated damages (LDs), and if the LDs exceed your potential profit margins, the project may not be worth the risk. Additionally, site and logistics constraints – like limited staging areas, phased work in occupied buildings, or poorly detailed subsurface conditions – can create hidden challenges .
1.3 Involve Your Team in Risk Identification
Once risks are categorized, bring in a diverse team to broaden the review process. Estimators can pinpoint quantity and pricing issues, project managers can assess resource and field challenges, financial managers can evaluate cash flow risks, and legal experts can flag liability concerns.
To counteract optimism bias, assign someone to play the "devil’s advocate" and challenge assumptions during team reviews. Field visits are equally important – photos might miss hidden issues like rotted framing, outdated electrical systems, or tight site access.
"Risk management should begin during the bid preparation."
- Kendall Jones, Editor in Chief, ConstructConnect
For private projects, it’s crucial to verify the owner’s financial stability. Use credit reports, bank references, and lien searches to confirm their ability to pay. Private developers typically require more scrutiny than public agencies. A collaborative, detailed review ensures your bid accounts for all potential risks, reducing surprises down the road.
2. Calculating the Financial Impact of Risks
Once you’ve identified potential risks, the next step is to figure out their financial impact. This process turns vague uncertainties into concrete numbers, allowing you to factor them into your bid pricing.
2.1 Apply the Probability × Impact Formula
The Expected Monetary Value (EMV) method is a simple way to quantify risks. Start by listing each risk – such as weather delays or spikes in material costs. Then, estimate the probability of each risk (as a percentage) and its financial impact. Multiply these two values to calculate the risk’s expected cost.
Here’s a quick example: Imagine there’s a 30% chance that steel prices will rise, adding $20,000 to your costs. The expected value of this risk would be $6,000 (0.30 × $20,000). Add up the expected values of all identified risks to determine the total amount you should set aside as a contingency fund.
For larger projects, especially those over $15 million or involving new technology, you might want to use more advanced tools like Monte Carlo simulations. These tools run thousands of scenarios to give you a clearer picture of potential cost outcomes.
2.2 Add Contingency Allowances
Contingency allowances help cover unexpected costs, and the percentage you set aside depends on the project’s complexity and how far along the design is:
| Risk Level | Design Complete | Design 50% | Design Concept |
|---|---|---|---|
| Low Risk | 0–2% | 3–5% | 8–10% |
| Medium Risk | 2–4% | 5–8% | 10–15% |
| High Risk | 4–6% | 8–12% | 15–20% |
Source: ConstructionBids.ai
For example, fully designed new construction projects often require a 3–5% contingency, while standard renovations might need 5–10% because of hidden conditions like issues behind walls or ceilings. Projects with less than 90% design completion should include at least a 15% contingency to account for scope changes.
Don’t forget to account for material waste. Typical allowances include:
- 5–10% for pipe and wire
- 10–15% for drywall and framing
- 15–20% for brick and tile
Additionally, labor costs can increase by 30–45% when you factor in FICA, insurance, and benefits. Once you’ve set your contingencies, historical data can help refine these estimates even further.
2.3 Use Historical Data for Risk Estimates
Using data from past projects makes your estimates more accurate and credible. Contractors who consistently track the difference between estimated and actual costs can reduce future errors by up to 35%. This approach is far more reliable than relying on supplier quotes or guesswork.
Creating a centralized database is key. Record details like:
- RFI (Request for Information) frequency by trade
- Change order volumes
- Actual material waste rates
- Labor productivity metrics
Tracking how much contingency you used – and why – provides valuable insights. For instance, if weather delays or design changes frequently impact your projects, you can plan for them in future bids.
Let’s say your data shows that concrete work typically runs 7% over budget. You could apply a 1.07 multiplier to concrete-related costs in your next estimate. By systematically using real-world data, you can reduce your estimating variance to just 3–5%, compared to the industry average.
Modern tools like ScopeTakeoff make it easier to maintain consistent cost codes across projects. This consistency allows you to spot trends and adjust your estimates, protecting your profit margins. When your bids are based on actual performance data instead of assumptions, they become more competitive – and easier to justify to stakeholders.
3. Building Risk Costs into Your Bid
After calculating your risk costs, the next step is figuring out how to include them in your bid while still staying competitive. The way you handle these costs will depend on your contract type, current market conditions, and how you allocate overhead.
3.1 Consider How Contract Types Affect Risk
The type of contract you’re bidding on plays a big role in determining who shoulders the financial risk – and how much contingency you should add. For example, hard bids (lump sum contracts) put most of the risk on you, the subcontractor. If costs go over budget, you’re responsible for covering the loss. That’s why it’s critical to build in solid contingencies.
On the other hand, cost-plus contracts shift much of the risk to the owner, as you’re reimbursed for actual costs plus a fee. This allows for smaller contingencies. Construction Manager at Risk (CMAR) contracts land somewhere in the middle, often using a Guaranteed Maximum Price (GMP) that includes a shared contingency fund.
Here’s a quick comparison of how different project delivery methods distribute risk:
| Delivery Method | Price Structure | Risk Holder | Estimating Precision |
|---|---|---|---|
| Design-Bid-Build | Lump sum fixed | Contractor | High (Definitive) |
| Design-Build | Negotiated/Lump sum | Contractor (including design) | Moderate-High |
| CM at Risk | GMP with contingency | Shared (Owner/CM) | Moderate |
| Cost-Plus | Reimbursable + fee | Owner | Low-Moderate |
| Unit Price | Per-unit rate | Shared (Volume risk to owner) | Moderate |
Source:
For public projects with hard bids, profit margins are typically between 3% and 6%. However, private negotiated work can offer margins of 8% to 15% or more. Understanding the risk profile of your contract helps you price your bid appropriately, balancing competitiveness with profitability.
3.2 Balance Competitive Pricing with Realistic Costs
Winning every bid you submit might sound great, but it’s often a warning sign that your pricing is too low. A competitive win rate usually falls between 15% and 25%.
The trick is knowing when to take a more aggressive approach and when to be cautious. If you have accurate takeoffs and solid historical data, you can afford to use lower contingencies. But for projects with incomplete designs or unfamiliar scopes, higher buffers are necessary to protect your margins.
You also have options when it comes to presenting contingencies. You can use an explicit contingency (a clearly listed line item) for transparency or opt for a buried contingency (increased unit prices) to make your bid appear more competitive. However, buried contingencies can backfire if they’re discovered during bid reviews, potentially damaging your credibility.
Another approach is value engineering. For instance, on a 12,000 sq. ft. office project in Austin, a general contractor saved $86,000 through value engineering. Combined with a pre-planned 5% contingency, the project maintained a margin above 14%.
Once you’ve tackled competitive pricing, the next step is ensuring that overhead and indirect costs are accurately included in your bid.
3.3 Include Overhead and Indirect Costs
Many subcontractors lose money simply because they don’t fully account for overhead and indirect costs. It’s crucial to track both project-specific job overhead (ranging from 5–8% for simpler projects to over 20% for more complex ones) and general & administrative (G&A) overhead, which typically falls between 8–15% of direct costs. To calculate your actual G&A rate, divide your total annual G&A expenses by your annual revenue, then apply that percentage to each bid .
Labor costs are another area where mistakes happen. Be sure to use fully burdened labor rates that include payroll taxes, workers’ compensation, and benefits. For commercial trades, this often adds 30–45% to the base wage. Failing to include these factors can understate labor costs by over 20%.
It’s also important to understand the difference between markup and margin. For example, adding a 20% markup to a $100,000 cost results in a sell price of $120,000 – but your profit margin is only 16.7%. To achieve a true 20% margin, you’d need a 25% markup.
For public projects, don’t forget to include performance and payment bonds, which typically cost between 0.5% and 3% of the contract value. Tools like ScopeTakeoff can help you standardize cost codes across projects, making it easier to track these indirect costs and ensuring nothing is overlooked when preparing your bid.
4. Creating Contingency Plans for Risk Management
Developing actionable contingency plans is a crucial step in managing risks effectively. A contingency budget serves as more than just a safety net – it’s a strategic resource that demands clear protocols and thorough documentation. These plans should seamlessly integrate into the broader risk management strategy established earlier.
4.1 Define Specific Mitigation Steps for Each Risk
For every major risk identified in your bid, outline precise mitigation steps. This involves determining the necessary resources, scheduling adjustments, and assigning responsibility for executing the plan. For instance, if delayed material deliveries are a potential risk, your plan might include pre-ordering essential items, arranging backup suppliers, or adding a two-week buffer to your schedule for items with long lead times.
The focus should be on actionable details rather than vague statements. Define clear trigger points – specific events that activate your contingency plan. Examples of trigger points might include a three-day weather delay, unexpected soil conditions, or a supplier failing to deliver within a 48-hour window.
Additionally, establish clear authorization protocols for accessing contingency funds. For example, field supervisors could handle smaller expenses (e.g., under $2,000), while larger financial impacts might require executive-level approval.
Once mitigation steps are outlined, it’s essential to document and monitor these risks effectively.
4.2 Create a Risk Register
A risk register serves as a central tool for tracking identified risks, their potential costs, and corresponding response plans. This document should include:
- The date the risk was identified
- The risk category (e.g., labor, materials, schedule)
- A detailed description of the risk
- Probability and impact scores
- Estimated costs if the risk occurs
- The specific mitigation actions planned
It’s important to differentiate between various contingency reserves, such as those for design changes, field uncertainties, and owner-driven scope changes. For example:
- Design contingency addresses risks from evolving drawings.
- Construction contingency covers field uncertainties like weather or subcontractor defaults.
- Owner contingency is allocated for discretionary scope changes.
Keeping these reserves distinct clarifies the origin of each risk and prevents one reserve from being misused to cover another.
"A contingency budget is about being prepared for the unexpected, while also fostering a culture of accountability and efficiency." – Sidharth Ramsinghaney, Director of Strategy and Operations, Twilio
Your risk register should remain a dynamic document, updated throughout the project’s lifecycle. For instance, once significant milestones – like completing the foundation – are achieved, you can reduce reserve levels to free up funds instead of holding the full contingency until the project wraps up. Regular updates ensure that your contingency plans adapt to the project’s progress.
Consider using tools like ScopeTakeoff’s integrated risk management features to simplify the process of maintaining and updating your risk register, keeping your plans relevant and efficient.
4.3 Match Plans to Project Size and Complexity
Tailor your contingency planning to fit the size and complexity of each project. Straightforward projects, like new construction with complete drawings, require minimal contingency. In contrast, renovations with limited pre-investigation or emergency work often need much higher reserves.
The level of design completion is a critical factor. Projects with less than 90% design completion typically require at least a 15% contingency, along with formal clarification processes. Conceptual designs demand more robust contingency planning compared to fully detailed plans.
For smaller, repetitive projects, a simple approach – adding a fixed percentage based on historical data – may suffice. However, for larger, more complex projects (e.g., exceeding $15 million or involving unfamiliar technology), probabilistic methods are better suited to account for multiple risk scenarios. The goal is to align the sophistication of your contingency planning with the specific risk profile of the project you’re bidding on.
5. Reviewing Your Risk Assessment Before Bid Submission
Before submitting your bid, a thorough review can prevent costly mistakes or even bidding on a project that results in a loss. This step ties together your earlier risk assessments and cost estimates to ensure nothing is overlooked. A structured, multi-tier review process is particularly effective, catching 94% of major estimating errors compared to only 67% with a single-reviewer approach. With winning bids on public projects often falling within a narrow margin of 2% to 3%, even a minor error can have a big impact on profitability.
5.1 Cross-Check Your Risk Estimates
Start by validating your bid using industry benchmarks like RSMeans or Craftsman, and compare these figures to outcomes from past projects. Double-check every calculation – errors in formulas or numbers can be costly. For example, on a $5 million estimate, identifying a 3% error during this stage could save $150,000. Ensure labor rates are fully accounted for, including all associated costs.
Once your calculations are confirmed, verify that all supporting documents align with your risk estimates. This ensures consistency across all parts of your bid.
5.2 Verify All Quotes and Documentation
Examine subcontractor quotes side-by-side to spot any scope gaps. Be cautious of unusually low bids, as they might exclude critical items like insulation or testing. Compare key quantities to historical ratios to catch any undercounts. Additionally, confirm that subcontractor and supplier quotes are still valid for the project’s start date, as material prices can fluctuate by 10–20% over a short period.
Make sure all issued addenda have been received, acknowledged on the bid form, and incorporated into your pricing. Use a detailed checklist to verify that required attachments – such as bid bonds, insurance certificates, and safety records – are included and properly completed. This step helps avoid technical disqualifications.
5.3 Conduct a Team Review
Assign specific roles for the review process to ensure thoroughness. For example:
- The Lead Estimator focuses on scope and pricing.
- A Second Estimator checks calculations and challenges assumptions.
- Operations ensures the schedule is realistic.
- Management oversees the final strategy and risk allocation.
Fresh perspectives are invaluable – studies show that new reviewers often catch errors missed by the original estimators. A second estimator who wasn’t involved in the initial takeoff should recheck numbers and assumptions.
| Review Tier | Participants | Focus Area | Error Detection Rate |
|---|---|---|---|
| Tier 1: Self-Review | Lead Estimator | Math, units, checklist completion | 78% |
| Tier 2: Peer Review | Second Estimator | High-value items, productivity assumptions | 89% (cumulative) |
| Tier 3: Management | Chief Estimator/Principal | Strategy, risk allocation, profit margin | 94% (cumulative) |
Allocate review time based on the size of the bid. For instance, smaller bids under $500K may need 2–4 hours, while larger projects over $10M might require 2–3 days. This collaborative effort also helps identify problematic contract terms, like unlimited indemnification clauses or "pay-when-paid" conditions, which might go unnoticed under tight deadlines. Tools like ScopeTakeoff can simplify this process by centralizing bid data, allowing team members to review quantities, pricing, and documentation more efficiently.
Conclusion
Evaluating cost risks turns subcontractor bids into reliable, profitable opportunities. The gap between a winning bid and a project that drains resources often hinges on how effectively you identify, measure, and prepare for risks before submitting your proposal.
"Risk management should begin during the bid preparation. It can be the difference between making a nice profit and breaking even or worse, suffering a loss".
Start by carefully identifying potential risks through in-depth document reviews and comprehensive site visits. From there, quantify those risks and set realistic contingencies. Incorporate these risk costs into your bid, while also creating detailed contingency plans that align with the project’s demands. Finally, conduct a structured team review to catch any costly oversights.
With profit margins often razor-thin – sometimes less than 5% – even small mistakes can eat away at your earnings. Tools like ScopeTakeoff help streamline the process by centralizing bid data and automating calculations, reducing the chances of human error. By using ScopeTakeoff, subcontractors can seamlessly apply these strategies, ensuring every bid maximizes profitability.
FAQs
Which contract clauses are the biggest cost-risk red flags?
Key contract clauses that raise cost-risk concerns include broad indemnification, no-damage-for-delay, pay-if-paid, high retainage (typically 10% or more), and ambiguous payment terms. These clauses can create financial challenges such as liability for damages, payment delays, or even non-payment. Spotting these red flags early gives subcontractors the chance to negotiate improved terms or adjust their bids to address potential financial exposure.
How do I choose the right contingency percentage for my bid?
To determine the appropriate contingency percentage, consider the unique risks tied to your project. These could include scope changes, unexpected conditions, or market fluctuations. Tools like risk scoring matrices can help you evaluate and quantify these risks, guiding you toward a contingency amount that strikes the right balance – keeping your bid competitive while still covering potential uncertainties.
The percentage you choose often depends on how complex the project is. Make sure your contingency aligns with the level of unpredictability involved, but avoid inflating it so much that it affects your bid’s appeal.
When should I use Monte Carlo instead of Probability × Impact?
Monte Carlo simulation is perfect when you need a thorough, data-based analysis of potential costs and risks. By running thousands of scenarios, it helps quantify the chances of cost overruns and identify tail risks. On the other hand, the Probability × Impact approach provides a quick estimate by multiplying the likelihood of an event by its potential impact. However, this method doesn’t account for multiple uncertainties or varying confidence levels. That’s why Monte Carlo works best for complex or high-stakes projects where precise risk management is essential.