
How to Analyze Bid Documents for Accurate Estimates
When it comes to construction bids, accuracy is everything. A single oversight in bid documents can lead to lost revenue, disqualified proposals, or costly change orders. Contractors lose 2-4% of revenue on average due to errors in estimating, and 15% of bid disqualifications stem from missed requirements or addenda. Here’s how to avoid these pitfalls:
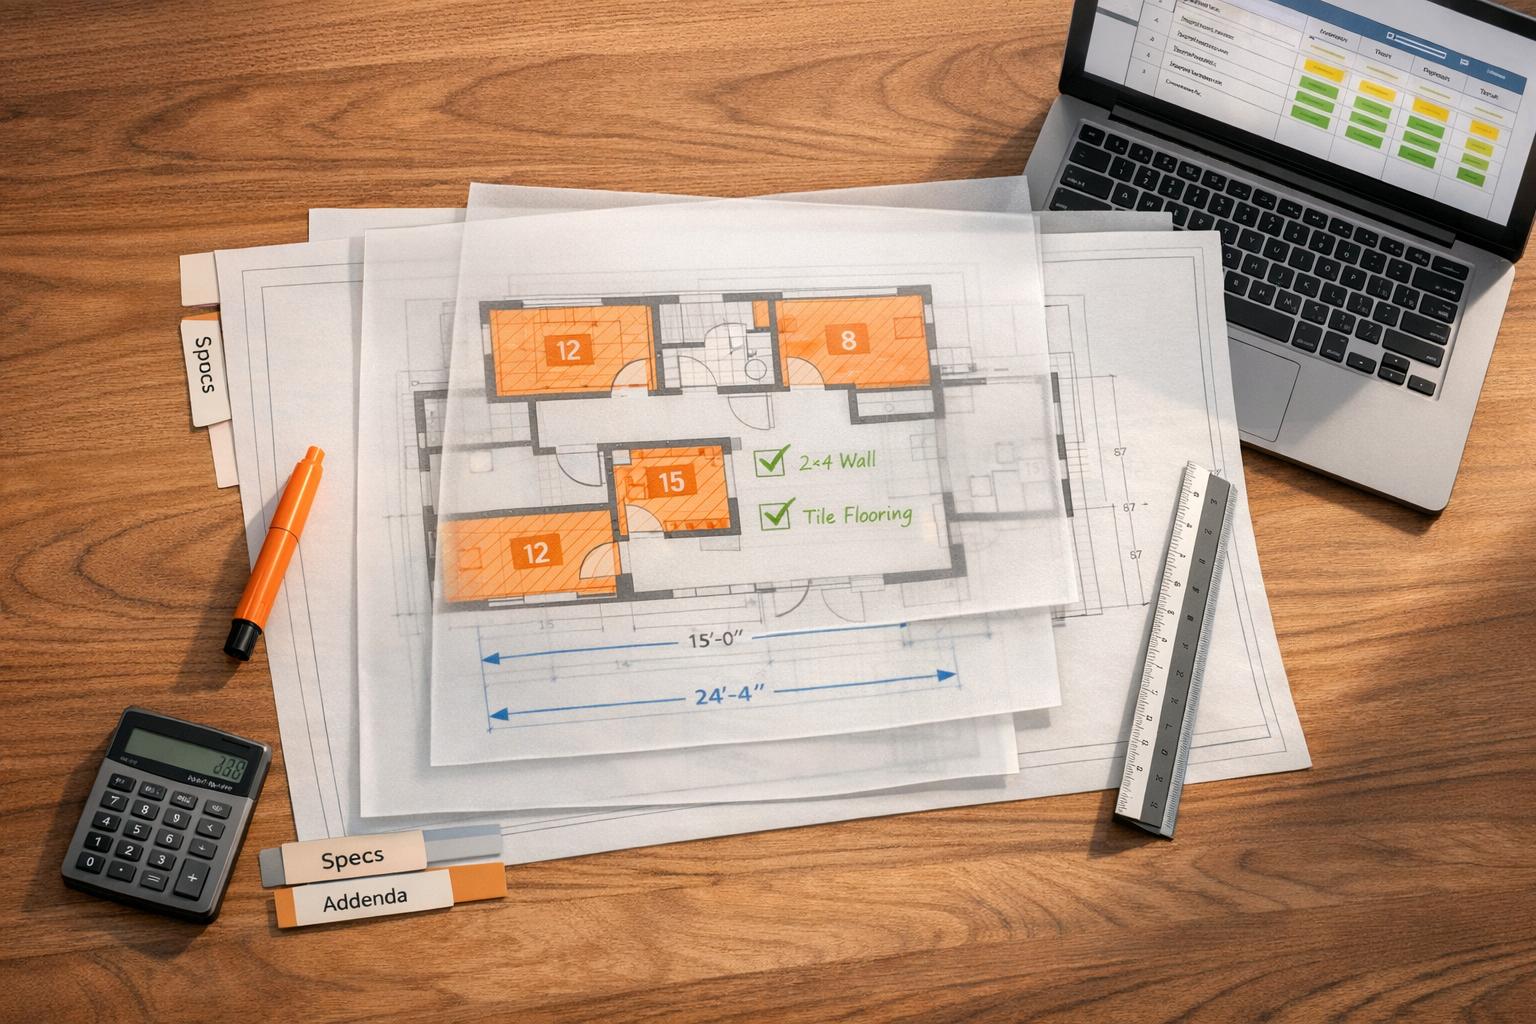
- Organize Your Documents: Gather and sort all bid documents – drawings, specifications, addenda – into clear categories. Missing even one can disqualify your bid.
- Review Drawings and Quantities: Extract dimensions, materials, and quantities while accounting for waste and discrepancies.
- Check Specifications: Align material and quality standards with the drawings to avoid scope gaps.
- Calculate Costs Precisely: Factor in labor, materials, and contingencies based on detailed takeoffs.
- Validate Assumptions: Double-check schedules, site conditions, and market data to ensure your bid reflects current realities.
- Use Digital Tools: Software like ScopeTakeoff can save time, reduce errors, and improve bid accuracy by up to 40%.
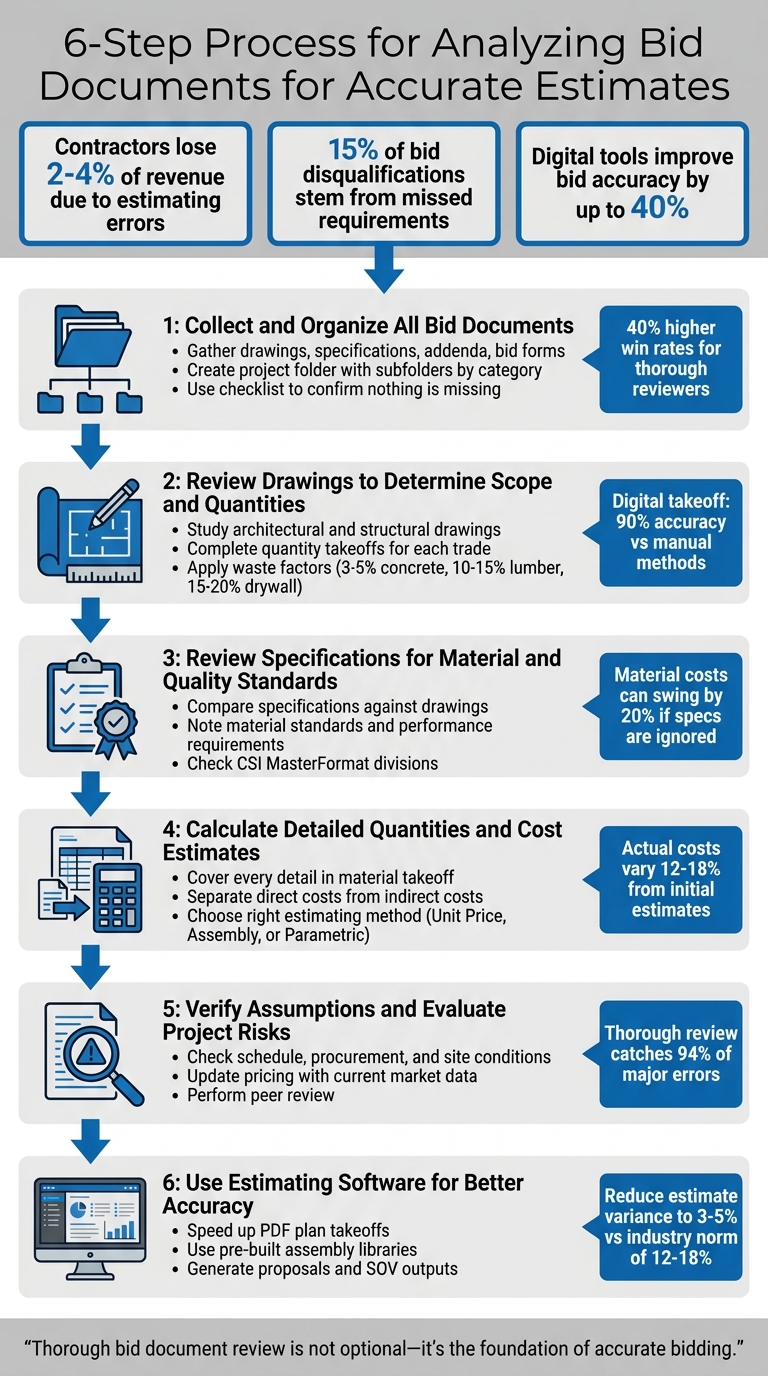
6-Step Process for Analyzing Construction Bid Documents
How to review your construction bids (Never Underquote Again)
sbb-itb-4ee4ad4
Step 1: Collect and Organize All Bid Documents
Start by gathering every document included in the bid package. These typically include drawings, specifications, instructions, contract documents (with general and supplementary conditions), addenda, bid forms, and often a bill of quantities. Missing even a single item – especially an addendum – can result in your bid being disqualified, no matter how competitive your pricing might be.
To stay organized, create a project folder with subfolders for categories like drawings, specifications, addenda, and correspondence. Use a checklist and compare it with the architect’s sheet index to confirm that nothing is missing. Once everything is in place, you’re ready to review the individual components of the bid package.
Identify the Main Components of Bid Packages
- Construction Drawings: These include architectural layouts, structural framing plans, civil grading, and MEP (Mechanical, Electrical, Plumbing) systems. They serve as the visual blueprint for the project.
- Specifications: These outline material requirements, workmanship expectations, and quality standards, often formatted using the CSI MasterFormat divisions.
- Instructions to Bidders: These rules cover submission formats, deadlines, and evaluation criteria.
- Addenda: Issued during the bidding process, these updates modify the original documents and take precedence over them.
- General and Supplementary Conditions: These define the roles and responsibilities of contractors and owners, payment terms, and any project-specific adjustments.
- Bid Forms: Standardized templates where you submit pricing details, including base bids, alternates, and unit prices.
Carefully reviewing all these components ensures you don’t miss critical details, which could lead to scope gaps or pricing errors.
Organize Documents by Discipline
After confirming that you have all the required documents, sort them by discipline. Use standard industry prefixes to categorize drawings:
- General (T)
- Demolition (DM)
- Architectural (A)
- Structural (S)
- Civil (C)
- Mechanical (M)
- Plumbing (P)
- Electrical (E)
- Fire Protection (SP)
If you receive a single large PDF file, use tools like Bluebeam to split it into separate files. This allows multiple estimators to work on different sections simultaneously. Similarly, organize specifications by CSI divisions to align with trade-specific scopes, such as Division 03 for concrete or Division 22 for plumbing.
| Discipline Prefix | Category | Typical Content |
|---|---|---|
| A | Architectural | Floor plans, elevations, sections, finish schedules |
| S | Structural | Foundation plans, framing, structural details |
| M / P / E | MEP | HVAC, plumbing, and electrical plans |
| C | Civil | Site grading, utilities, paving plans |
| DM | Demolition | Structures to be removed, temporary barricades |
Rename files with clear, descriptive titles. For example, avoid generic names like "PlanSet_Final.pdf" and use something like "Riverside_Medical_Structural_Addendum_01.pdf." Mark outdated files as "superseded" to ensure your team works only with the latest versions.
This methodical approach not only simplifies document management but also lays the groundwork for accurate takeoffs. An organized file structure reduces the chance of errors and ensures that trade-specific quantity takeoffs are precise. Interestingly, subcontractors who thoroughly review all document types – rather than focusing only on drawings or specifications – tend to achieve 40% higher win rates.
Step 2: Review Drawings to Determine Scope and Quantities
Carefully reviewing construction drawings is crucial for extracting dimensions, materials, and quantities needed for accurate estimation. These drawings act as the project’s visual guide, but misinterpretation can lead to costly mistakes. In fact, estimating errors can cost contractors between 2% and 4% of total revenue due to underbidding or scope gaps. Precision at this stage is non-negotiable.
Study Architectural and Structural Drawings
Architectural and structural drawings provide different but equally important details about the project. Architectural drawings include floor plans that outline room layouts and wall dimensions, elevations that show exterior finishes and roof angles, and sections that reveal details like insulation and ceiling heights. On the other hand, structural drawings focus on the framework, such as foundation layouts with slab and footing measurements, framing plans with beams and columns, and connection details.
Always verify the scale on each sheet, as PDF plans can sometimes distort the indicated scale. Use a known dimension to calibrate your measurements. Pay special attention to revision clouds, which highlight changes, and review schedules – tables that list crucial details like doors, windows, finishes, and hardware. These schedules often contain information not fully detailed on the main plans. Cross-referencing architectural and structural drawings can also help identify potential conflicts, such as a beam interfering with ceiling height, before these issues arise on-site.
"Measuring dimensions and tying them to specific materials happens in the same motion: square meter measurements get worked out for tasks like plastering, insulation, and painting, and contractor labor and overhead costs for things like equipment rentals get layered on top to build complete estimates." – Steve Griffin, Estimator, Just Building Group
Complete Quantity Takeoffs for Each Trade
Once the drawings are understood, the next step is quantifying the work for each trade. Follow the logical construction sequence – starting with demolition and excavation, then moving to structural, architectural, and MEP (Mechanical, Electrical, Plumbing) – to ensure no part of the scope is overlooked.
Different materials require different measurement techniques. For example:
- Count items like doors, windows, and light fixtures individually.
- Measure linear components, such as baseboard trim, gutters, and conduit, in linear feet.
- Use square feet for drywall, flooring, and painting.
- Calculate cubic yards for materials like concrete slabs, footings, and fill dirt.
- Adjust roof shingle estimates by factoring in roof pitch.
Avoid relying solely on raw plan quantities for material orders. Apply waste factors to account for cutting and field conditions. For example, use 3–5% for concrete, 10–15% for lumber, 15–20% for drywall, 10–15% for paint, and 5–10% for flooring. These adjustments help prevent material shortages during the project.
Be mindful of annotations like "TYP", which indicates multiplication across areas, and "NIC", which excludes certain items from counts. Also, review "Key Notes" and "Details" sheets, as they often include hidden scope elements like temporary barricades or specific mounting hardware not shown on the main plans.
Leveraging trade-specific estimating software can significantly boost accuracy – up to 90% compared to manual methods – and cut takeoff time from over 20 hours a week to just 2–3 hours. McKinsey research highlights that 84% of projects exceeding their budgets can trace the problem back to poor takeoff calculations. This underlines the importance of getting this step right.
Accurate quantity takeoffs are the foundation of reliable cost estimates. By thoroughly reviewing drawings and understanding the scope, you set the stage for precise calculations and more competitive bids.
Step 3: Review Specifications for Material and Quality Standards
Drawings show what needs to be built, but specifications explain how to build it. These details are critical to ensure your estimate accounts for all material and performance requirements. Missing or ignoring specifications can cause material costs to swing by as much as 20%.
Specifications are typically structured using the CSI MasterFormat system, which organizes work into numbered divisions by trade. For instance, Division 03 covers Concrete, Division 26 focuses on Electrical, and so on. Each section of the specifications follows a three-part format: Part 1 – General, Part 2 – Products, and Part 3 – Execution. Familiarity with this structure helps you quickly find the details that directly impact your estimate.
Compare Specifications Against Drawings
Drawings and specifications don’t always match perfectly. When discrepancies arise, specifications generally take precedence over drawings, but addenda usually override both. Spotting these conflicts early can save you from costly scope gaps or change orders that eat into profits.
Start by cross-referencing schedules on the drawings – such as door, window, or finish schedules – with the product requirements in the specifications. For example, if a drawing indicates a 6" base but the specification calls for a 4" base, you’ll need clarification before pricing. Submit an RFI (Request for Information) immediately, referencing the specific drawing numbers and specification sections in question.
Pay close attention to Division 01 (General Requirements), which outlines project-wide mandates like allowances, temporary facilities, and quality control measures that influence costs across all trades. This section often includes critical details – such as mandatory testing, special warranties, or site access restrictions – that aren’t mentioned elsewhere. It’s also essential to confirm that the specification version matches the latest addenda by checking revision dates. Pricing outdated material standards can lead to significant financial losses.
Note Material Standards and Performance Requirements
Specifications don’t just list materials – they define the quality levels and performance criteria they must meet. For example, Part 2 (Products) specifies acceptable manufacturers and material standards, while Part 3 (Execution) outlines installation methods that directly affect labor costs and production rates.
Different types of specifications can impact your estimate in various ways:
- Prescriptive specifications clearly state the materials and methods to use, making pricing straightforward but limiting flexibility for cost-saving alternatives.
- Performance specifications focus on the desired result, such as achieving R-19 thermal resistance for insulation. These allow more flexibility but often require additional engineering to prove compliance.
- Proprietary specifications name a specific brand or manufacturer, which can increase costs unless "or approved equal" language permits substitutions.
Be on the lookout for hidden costs buried in the specifications, such as submittals (shop drawings, product data), mandatory testing or inspections, and extended warranties beyond standard durations. These requirements can quickly inflate your bid. To avoid surprises, create a specification checklist for each trade. This will help you track technical requirements like material grades, installation methods, and performance standards that directly influence your pricing. Attention to these details is what sets apart profitable bids from costly mistakes.
Once you’ve aligned the specifications with the drawings, you’ll be ready to move on to accurate quantity and cost calculations.
Step 4: Calculate Detailed Quantities and Cost Estimates
Once your drawings and specifications are in sync, it’s time to convert your takeoffs into accurate cost estimates. This step is crucial because even small estimating mistakes can have big consequences. Contractors lose an average of 2–4% of revenue due to underbidding and scope gaps, and actual construction costs typically vary by 12–18% from initial estimates.
To stay on track, work systematically. Follow the CSI MasterFormat divisions in order, breaking them down into specific areas like the foundation, framing, exterior envelope, and interior finishes. This structured approach reduces errors and ensures your cost calculations are thorough.
Cover Every Detail in Your Material Takeoff
Your Material Takeoff (MTO) should account for everything – from major materials like lumber to smaller items like fasteners and sealants. Overlooked items, such as embeds, anchors, and accessories, are responsible for errors in 73% of estimates. Don’t forget to factor in waste: add 3–5% for concrete, 10–15% for lumber, and 15–20% for drywall to account for cuts, breakage, and other site realities.
For labor, avoid broad estimates. Instead, calculate the hours required for each task. For instance, installing 10,000 square feet of drywall at a production rate of 200 square feet per hour translates to 50 hours of work. Be sure to include the fully burdened labor rate, which accounts for taxes, insurance, and benefits. A $35/hour base wage, for example, could actually cost $48–$51/hour when these factors are included. Labor burden typically adds 30–45% to the base wage, and skipping this calculation can lead to underestimating labor costs by 20–30%.
Separate Direct Costs from Indirect Costs
Direct costs are tied directly to the project and include materials, labor, equipment rentals, and subcontractor fees. Indirect costs, on the other hand, fall into two categories:
- General Conditions: These are project-specific expenses like temporary utilities, permits, site office trailers, and project management salaries.
- Company Overhead: These cover broader business expenses, such as office rent, administrative salaries, insurance, and marketing. Residential contractors typically allocate 10–20% of direct project costs to overhead.
Also, don’t assume owned equipment is free. Charge the project an internal rental rate that covers depreciation, maintenance, and insurance. Allocate overhead consistently, whether as a percentage of direct costs, labor dollars, or a fixed amount per man-hour.
"The bid is where profit is won or lost, and the margin between a competitive bid and a losing one is often less than 5%."
– ToolGrit
Always list contingency costs separately to keep individual costs transparent. For new construction, plan for 3–5%; renovations with surveyed conditions should include 5–10%; and for historic or high-risk projects, allocate 15% or more. This clarity not only reassures clients but also protects your profit margins.
Choose the Right Estimating Method
The estimating method you use depends on the project phase and the level of detail available. Here are three common approaches:
- Unit Price Estimating: Multiply the quantity of each item by its specific unit cost for materials, labor, and equipment. This method is highly precise and creates a detailed procurement list, making it ideal for final bids. However, it’s time-consuming and prone to manual errors.
- Assembly Estimating: Group related items into a single unit. For example, instead of pricing each part of an interior wall separately, calculate the cost per linear foot of the complete wall. This approach is faster and helps ensure you don’t miss smaller components like anchors or brackets. Using pre-built assembly libraries can save time and improve accuracy.
- Parametric Estimating: Rely on historical data and statistical relationships to calculate costs based on broader parameters, such as cost per square foot or cost per hospital bed. This method is best for early conceptual phases and serves as a useful check for more detailed estimates. For instance, if your drywall estimate comes to $4.50 per square foot but historical data suggests $2.75 per square foot, you might need to double-check your calculations.
| Method | Best Used For | Pros | Cons |
|---|---|---|---|
| Parametric | Conceptual/Early Budgeting | Quick and requires minimal design data. | Less accurate; lacks detail. |
| Assembly | Design Development/Trade Bids | Faster than unit pricing; avoids omissions. | Needs pre-built libraries; less flexibility. |
| Unit Price | Final Bids/Lump Sum Contracts | Highly accurate; detailed procurement list. | Time-intensive; higher manual error risk. |
"Break the job into small, detailed parts. For example, if you’re repairing a foundation, don’t just list ‘materials.’ You need to specify whether it’s rebar, concrete, piers, and even safety gear."
– Aaron Lipman, Owner, Two Brothers Foundation Repair
Finally, perform a parametric cross-check against historical cost data to validate your estimates. Contractors who consistently track actual versus estimated costs reduce future errors by 35%. This habit turns every project into a learning opportunity, helping you refine your approach for greater accuracy down the line.
Step 5: Verify Assumptions and Evaluate Project Risks
An estimate is only as good as the assumptions it’s built on. Before submitting your bid, take the time to double-check every key decision. Studies show that final project costs often vary by 12–18% from initial estimates. However, contractors who consistently validate their assumptions and compare actual costs to estimates reduce future errors by 35%.
Check Schedule, Procurement, and Site Conditions
Start by reviewing the project schedule and ensuring it aligns with your labor and material assumptions. Tight schedules can drive up labor costs, often requiring overtime or larger crews to meet deadlines. If the contract includes penalties for delays (like liquidated damages), make sure these risks are factored into your pricing.
Take the time to visit the project site with a checklist in hand. This helps uncover hidden challenges that might not be obvious on paper. For example, uneven terrain, limited equipment access, or unexpected utility conflicts can all increase costs and disrupt productivity.
Also, confirm material delivery schedules with your suppliers. Material prices can fluctuate by 10–20% between the bid date and the start of the project. From 2022 to 2025, material prices saw an average annual volatility of 8.3%, while labor rates climbed 12–18% during the same period. For projects running longer than 90 days, consider adding a material escalation clause or building a price contingency into your estimates.
Resolve any discrepancies in project documents through RFIs (Requests for Information). Follow the proper hierarchy when addressing conflicts: addenda > supplementary conditions > general conditions > specifications > drawings. Missing a single addendum could disqualify your bid, no matter how competitive your pricing is. Always confirm that you’ve acknowledged all addenda.
These steps help ensure your pricing reflects the realities of the job and current market conditions.
Update Pricing with Current Market Data
Once you’ve reviewed the project documents, update your assumptions using current market data. Make sure your material quotes are up-to-date. Reach out to suppliers for written, firm quotes that include details like quantity discounts, lead times, and price validity periods. This safeguards your pricing against unexpected increases.
Labor rates also need regular updates – review them annually. If local construction unemployment falls below 4%, plan for a 5–10% labor premium to cover overtime and account for hiring less experienced workers.
Compare your final estimate with historical data and industry benchmarks, such as cost per square foot or per unit. For instance, if your drywall estimate is $4.50 per square foot but similar past projects suggest $2.75, investigate the difference. Similarly, if your concrete estimates are consistently 7% low, apply a 1.07 multiplier to future estimates for accuracy.
Finally, have another experienced estimator review your work. A thorough review process – including self-checks, peer reviews, and management oversight – catches 94% of major errors before submission, compared to 67% with single-review processes. A healthy win rate for competitive bids is 15–25%. If you’re winning more than a third of your bids, it may be a sign that your pricing is too low.
Step 6: Use Estimating Software for Better Accuracy
Digital estimating software simplifies calculations and standardizes processes, helping contractors protect their profit margins and reduce costly mistakes. On average, estimating errors cost contractors 2% to 4% of their total revenue due to underbidding and scope gaps. By adopting digital tools for takeoff and estimating, contractors have reported cutting takeoff time by 40%, while AI-powered platforms can reduce it by up to 60%. Even more impressive, these tools lower the difference between estimates and actual costs to just 3% to 5%, compared to the industry norm of 12% to 18%. Let’s break down how these tools streamline the estimating process.
Speed Up PDF Plan Takeoffs and Trade Calculations
Digital takeoff tools allow you to measure quantities directly from PDF plans and feed the data into your estimates – no manual retyping or calculations required. This eliminates common errors like incorrect scale readings or number transpositions, ensuring more accurate bids.
Take ScopeTakeoff as an example. Its PDF plan takeoff feature applies trade-specific formulas as you measure. For instance:
- A concrete estimator marking a slab area gets instant cubic yard calculations based on depth.
- Drywall measurements automatically deduct openings and calculate board quantities.
- Roofing estimates factor in slope adjustments for accurate pitch area measurements.
In 2024, Executive Flooring used advanced takeoff tools to slash their large-scale takeoff time from 2 hours to just 5 minutes, thanks to custom assemblies and precise measurement capabilities. Jonathan Moll, VP of Business Development, emphasized how these tools transformed their process. Similarly, The TPH Group cut their takeoff time by 40% and doubled their bid win rate after adopting digital estimating tools.
To ensure accuracy, calibrate the digital scale with a known measurement, like a door width, since PDF plans may not always match the stated scale.
Use Pre-Built Assembly Libraries
Assembly-based takeoffs group related items into a single measurement, making it easier to account for small but essential components. Instead of tallying individual items, you measure a consolidated unit – like the linear feet of an exterior wall – and let the software handle the detailed calculations.
ScopeTakeoff offers pre-built assembly libraries for over 10 trades, including concrete, masonry, drywall, painting, HVAC, flooring, and more. These libraries come with industry-standard material lists, labor rates, and waste factors tailored to each trade. For example, the masonry library calculates block counts, mortar, and grout quantities based on wall dimensions.
"The masonry assembly library alone is worth it. I used to count every block by hand off the plans. Now I enter the dimensions, and it automatically calculates quantities, mortar, everything."
– Mike C., Masonry Contractor
Using trade-specific assemblies also ensures consistency across your team. When all estimators rely on the same database, they apply uniform formulas, labor rates, and material standards, preventing discrepancies caused by differing assumptions. Plus, when project specs change, the software can update an entire estimate in minutes – something that could take days manually. This consistency naturally leads to polished, professional proposals, as described next.
Generate Proposals and SOV Outputs
ScopeTakeoff simplifies creating client-facing proposals and Schedule of Values (SOV) outputs directly from your estimates. The SOV export is formatted specifically for general contractors, while the client-facing proposal includes your branding and detailed line items. Both documents pull from the same estimate, ensuring consistency across all bid materials.
"Our estimators turn around 3x as many bids per week now. The SOV export goes straight to the GC – no reformatting, no copying into Word."
– Travis W., Roofing Sub
ScopeTakeoff costs $100 per person per month and includes trade assembly libraries, PDF takeoff, unlimited projects, and proposal generation. One concrete subcontractor switched from a pricier platform and saw bid times drop by 50%:
"ScopeTakeoff has everything we actually need for our concrete work. It reduced our bid time by 50%."
– Jason R., Concrete Sub
Conclusion
Careful bid document analysis plays a key role in ensuring profitability. A thorough review helps clarify the project scope, resolve discrepancies between drawings and specifications, and accurately price the work involved. Skimming through documents or overlooking critical details can lead to underpricing, missed submission requirements, or costly change orders during construction.
By systematically organizing documents and verifying assumptions, you can create more dependable estimates. Mistakes in estimating can cost contractors between 2% and 4% of their revenue, while 15% of bid disqualifications happen because of incomplete forms or missed addenda. Additionally, subcontractors relying on manual document management may miss out on about 15% of opportunities simply due to poor organization.
"Thorough bid document review is not optional – it’s the foundation of accurate bidding. Rushing through documents leads to missed scope, underpriced work, and project problems."
– CBConstructionBids.ai Team
Diligently reviewing, quantifying, and validating every detail strengthens your bid, minimizes errors, and protects your profit margins. Contractors who adopt digital bid management tools report submitting 40% more bids and achieving 20% higher win rates compared to those using manual processes. Tools like ScopeTakeoff simplify takeoffs, ensure consistent assemblies, and enhance bid accuracy – all for just $100 per person per month. Combining a structured approach with digital tools ensures your bids are precise, competitive, and set up for success.
FAQs
What should I do when drawings and specs don’t match?
When drawings and specifications clash, rely on the standard document hierarchy to address the issue. Make sure to document your interpretation and highlight any major conflicts. In cases where clarity is still needed, consider submitting a Request for Information (RFI) for further guidance. Generally, drawings are given precedence over specifications, but it’s essential to clearly identify the conflict in your bid. This approach helps prevent miscommunication and minimizes mistakes during the project.
How do I account for waste and hidden scope in takeoffs?
To ensure your takeoffs account for waste and hidden scope, include waste factors and overage allowances in your measurements. This approach helps cover the need for extra materials due to overages or unexpected challenges that might arise.
You should also incorporate contingency allowances to address any hidden scope or unforeseen conditions. By doing this, you can improve the accuracy of your bids, making them better equipped to handle uncertainties that aren’t clearly outlined in the bid documents.
When should I add contingencies or escalation to my bid?
When preparing a bid, it’s smart to include contingencies and escalation to address uncertainties and potential cost increases.
- Contingencies are set aside for unexpected expenses, such as changes in project scope or unforeseen site conditions.
- Escalation factors in inflation or market fluctuations that could impact material or labor costs over time.
By accounting for these elements in your estimate, you can better safeguard profitability while addressing potential risks and future cost changes.