
How to Integrate Estimating Software into Daily Workflows

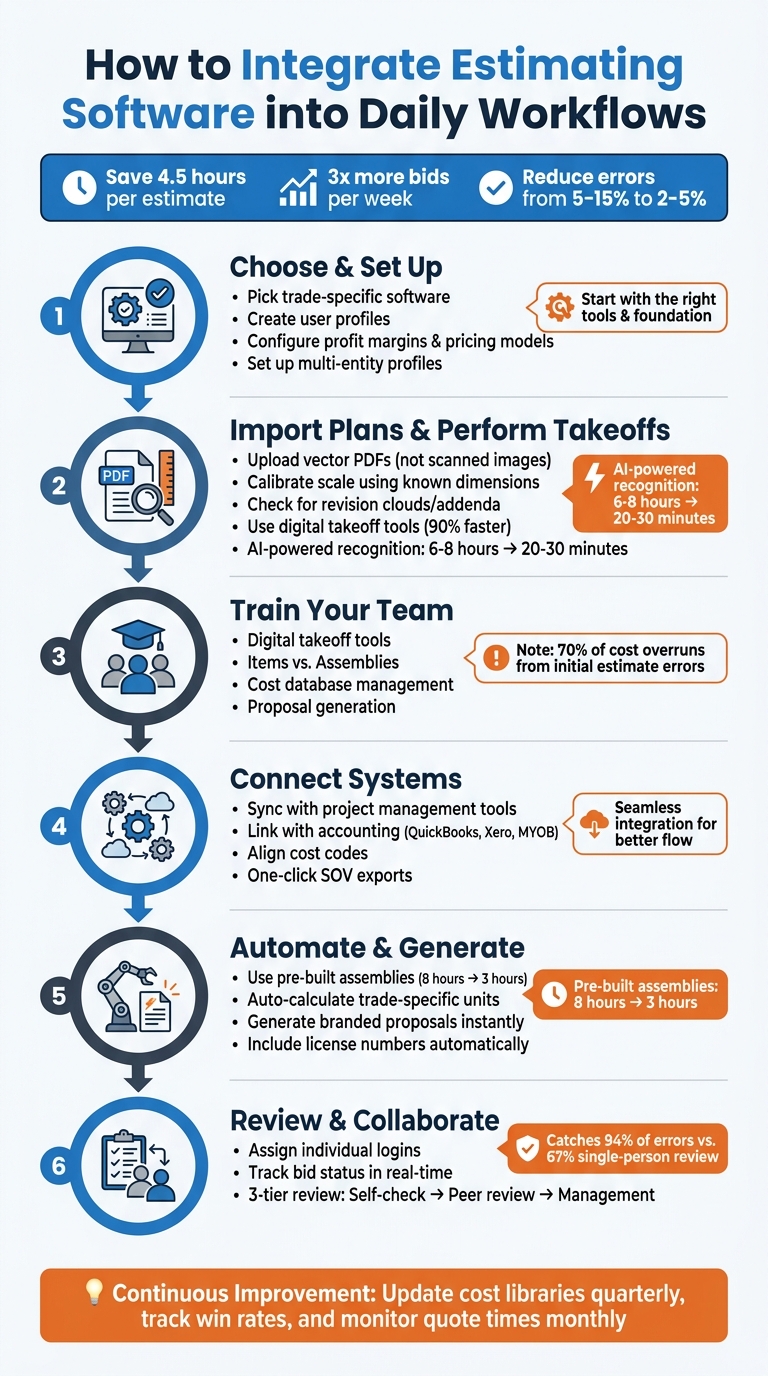
Still using spreadsheets for estimates? It’s time to upgrade. Estimating software saves time, reduces errors, and helps you create accurate bids faster. Subcontractors report saving 4.5 hours per estimate and tripling their weekly bid output. Here’s how to make the switch:
- Pick trade-specific software: Choose tools designed for your industry to ensure accurate calculations and relevant features.
- Set up and customize: Configure user profiles, pricing models, and profit margins to fit your business.
- Digitize plans: Use vector PDFs for precise measurements and leverage digital takeoff tools to convert dimensions into actionable data.
- Train your team: Focus on core features like takeoff tools, cost databases, and automated proposals.
- Connect systems: Sync estimating software with project management and accounting tools to streamline workflows.
- Automate and review: Use pre-built assemblies to speed up estimates and implement structured bid reviews for accuracy.
6-Step Guide to Integrating Estimating Software into Subcontractor Workflows
Step 1: Choose and Set Up Your Estimating Software
Pick Trade-Specific Software
Using software tailored to your specific trade can save you from dealing with irrelevant features and missing critical calculations. For example, concrete subcontractors need tools that automatically convert square footage and depth into cubic yards. Drywall contractors rely on accurate board counts that account for openings, while asphalt crews require tonnage calculations based on area and depth.
Trade-specific platforms often include pre-built assembly libraries, which eliminate the need to create manual formulas for every material and labor component. Instead, you can input dimensions once and generate a complete estimate, including detailed labor and material breakdowns.
As Mike C., a masonry contractor, shares, "The masonry assembly library alone is worth it. I used to count every block by hand off the plans. Now I enter the dimensions and it generates detailed quantity estimates, mortar, everything".
Before fully committing to any software, test it using a completed project. Recreate the estimate in the software and compare its output to your actual costs and original bid. This ensures the tool aligns with your trade’s specific needs and pricing structure. Also, double-check that the software uses the correct measurement units. Most U.S. subcontractors work in imperial units (feet, inches, square feet), so confirm the platform defaults to these settings.
Once you’re confident in the software’s capabilities, take the time to configure it to match your company’s workflow.
Create User Profiles and Configure Settings
Start by setting up multi-entity profiles if your business operates under multiple licensed companies. Platforms like ScopeTakeoff allow you to create separate profiles for each entity, ensuring that every proposal automatically includes the correct license number, address, and signatory. This helps avoid costly errors, like sending a bid with the wrong company information, which could disqualify you from a job. Additionally, create individual logins for each estimator to streamline bid review processes and keep track of submitted and won bids.
Next, configure your profit and pricing models. Decide whether you calculate profit as a margin (sales minus cost of goods) or as a markup (a percentage added to cost). Set minimum margin percentages to prevent estimators from underbidding and cutting into your profit. For labor pricing, choose between flat unit costs or hourly rates with difficulty multipliers, depending on how your crew bills for work.
sbb-itb-4ee4ad4
Step 2: Import Plans and Perform Digital Takeoffs
Upload Project Plans
Once your setup is complete, the next step is to import your project plans. For best results, always request vector PDFs directly exported from CAD software instead of scanned raster images. Vector files ensure cleaner lines and more accurate measurements, which are crucial for precise work.
After uploading your plans, calibrate the scale. Don’t just rely on the stated scale on the drawing – it’s better to use a known dimension, like the width of a 3-foot door, to convert digital pixels into real-world measurements. Once calibrated, verify the accuracy with a second measurement to ensure everything aligns perfectly.
Another critical step is to check for revision clouds or addenda to confirm you’re working with the most up-to-date plans. Relying on outdated drawings can lead to costly bid errors, potentially disqualifying you from the project or cutting into your profit margins.
Once your plans are calibrated and verified, you’re ready to use digital tools to extract precise measurements.
Use Digital Takeoff Tools
With your plans properly scaled and verified, digital takeoff tools become your best ally for converting measurements into actionable data. These tools let you trace areas for flooring or roofing, outline walls or pipes, and count fixtures like doors or windows. The software then translates these measurements into trade-specific units – whether it’s cubic yards for concrete, square feet for painting, or tonnage for asphalt.
Many modern platforms go a step further by incorporating AI-powered recognition. This technology can automatically identify and count items like electrical outlets or fixtures across multiple sheets. Tasks that would traditionally take 6–8 hours manually can now be completed in just 20–30 minutes, with some contractors reporting up to a 90% reduction in total takeoff time.
As Tectonic puts it, "The winning combination isn’t AI vs. humans – it’s AI-assisted humans. Let the machine do the tedious measuring. You focus on the decisions that require experience and judgment."
To ensure accuracy, work systematically – left-to-right, top-to-bottom – and use color-coding to avoid double-counting. Be mindful of abbreviations like "NIC" (not in contract) and apply the correct multipliers for "TYP" (typical) counts. This methodical approach ensures nothing gets overlooked or miscalculated.
Step 3: Train Your Team on Core Features
Teach Team Members the Key Features
Get your team up to speed on the essential features of your estimating software. Focus on tools like digital takeoff, Items and Assemblies, cost database management, and proposal generation. Show them how to upload plans, use digital measurement tools to trace areas and lengths, and let the software calculate quantities automatically – cutting out manual counting and reducing the risk of errors.
Break down the difference between Items and Assemblies. Items are reusable components, such as specific materials or labor rates, while Assemblies bundle multiple items together with formulas that handle complex calculations. For example, a drywall assembly can calculate all necessary materials and labor based on the measured wall area. This approach ensures that estimates remain consistent, even if team members have varying levels of experience.
Teach your team how to manage cost databases effectively. This includes adjusting labor rates based on crew skill levels and applying proper overhead and profit markups. They should also learn to generate professional documents like Schedule of Values (SOV) for contractor submissions and polished, branded proposals for clients – all with just a few clicks. According to KPMG, 70% of construction cost overruns are caused by errors in initial cost or quantity estimates.
Set Up Standard Workflows for Team Use
Once your team understands the software’s core features, focus on creating standardized workflows to ensure consistency. Build a library of reusable Items with preset costs and develop Assemblies that automatically account for all related expenses in a single measurement.
Make it a habit to update your cost database at least every quarter to keep pricing accurate. Use pre-built templates for common project types – like commercial remodels or residential roofing – to streamline the estimating process across the team. Encourage new estimators to base their bids on successful examples created by experienced team members.
Track key metrics, such as bid accuracy and turnaround time, to identify areas where additional training might be needed. You can also incorporate techniques like Planning Poker during bid reviews to ensure that every team member contributes independently, fostering collaboration and reducing groupthink.
Step 4: Connect Software with Existing Systems
Sync with Project Management Tools
Integrating your estimating software with project management tools can save you hours of manual effort and improve accuracy. By automating the transfer of takeoff quantities and pricing into your project controls, you eliminate the need for double-entry, reducing the chance of errors. This ensures that your data remains consistent across platforms while streamlining your workflow.
When choosing software, prioritize options that support interoperability – the ability to automatically match items based on bid forms, disciplines, or resource types. Look for features like one-click exports for Schedule of Values (SOV), which allow seamless syncing with general contractors’ project management systems. This ensures your estimate format aligns with GC requirements, making collaboration smoother.
"The key is integration – letting each system do what it does best, while ensuring data flows cleanly between them." – BidBow
Another smart move? Centralize access to documents. By linking your estimating software with document management systems, task cards can reference original plans and takeoff sheets directly. Syncing estimating deadlines with team calendars also helps your team stay on top of bid dates, ensuring nothing slips through the cracks.
Once this is in place, the next step is linking with accounting systems for better financial management.
Link with Accounting and ERP Systems
Connecting your estimating software to accounting platforms like QuickBooks, Xero, or MYOB simplifies the transition from winning a bid to managing an active project budget. The key is aligning cost codes between your estimating software and accounting system. This ensures that every material, labor, equipment, and subcontractor expense is accurately categorized.
Before syncing, assign each income and expense category in your estimating software to a specific accounting chart of accounts. Push detailed entries – such as individual bills, expenses, and labor costs – instead of just lump-sum summaries. This level of detail supports detailed Work in Progress (WIP) reports and makes tax preparation far easier. A nightly sync is often the best choice, as it keeps your records up-to-date without the risks of real-time syncing while data is still being finalized.
To ensure smooth integration, designate someone – like your office manager or bookkeeper – to review sync logs weekly, address errors, and update mappings as needed. Consistency is critical, so standardize naming conventions across platforms to prevent duplicate records. If you’re reorganizing your chart of accounts or merging customer entries, pause the integration temporarily to avoid data misrouting.
"If your job cost data does not flow cleanly from your PM software into QuickBooks, you are flying blind on project profitability." – Projul
Step 5: Automate Calculations and Generate Proposals
Speed Up Estimates with Pre-Built Assemblies
Pre-built assembly libraries can drastically cut down the time it takes to create estimates. Instead of manually entering every stud, plate, nail, or fastener, you can use a single pre-configured assembly that includes all the necessary components. For example, this approach can reduce an 8-hour process to just 3 hours.
Tools like ScopeTakeoff simplify complex calculations for specific trades. Whether you’re working with concrete (measured in cubic yards), drywall (board counts), asphalt (tonnage), or painting (coverage rates), the software applies the correct formulas automatically. You only need to input quantities once, and it generates a complete estimate, breaking down labor and materials.
The impact of automation is clear when you look at error rates. Manual estimates often have a 5% to 15% error margin, while software-assisted estimates bring that down to just 2% to 5%. On a $500,000 project, this difference could determine whether you make a profit or take a loss. Additionally, estimators using these tools can produce three times as many bids each week.
By automating calculations, you save time and reduce errors, allowing you to focus on refining bids and strengthening client relationships. Once you’ve streamlined your estimating process, the next step is to turn those numbers into polished, client-ready proposals.
Generate Polished Proposals Effortlessly
Modern estimating software makes it easy to create professional Statements of Values (SOVs) and branded proposals in no time. Gone are the days of tediously reformatting Excel sheets into Word documents.
With multi-entity profiles set up, the software automatically fills in details like license numbers, addresses, and signatories for every proposal. This ensures accuracy and maintains consistent branding across all your submissions. The SOV export is formatted to meet the expectations of general contractors, making collaboration smoother and more efficient.
"Our estimators turn around 3x as many bids per week now. The SOV export goes straight to the GC – no reformatting, no copying into Word. It looks professional every time."
- Travis W., Roofing Sub
This level of automation has a compounding effect. For instance, if you’re bidding on 10 projects a month, the time saved can be redirected toward other priorities like business development, site visits, or pursuing additional opportunities.
Step 6: Set Up Bid Review and Collaboration Processes
Enable Team Collaboration
To keep things organized and efficient, assign individual logins to team members. This not only ensures accountability but also allows multiple people to work on bids simultaneously – no more juggling outdated Excel files sent back and forth via email. A centralized dashboard can show the real-time status of each bid, whether it’s marked as "In Progress", "Submitted", "Awarded", or "Lost." This makes it easier to focus on estimates that need urgent attention as deadlines approach. Additionally, setting up multi-entity profiles ensures that finalized bids automatically include the correct license numbers using HVAC estimating software and required signatories for seamless submissions.
Once collaboration tools are in place, the next step is implementing a structured review process to catch mistakes early.
Conduct Thorough Bid Reviews
A solid review process is essential for accuracy. Start with a three-tiered review system:
- Self-check: Review calculations, tax applications, and insurance requirements to ensure everything adds up correctly.
- Peer review: Focus on the five highest-value line items, especially those exceeding $50,000. This step is critical for identifying errors like incorrect takeoffs or outdated vendor quotes.
- Management review: Ensure strategic alignment and verify markups for accuracy.
This layered approach has been proven to catch 94% of errors, compared to just 67% when only one person reviews the bid. Teams that focus their peer reviews on critical cost items and track estimated versus actual costs on completed projects have reduced future estimating mistakes by 35%.
The Ultimate Construction Estimating Software Stack (best tools)
Best Practices for Continuous Improvement
Continuous improvement keeps your estimating software working for you, ensuring it evolves into a powerful tool rather than becoming outdated.
Monitor Software Usage and Performance
Getting your estimating software up and running is just the start. The real value lies in tracking how it performs and impacts your business. Set baseline metrics like quote time, win rate, and error frequency. Then, review these numbers monthly to confirm the software is delivering the results you need.
Focus on metrics tied to your bottom line. For example, compare how many bids your team completes now versus during the manual process. One residential electrical contractor cut quote time from 4 hours to just 20 minutes, tripled monthly quotes from 10 to 30, and improved their win rate from 30% to 45%. These changes boosted first-year revenue by 60%. Additionally, compare estimated labor and material costs with actuals to identify if your pricing is too low or if specific assemblies need adjustments.
Use your software’s dashboard to track projects in progress, submitted bids, and wins. If you see an increase in bid submissions but no improvement in win rates – or if quotes still take too long – it might be time to reassess your pricing strategy or explore untapped features like assembly libraries.
By keeping a close eye on performance metrics and making regular updates, you’ll ensure your software continues to enhance your competitive position.
Stay Updated on New Features
Software updates are designed to meet shifting industry demands. Assign someone on your team to review release notes and test new features on smaller projects before rolling them out. For example, a commercial HVAC contractor increased their win rate from 25% to 38% in November 2025 by adopting standardized templates and pricing databases, which eliminated calculation errors.
Set aside time every quarter to compare recent project costs with your original estimates. If you notice recurring discrepancies – like underestimating concrete labor or HVAC ductwork – update those cost libraries right away. Outdated material prices can quickly eat into your profits. Keep your vendor quotes up to date in the system and review labor productivity rates every few months based on actual crew performance.
This kind of ongoing fine-tuning separates contractors who simply use the software from those who truly see financial gains. When you align software updates with real-world project data, you create a culture of continuous improvement that drives long-term success.
Conclusion
Using estimating software in your daily workflow doesn’t have to be complicated. Start by selecting tools tailored to your trade, training your team on the essentials, and integrating the software with your existing systems. The benefits are clear: estimators who switch from manual spreadsheets to specialized software save an average of 4.5 hours per bid.
Subcontractors also report a dramatic boost in productivity, completing three times as many bids per week with the help of these tools. This faster turnaround pairs well with professional-grade proposals that help secure more projects.
Features like a polished Schedule of Values and branded proposals can set you apart from the competition. The ability to generate these documents with a single click not only saves time but also signals to General Contractors that you’re serious about your work – an edge that can help win contracts.
Beyond speed and precision, tools like ScopeTakeoff combine efficiency with professionalism. Designed for subcontractors in over 10 trades, it offers features like PDF plan takeoff, trade-specific assemblies, and team collaboration – all for $100 per person per month, with no annual commitment. It’s a practical option that delivers advanced functionality without unnecessary complications.
While the initial setup simplifies bidding, continuous improvement keeps you ahead. Track your performance metrics, update cost libraries, and explore new features regularly. Staying proactive with your software ensures you protect your margins and secure profitable projects.
FAQs
How do I pick the right trade-specific estimating software?
When selecting trade-specific estimating software, focus on platforms designed specifically for subcontractors in your field. Look for features like pre-built assembly libraries, PDF plan takeoff, and automatic trade calculations. Make sure the software aligns with your trade – whether it’s concrete, HVAC, or another specialty – and helps enhance bid accuracy.
Ease of use is key. Features such as pricing history tracking and proposal generation tools can make a big difference. Choose software that simplifies your workflow while minimizing common bidding mistakes.
What should I do if my plans are scanned PDFs?
If your project plans are scanned PDFs, consider using digital takeoff software to import and measure quantities directly from the files. For improved precision, ask for vector PDFs exported from CAD software rather than relying on scanned images. After importing, make sure to calibrate the scale, separate layers, and trace lines or areas for accurate measurements. This method helps minimize manual errors and makes your estimating process smoother and faster.
What’s the best way to sync estimates with accounting cost codes?
To ensure smooth integration between your estimates and accounting system, it’s important to align your estimating software with your accounting cost codes. Here’s how you can do it:
- Organize Cost Codes: Start by categorizing cost codes in your accounting system. Common categories include materials, labor, and subcontractors. This structure makes it easier to match items later.
- Match Estimate Items: Link each item in your estimate to the appropriate cost code. You can do this manually or streamline the process by using import templates if your software supports them.
- Maintain Consistency: Use consistent coding practices and provide detailed documentation of the project scope. This not only improves accuracy but also simplifies the synchronization of data between systems.
By following these steps, you’ll create a more efficient workflow and reduce the chances of errors in your project accounting.