How to Spot Errors in Construction Estimates
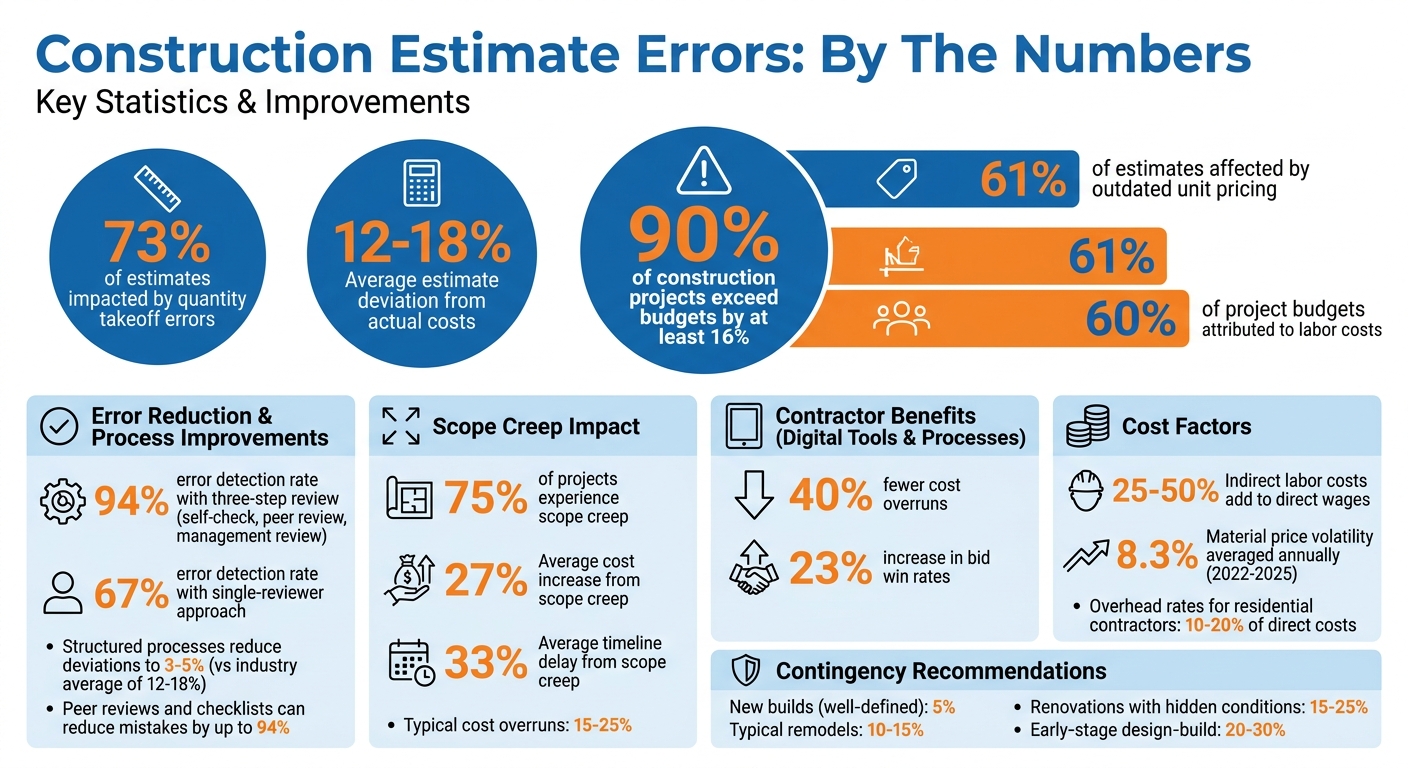
Mistakes in construction estimates can lead to serious financial losses, delays, and even put your business at risk. With 90% of construction projects exceeding budgets by at least 16%, accuracy in estimating is critical. This guide breaks down key steps to avoid errors and protect your profits:
- Review Quantities and Plans: Errors in takeoffs impact 73% of estimates, often caused by outdated or inaccurate plans. Double-check scales, revisions, and site conditions.
- Verify Calculations and Costs: Outdated unit prices or math mistakes can snowball. Focus on high-value items and use current pricing data.
- Assess Labor and Productivity: Labor accounts for 60% of budgets. Factor in indirect costs, site constraints, and realistic productivity rates.
- Account for Overhead and Contingencies: Include job-specific and company-wide overhead, and set appropriate contingency reserves to handle unexpected costs.
- Double-Check and Team Reviews: Use structured reviews and digital tools to catch errors. Peer reviews and checklists can reduce mistakes by up to 94%.
Construction Estimate Error Statistics and Impact Data
Construction Cost Estimating – How to check your estimate is correct
sbb-itb-4ee4ad4
Review Quantities and Takeoffs
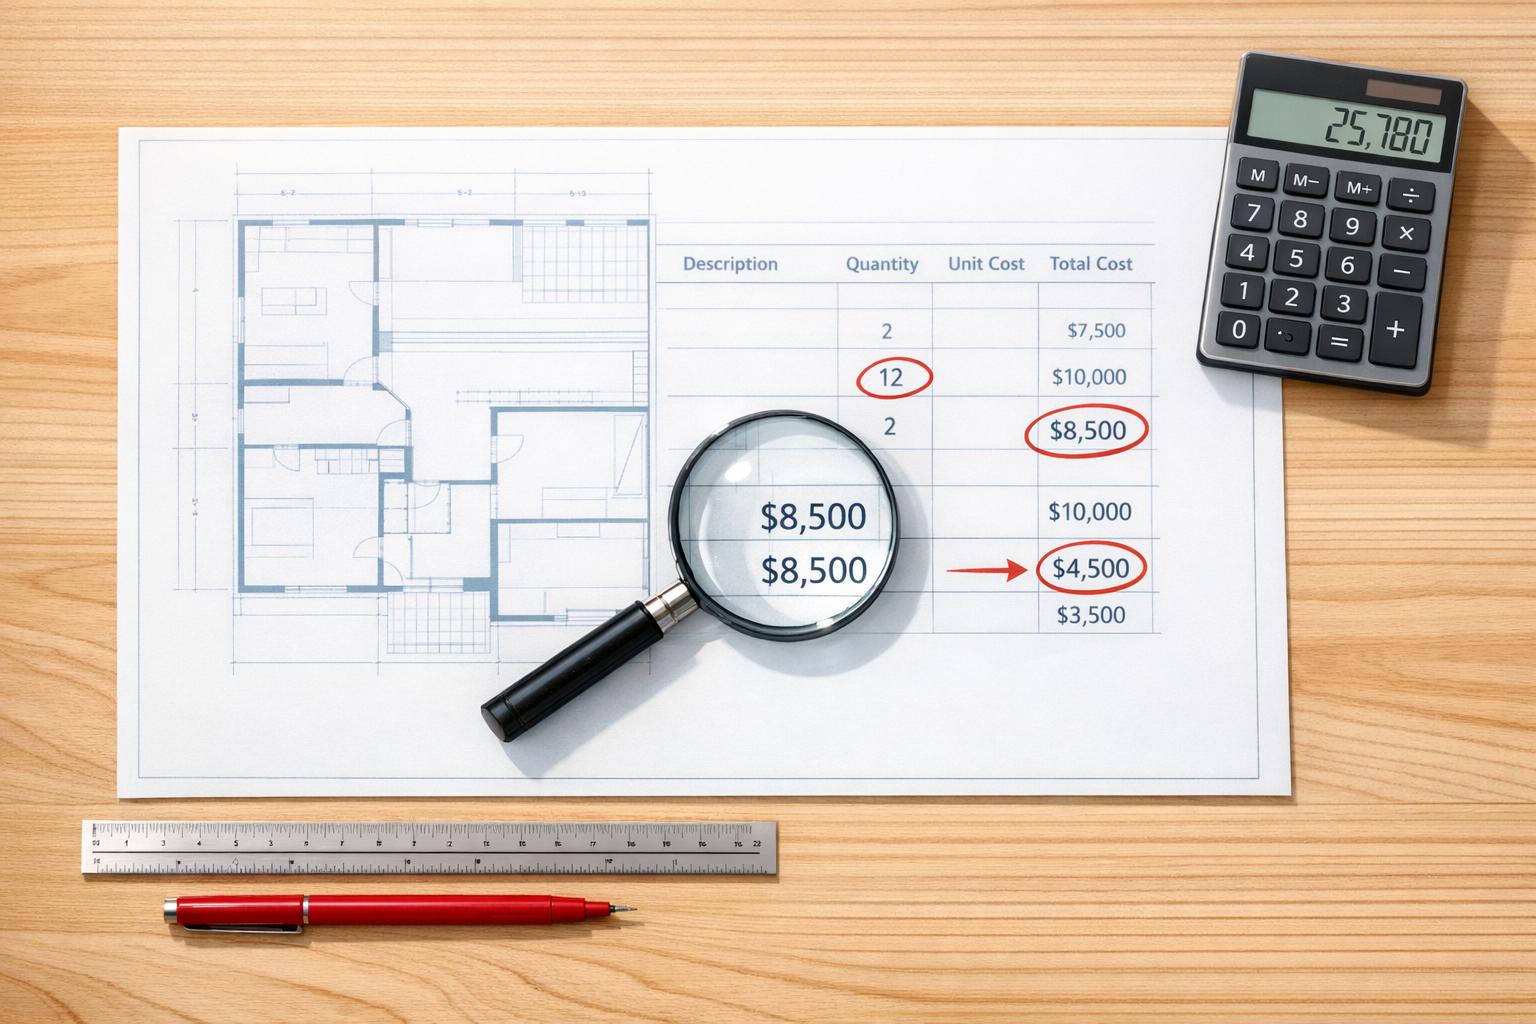
Mistakes in quantity takeoffs can throw your entire estimate off track. In fact, errors in this area impact 73% of construction estimates, with the average estimate deviating 12–18% from actual project costs. Whether you’re calculating drywall square footage, counting electrical outlets, or determining concrete volume, even small missteps can lead to major discrepancies in your totals.
One of the main culprits? The plans themselves. For example, a PDF might state a scale of 1/4" = 1′-0", but depending on how it’s displayed or printed, that scale might not be accurate. To avoid errors, always calibrate measurements against a known dimension – like a door width or grid line spacing – instead of relying solely on the stated scale.
Outdated plans can also create problems. Revisions often change the scope of a project, so it’s critical to upload updated sheets as soon as they’re available. Comparing new versions against older ones can help you spot quantity changes before finalizing your bid.
Check Plans and Site Conditions
Plans often assume ideal conditions, but real-world sites rarely match those assumptions. For instance, a site plan might show flat terrain, but an in-person visit could reveal slopes that require extra fill, retaining walls, or layout adjustments. Similarly, soil reports and drainage plans might expose issues like seasonal flooding or unstable ground that aren’t apparent in the drawings.
To avoid missing details, systematically review every page of the plans from left to right and top to bottom. Use color-coding to mark items as you count them. Pay close attention to the legend for abbreviations like "TYP" (typical), which means an item applies to multiple locations, and "NIC" (not in contract), which should be excluded. A common mistake involves miscounting floors – if a building spans Levels 10 through 28, remember to include the bottom floor in your calculation: 28 – 10 + 1 = 19 floors.
While manual reviews are essential, digital tools can make this process faster and more accurate.
Use Digital Tools for Takeoffs
Traditional takeoffs using paper plans and rulers are not only time-consuming but also prone to errors. Digital tools simplify this process by eliminating scale-reading mistakes and providing an audit trail of your measurements. For example, ScopeTakeoff allows you to measure directly on a PDF plan while automatically calculating material and labor quantities. It even factors in waste (usually 5–15%) and uses pre-built assemblies to convert counts into labor hours.
That said, even with digital tools, you still need a systematic approach. Use the right measurement methods for each type of material: count doors and fixtures individually, measure baseboards and conduit in linear feet, calculate drywall and flooring in square feet, and estimate concrete in cubic yards. While digital tools handle unit conversions for you, double-check that the totals align with the project scope.
"A takeoff determines whether an estimate reflects the real scope of the build. When quantities are incomplete… mistakes surface later in material shortages [or] unexpected costs."
Verify Calculations and Unit Costs
Once you’ve finalized quantities, double-check your calculations and update pricing to reflect current rates. Did you know that outdated unit pricing impacts 61% of construction estimates? Even a minor math error can snowball into a significant problem throughout your bid. Keeping prices current is essential, especially given how unpredictable material costs have become. For instance, a contractor who estimated concrete at $145 per cubic yard in early 2025 might face actual costs of $162 per yard by mid-year – a 12% increase that could entirely erase the project’s profit margin. Labor costs are just as fluid, especially when prevailing wage requirements come into play, potentially diverging significantly from your usual crew rates.
"Being out by a couple of dollars on a labour rate could potentially mean being hundreds of thousands of dollars out on our overall estimate."
Prioritize reviewing the 20% of line items that account for 80% of your estimate’s total value. These high-impact items are where errors can lead to the most significant financial risks. To catch discrepancies, use parametric benchmarking – compare your unit costs with historical data from similar projects. This method helps flag figures that seem off and ensures your bid margins remain protected, just as accurate takeoffs secure your project scope.
Once you’ve verified your calculations, move on to validating supplier quotes.
Cross-Check Supplier Quotes
Always verify vendor quotes by comparing them with multiple sources. Material prices can fluctuate significantly between the time you prepare an estimate and when construction begins. Building strong relationships with manufacturers and suppliers can help you lock in pricing or identify alternative materials that fit within your budget.
Pay close attention to how long supplier quotes remain valid. In 2026, many quotes come with shorter expiration periods, and overlooking these can leave your margins vulnerable to unexpected price hikes. For volatile materials like structural steel or lumber, it’s a good idea to update your unit prices monthly. Cross-checking ensures you’re not multiplying incorrect quantities by outdated costs, which could lead to costly mistakes.
Once you’ve confirmed supplier pricing, consider automating your calculations to minimize errors.
Use Automatic Calculations
Manual calculations are a common source of mistakes. Switching to digital tools can help eliminate errors in multiplication, addition, and unit conversions. For example, ScopeTakeoff’s automatic trade calculations convert takeoff measurements directly into material and labor costs. This software applies consistent unit costs across all sections of your estimate, reducing discrepancies between trades. Digital tools streamline essential estimating tasks while maintaining accuracy throughout the bidding process.
To ensure consistency, use standardized templates with pre-built formulas for extensions (Quantity × Unit Cost). This approach not only minimizes errors but also improves traceability across every line item.
Examine Labor and Productivity Assumptions
Labor often accounts for about 60% of project budgets. Unlike material costs, which are usually backed by supplier quotes, labor costs rely heavily on assumptions about crew productivity, site conditions, and the complexity of the work. Misjudging these factors can turn a potentially profitable project into a financial loss.
First, ensure your labor rates align with local market conditions rather than relying on national averages. Don’t forget to include indirect labor costs such as payroll taxes, workers’ compensation, insurance, and benefits. These indirect expenses typically add 25% to 50% to the direct wage costs. For instance, if your crew earns $30 per hour, the actual labor cost could range from $40 to $45 per hour once all indirect costs are factored in.
It’s also important to account for less-than-optimal productivity. Factors like weather delays, inspection schedules, delivery issues, and limited site access can all slow progress. Always inspect the site for potential constraints before finalizing your labor estimates. For example, while a crew might install 100 feet of pipe daily on an open site, that number could drop to 60 feet on a congested site with multiple obstacles.
"Labor is the most critical cost component to analyze as it can tell a story that most other costs cannot."
- David Hopkins, VERTEX
Engage your foremen or site managers during the review process. Their on-the-ground experience can shed light on productivity bottlenecks and help identify overly optimistic timelines before you submit your bid. Peer reviews are particularly useful for complex work, like custom finishes, curved walls, or remodeling projects in occupied spaces. These types of tasks often require additional labor hours. Once labor assumptions are clear, it’s easier to dive into how job complexity and crew size affect productivity.
Factor in Job Complexity and Crew Size
The complexity of a job has a direct impact on labor costs. Tasks like intricate designs, retrofitting existing structures, or working in hard-to-reach areas take significantly more time than straightforward installations.
Crew size is another critical factor. Overstaffing a small area can lead to congestion, reducing individual efficiency. For example, a three-person crew working in a confined space may accomplish less per person than a two-person crew with enough room to work effectively. Similarly, having multiple crews working simultaneously can cause delays due to interference.
Certain conditions further increase labor hours. For instance, working at unusual heights requires additional safety measures and slows down movement. Remodeling projects in occupied buildings may limit work hours and require extra cleanup. Night shifts and extended work weeks can also reduce productivity due to fatigue. In these situations, it’s essential to apply a productivity adjustment factor, often adding 10% to 30% more labor hours depending on the severity of the conditions. Accounting for these factors in your estimate can help protect your profit margins and ensure bid accuracy.
Use Software for Detailed Labor Breakdowns
Managing these detailed calculations manually can be overwhelming, but modern estimating software can simplify the process. Tools like ScopeTakeoff convert takeoff quantities into labor hours using historical productivity data, reducing the guesswork.
Crew-based templates offer more precise estimates for complex tasks. Instead of relying on a generic cost per square foot, you can define specific crew compositions – like one foreman and two carpenters – and estimate the time required for that team. This approach acknowledges that adding more crew members doesn’t necessarily result in linear productivity increases.
ScopeTakeoff also ensures consistency by applying uniform labor rates across your estimate while considering trade-specific productivity standards. The software tracks your company’s actual performance on past projects, replacing generic industry averages with real data from your completed work. This historical insight helps you spot patterns in over- or underestimating labor needs, especially on projects with challenging site conditions.
To stay accurate, set your software to update labor rates monthly or quarterly. This keeps your estimates in line with union negotiations and market changes. Additionally, when local construction unemployment falls below 4%, consider applying a 5% to 10% labor premium to account for overtime costs and the likelihood of working with less experienced crews in a tight labor market.
Check Overhead, Contingencies, and Scope Assumptions
Once you’ve nailed down quantities, calculations, and labor assumptions, it’s time to address indirect costs and scope clarity. These factors are critical for protecting your profit margins. Even if your material and labor estimates are spot on, overlooking indirect costs or failing to define the project scope can lead to trouble. Studies show that 90% of construction projects run over budget, with the average project exceeding its budget by at least 16%. A major culprit? Underestimated overhead and unclear scope boundaries.
Indirect costs are a common source of profit erosion. Job-specific overhead includes things like site trailers, temporary fencing, and permits, while company overhead covers broader expenses such as office rent, administrative salaries, and software subscriptions. To maintain a healthy business, you need to systematically recover these costs across all projects. Divide your annual overhead by total sales to calculate your overhead percentage. For context, most residential contractors carry overhead rates between 10% and 20% of direct project costs.
Contingency funds are another key piece of the puzzle. These aren’t just "extra padding" – they’re a calculated reserve to handle unforeseen issues or price spikes. Without them, unexpected challenges can eat into your profits. Use risk-based percentages to set your contingency: 5% for well-defined new builds, 10–15% for typical remodels, and 15–25% for renovations with hidden conditions. For early-stage design-build projects, where plans are still conceptual, a contingency of 20–30% might be necessary.
Include Overhead and Contingencies
Start by splitting your overhead into two categories. Job-specific overhead includes things like temporary fencing, site trailers, and permits. Company overhead, on the other hand, covers operational expenses such as insurance, vehicles, and administrative time. Both types of overhead must be accounted for to avoid undercutting your earnings.
Don’t forget to include soft costs like permits, inspections, and engineering fees. Once you’ve calculated your overhead percentage, apply it to every job. For example, if your annual overhead is $150,000 and your annual sales are $1,000,000, you’ll need to add 15% to each estimate just to break even. Then, layer a contingency on top based on the project’s risk level. A straightforward addition with complete plans might only need a 5% contingency, while a renovation with unknown conditions could require 15–20%.
"Contingency is a calculated risk fund, not padding."
Material price volatility, which has averaged 8.3% annually from 2022 to 2025, makes escalation clauses a must for longer projects. Include contract language to protect yourself against price swings in commodities like lumber, steel, and copper.
Equally important, clear scope definitions can save you from costly change orders.
Document Scope Assumptions
Vague scope definitions are a recipe for cost overruns, which can range from 15% to 25%. Terms like "standard quality finishes" or "typical installation" leave too much room for interpretation, often leading to disputes. In fact, about 75% of construction projects experience scope creep, causing an average 27% increase in costs and a 33% delay in timelines.
To avoid this, create a detailed Scope of Work (SOW) that specifies materials down to the brand, model, size, and finish. For example, instead of saying "tile flooring", specify "12×24-inch porcelain tile, Daltile brand, installed in a herringbone pattern." For electrical work, clarify whether you’re including basic outlets or adding features like USB charging ports and dimmer switches. This level of detail minimizes misunderstandings about what your bid includes.
Be explicit about physical assumptions too. For instance, note wall heights (e.g., 8 feet versus 10 feet), site access conditions, or the state of existing structures. If you assume a clear work area but encounter a cluttered space, the extra labor could eat into your profit. Budget allowances for unfinished selections, like fixtures or tiles, provide clients with realistic placeholders while protecting you from unexpected costs.
Also, clearly outline exclusions. For example, if your drywall bid doesn’t include texture matching in adjacent rooms or your electrical work excludes upgrading the main panel, spell it out. These exclusions set boundaries and prevent unpaid extra work. Use the "third-party test": if another contractor couldn’t execute the project using just your estimate and SOW, your documentation might not be detailed enough.
Finally, attach your SOW directly to the contract as an itemized document. This step helps prevent scope disputes and gives you a strong foundation for managing change orders. For more complex projects, consider using a formal Request for Information (RFI) process during the bid phase to clarify any ambiguous details before submitting your estimate.
Use Double-Check and Team Review Processes
Even seasoned estimators can miss details, but a structured review process significantly reduces the chances of oversight. A three-step review system – self-check, peer review, and management review – can identify 94% of major errors before bid submission, compared to just 67% with a single-reviewer approach.
Accurate quantities and labor assessments are the foundation, but getting a fresh perspective is critical. Having another estimator, especially a more experienced one, review your work is one of the best ways to catch errors. As one estimating firm explains:
"The number one thing that ensures accuracy in our company is getting the estimate checked by a different (usually more experienced) estimator."
Start with a self-check after taking a 15-minute break. This short pause improves focus and helps you spot mistakes you might otherwise overlook. Ideally, this self-check should take less than 10% of your total takeoff time.
To make the process efficient, focus on high-impact areas. Apply the 80/20 rule – spend the most time reviewing the 20% of items that account for 80% of your estimate’s value, such as large material orders or complex labor tasks [4,23]. Peer reviewers don’t need to re-estimate everything; instead, they should verify quantities for the top five high-value items and scrutinize any pricing assumptions exceeding $50,000.
Once your self-check is complete, structured checklists add another layer of accuracy.
Use Checklists for Final Reviews
A standardized checklist is a powerful tool for finalizing estimates. It should cover key details like drawing scales, plan updates, floor counts, scope inclusions and exclusions, and soft costs. Maintaining a "common error" log can also be helpful – record mistakes caught during reviews and update your checklist to avoid repeating them.
For large-scale projects with repetitive elements, like multi-family housing, focus on a detailed review of one or two unit types. If these are accurate, visually scan the remaining units for missing areas instead of re-estimating every unit.
After completing the checklist process, team collaboration can further refine the estimate.
Collaborate with Team Members
Digital tools and shared platforms make collaboration easier by enabling real-time feedback and accurate version control. Digital takeoff software, for example, provides an audit trail that shows what was measured and by whom, reducing confusion during team reviews.
ScopeTakeoff’s team estimating tools allow multiple team members to work on the same estimate while tracking changes and maintaining version control. These features help peer reviewers quickly understand your assumptions and calculations without starting from scratch. Pre-built assembly libraries and automated trade calculations further minimize manual errors.
Use the review process as a learning opportunity for the team. After completing a project, conduct post-mortem reviews to compare estimated costs with actual costs. This analysis can reveal patterns of underestimation or overestimation, helping improve future estimates.
"Individual estimators miss errors that fresh eyes catch immediately."
The goal isn’t to achieve perfection on the first try but to create a system where multiple checkpoints catch errors before they lead to costly mistakes. By combining structured reviews with collaborative tools, you can reduce estimate deviations from the industry average of 12–18% to just 3–5%.
Conclusion
To catch estimating errors, focus on verifying quantities, double-checking calculations, reassessing labor assumptions, and reviewing processes. Each of these steps helps intercept mistakes that can chip away at your profit margins.
In an industry where cost overruns and tight margins are the norm, even small estimating errors can have a big impact. Many of these issues arise from preventable mistakes, like miscalculated quantities, outdated pricing, or overly optimistic productivity assumptions. A systematic approach to estimating turns this risky process into a reliable one, safeguarding your bottom line.
"If you’re not calculating labor burden, you’re not estimating, you’re guessing. And in this business, guessing kills profits."
Using digital tools can strengthen your systematic approach. These tools help reduce human errors. For example, ScopeTakeoff’s trade-specific estimating software tackles common pitfalls with features like automated calculations, pre-built assembly libraries, and team collaboration tools with version control.
The combination of careful manual review and automation delivers real benefits. Contractors who adopt structured processes and digital solutions report 40% fewer cost overruns and see a 23% increase in bid win rates. By implementing these strategies, you can turn error-prone estimates into a competitive advantage.
FAQs
What are the most common takeoff mistakes subcontractors make?
Mistakes during the takeoff process can lead to expensive setbacks. Some frequent errors include rushing through the process, misinterpreting specifications, or relying on outdated drawings. Failing to adjust quantities when new addenda are issued is another common oversight.
Specific missteps like miscalculating slab thickness or ignoring site conditions can cause significant delays. These problems often arise from a lack of thorough review, poor teamwork, or not paying close enough attention to the details. This highlights how essential precision and carefulness are during takeoff.
How can I tell if my unit prices and supplier quotes are outdated?
To ensure your unit prices and supplier quotes are up to date, compare them against current market rates and recent data. Check if there have been any recent changes in supplier prices or material costs, like fluctuations in copper prices. It’s also important to confirm that your labor rates align with current regional standards. By routinely reviewing and validating cost data, you can avoid underestimating expenses and maintain accurate estimates.
How much contingency should I add to my estimate?
When preparing construction estimates, it’s common to include a contingency of 5% to 10% of the total project cost. This buffer accounts for unexpected conditions, changes in scope, or potential errors. The exact percentage you choose should reflect the complexity and risks unique to your project, helping to keep your estimate accurate and your budget on track.