
How to Estimate Construction Projects: 7 Steps for Accuracy
Accurate construction estimates are critical to ensuring both profitability and competitiveness. Miscalculations can lead to significant losses – just a 15% error on a $2 million project results in a $300,000 shortfall. With cost deviations in the industry averaging 12–18%, precise estimating is essential to avoid overruns and win bids. This guide outlines a straightforward 7-step process to improve your estimating accuracy, reduce errors, and keep your projects on track.
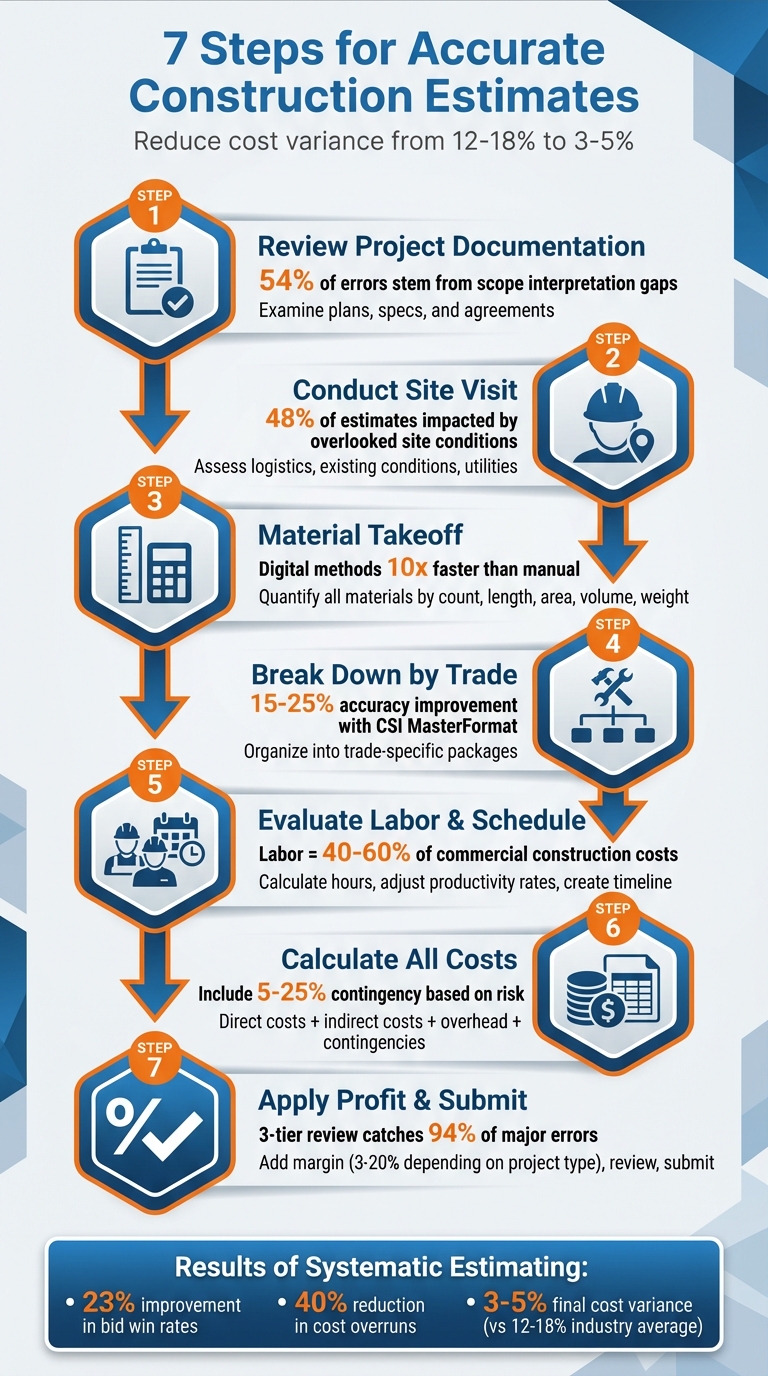
Key Steps:
- Review Project Documentation: Carefully examine all plans, specifications, and agreements to avoid scope errors.
- Conduct a Site Visit: On-the-ground insights can uncover hidden challenges not visible in drawings.
- Perform Material Takeoffs: Quantify all materials systematically, using manual or digital methods.
- Break Down Work by Trade: Organize tasks into trade-specific packages using the CSI MasterFormat.
- Evaluate Labor and Schedule: Calculate labor hours, adjust for productivity rates, and create a realistic timeline.
- Calculate Costs: Separate direct and indirect costs, account for contingencies, and include overhead.
- Add Profit Margin: Set a competitive but profitable margin, then finalize and review your bid.
By implementing these steps, contractors can lower cost variances to 3–5%, reduce overruns by 40%, and improve bid win rates by 23%. Accurate estimating isn’t just about numbers – it’s the foundation for successful, profitable projects.
7-Step Construction Estimating Process for Accurate Project Bids
Construction Estimating: The Complete Step-by-Step Guide
sbb-itb-4ee4ad4
Step 1: Review and Organize Project Documentation
Before diving into calculations, take time to carefully review all project bid documents. This includes owner-contractor agreements, bond forms, general conditions, supplementary conditions, and construction specifications. Overlooking even a small detail here can lead to costly mistakes in your estimate.
"A precise scope of work (SOW) is the single biggest factor affecting estimate accuracy. Without a detailed SOW you invite scope creep, disputes, and budget overruns." – MicroEstimates
Start by ensuring you have all the necessary documents. Confirm that the drawings are numbered sequentially and sorted by discipline – site, architectural, structural, mechanical, electrical, and plumbing (MEP). Compare the technical specifications with the drawings to identify any discrepancies early. Research shows that 54% of construction estimate errors stem from gaps in scope interpretation, and many of these issues arise during the document review phase.
Understand the Project Scope
The first step is to define the project’s actual scope. Look for the Scope of Work (SOW) document, which should clearly outline inclusions, exclusions, client allowances, and specific assumptions. Pay close attention to nonstandard elements like unique architectural designs, intricate floor plans, or high-end finishes that might require specialized labor or equipment beyond standard pricing.
As you review, create an assumption log to document the data you’re using for cost assumptions and note what’s excluded from your bid. This log provides a clear record if questions arise later. If you encounter vague language – such as "painting all exposed surfaces" without specifying whether it includes mechanical rooms – flag it immediately and submit a Request for Information (RFI) to clarify these points before proceeding with your estimate.
Once the scope is clear, organizing your documents systematically will make the takeoff process much smoother.
Organize Plans Systematically
After confirming that your documents are complete, organize them by trade and system. Group construction drawings by discipline (site, architectural, structural, MEP) and align the technical specifications with the corresponding CSI MasterFormat divisions, such as concrete, masonry, metals, and finishes. This method allows you to quickly locate the information you need during your takeoff and reduces the chance of missing critical details hidden within extensive documentation.
From the start, map the project scope to your internal job cost codes. This alignment ensures you track task coverage effectively and avoid omissions or duplications. Keep in mind that indirect costs – like jobsite management and permits – typically account for 10–15% of total project expenses. These costs are often detailed in the general conditions or supplementary documents rather than in the drawings, so be sure to account for them early in the process.
Step 2: Conduct a Detailed Site Visit and Assessment
Visiting the site in person is a must. Even the most detailed drawings can miss critical on-the-ground details, and skipping this step can lead to costly errors. In fact, about 48% of construction estimates are impacted by overlooked site-specific conditions. A physical walk-through uncovers logistical challenges, existing conditions, and factors like soil and drainage that directly affect labor, equipment, and overall costs. This step is all about minimizing errors and improving the accuracy of your bid.
"Never estimate a job you haven’t seen. Photos from the client don’t cut it. You need boots on the ground." – Projul
When you visit the site, bring essential tools like a tape measure, a camera, and a notepad to document your observations. Start by assessing site logistics: Are there narrow entryways? Is parking limited? Is there space for staging materials? For example, a downtown project without a staging area and with restricted delivery hours can increase costs by 15-25% compared to a similar project in a suburban setting.
If you’re dealing with a renovation, inspect the existing structure for potential hidden problems, such as rotted framing or outdated wiring, that aren’t visible in the plans. These issues can significantly impact the budget and timeline.
Environmental and ground conditions are equally critical. Check the soil type, drainage, and topography – these factors influence excavation and foundation costs. Also, verify whether utilities like power, water, and sewage are already in place. Determine if temporary facilities, such as site trailers or fencing, will be needed. Don’t overlook external factors like occupied neighboring buildings, restricted delivery hours, or traffic management requirements that could slow down productivity.
To ensure nothing gets missed, use a standardized checklist during your visit. Confirm key dimensions against the drawings to catch any discrepancies early, and document uncertainties – like unknown soil conditions – in a log for later reference. Take plenty of photos; these visual records will be invaluable when you’re back at your desk working on takeoffs. Finally, a joint site walk with the client can clarify key details, including what’s included in the project, what’s excluded, and who’s responsible for tasks like debris removal.
Step 3: Perform a Material Quantity Takeoff
After evaluating the site, the next step is to accurately quantify all the materials needed for the project. This process, known as a material takeoff, is crucial for ensuring your bid is precise. It involves measuring and counting every material required, from concrete and lumber to smaller items like fasteners and paint. A single mistake here could either inflate your budget or leave you short on materials mid-project. The objective is to create a complete, well-organized list of materials with exact quantities, making it easier to price and order what’s needed. This step also sets the stage for deciding between manual and digital methods.
Manual vs. Digital Takeoff Methods
When it comes to material takeoffs, you have two main approaches: manual or digital.
Manual takeoffs involve printed blueprints, scale rulers, highlighters, and spreadsheets. You manually measure dimensions on the plans and record the data yourself. While this method doesn’t require software expenses and gives you full control, it’s time-consuming and prone to errors. Something as simple as a typo in your spreadsheet could throw off your entire bid.
On the other hand, digital takeoff software offers a faster and more reliable alternative. Tools like ScopeTakeoff let you measure directly on digital blueprints, with built-in automation to reduce transcription errors. Digital methods can be up to 10 times faster than manual ones. For example, tasks that might take 6 to 8 hours manually can be completed in just 20 to 30 minutes using AI-powered features. These tools can even auto-detect elements like outlet symbols across multiple blueprint pages, saving hours of tedious work.
Which method you choose depends on the size and complexity of your project. For smaller residential jobs, manual takeoffs might be sufficient. However, for commercial projects, tight deadlines, or frequent revisions, digital tools are almost indispensable. Just remember to verify the digital scale against a known dimension, such as a door width or grid line, to avoid significant errors.
Categorize Materials by Measurement Type
Once you’ve measured and recorded quantities, the next step is to categorize materials properly. Grouping materials by how they are measured helps prevent confusion and ensures pricing accuracy. Typically, materials fall into five categories:
- Count: Items like doors and windows.
- Length: Materials such as lumber and conduit.
- Area: Flooring, drywall, or similar materials.
- Volume: Concrete, sand, or other bulk items.
- Weight: Often used for shipping calculations.
Be as specific as possible when categorizing. For example, instead of simply listing "flooring", break it down into tile, hardwood, or carpet, with exact square footage for each type. Don’t overlook smaller components like door handles, fasteners, or anchors. Consider using assembly-based takeoffs, which group related items together. For instance, measuring "linear feet of exterior wall" could automatically include studs, top and bottom plates, sheathing, and nails. This method ensures you account for all necessary components.
Another key consideration is factoring in material wastage. Different materials require varying allowances: structural steel may need 12–15% extra for cutting and bending, granite might need 8–12% for breakage, and cement could require 3–4% to offset airborne loss during mixing. Mark off items as you measure them to avoid duplication. By categorizing materials systematically and accounting for wastage, you’ll lay a strong foundation for the pricing phase that follows.
Step 4: Break Down Work into Packages and Trade Divisions
Once your material takeoff is complete, the next step is to organize the work into trade-specific packages. This means grouping tasks systematically by trade – such as concrete, electrical, HVAC, and finishes. Without these clear divisions, you could miss items, double-count costs, or create confusion when coordinating with subcontractors. Think of this process as creating a roadmap where every task is accounted for, ensuring no details slip through the cracks. This structured approach ties directly back to your material takeoff, making sure every cost is included.
A helpful tool for this step is the CSI MasterFormat, a standardized system that organizes construction work into 50 divisions. Pro Estimating Services describes its value perfectly:
"The CSI MasterFormat is like the Dewey Decimal System for construction. It’s a standardized framework that organizes construction information in a logical way that makes sense whether you’re in Boston or Bakersfield."
– Pro Estimating Services
The system uses a hierarchical numbering structure: the first two digits represent broad categories (e.g., Division 03 for Concrete), while additional digits specify details (e.g., 03 30 00 for Cast-in-Place Concrete). Using MasterFormat can improve cost estimation accuracy by 15–25%.
Create Trade-Specific Work Packages
To start, divide your project into trade-specific packages based on the CSI divisions. For example:
- Division 03: Concrete work
- Division 09: Finishes like drywall and flooring
- Division 26: Electrical systems
Each division should include all materials, labor, and equipment related to that trade. Be consistent with measurement units – for example, concrete is typically measured in cubic yards (CY), structural steel in tons, and finishes in square feet (SF). Consistency simplifies pricing and helps you compare supplier quotes more effectively.
Concrete work under Division 03 often accounts for 12–18% of total project costs, while combined structural costs (Concrete, Masonry, Metals, and Wood) typically represent 35–45% of the budget. To ensure accuracy, break down each package thoroughly. For instance, if you’re working on a wall assembly in Division 09, don’t just list "drywall." Include all related components like studs, insulation, sheathing, fasteners, and finishing materials. This detailed approach captures every aspect of a trade’s scope. Additionally, securing subcontractor bids early can clarify trade boundaries, especially for complex areas like electrical connections or structural support.
Avoid Overlaps and Duplication
Clear trade divisions help prevent duplicate cost entries. Use the hierarchical numbering system to create distinct boundaries between trades. For example, HVAC ducts and casings fall under 23 31 00, while raceways and boxes are categorized as 26 05 33.
Document everything clearly, including inclusions, exclusions, and client-supplied items. For example, if the client is providing specific materials, note that under the appropriate division. Similarly, if there are unique conditions – like limited site access or varying wall heights – record those details. This avoids scenarios where multiple trades claim the same preparatory work.
Finally, compare your trade breakdown with historical data from past projects. If Division 09 (Finishes) appears unusually high compared to similar projects, it might signal duplication or miscategorized items. Double-checking these details early can save you from costly errors during construction. With your trade breakdown in place, you’re ready to dive into labor and schedule planning in the next steps.
Step 5: Evaluate Labor Requirements and Project Schedule
Labor typically makes up 40–60% of commercial construction costs, making it the biggest variable in your estimate. Even a 10% error in productivity assumptions can lead to a 4–6% error in your total bid price. That’s why, after organizing your trade divisions in Step 4, getting labor estimates right is critical.
Calculate Labor Hours and Roles
Labor estimates start with productivity rates – how much work a crew can complete per hour. For example, a two-person drywall crew might hang 45–65 square feet (SF) of 5/8" Type X drywall each hour, while a three-person framing crew might install 30–45 linear feet (LF) of 3-5/8" metal studs per hour.
Whenever possible, rely on your own historical data. Contractors who track and compare actual field performance with their estimates improve accuracy by 8–15% compared to those who only use published benchmarks. If you don’t have historical data, industry resources like RS Means can help. RS Means assumes a "productive 45-minute hour", factoring in 15 minutes of downtime per clock hour.
Adjust these baseline productivity rates for factors like crew experience, site access, weather, project complexity, and building height. For example, productivity drops by 3–5% per floor above ground level. Remodeling projects often take 15–20% more labor time than new construction due to demolition and working around existing structures. Additionally, if your schedule includes sustained overtime (over 60 hours per week for more than two weeks), expect a 15–25% productivity decline starting in the third week.
Don’t forget to use fully burdened labor rates. These include not just wages but also FICA, unemployment insurance, workers’ compensation, health insurance, and paid time off. Burdens typically add 25–50% to the base wage. For example, an electrician earning $28 per hour might have a fully burdened rate of $35–42 per hour. Missing these costs can understate labor expenses by 20–30%.
Once you’ve estimated total labor hours, you can start translating them into a feasible project schedule.
Develop a Realistic Schedule
Using your labor hour calculations, determine daily production rates to create an accurate schedule. Production rates measure how much work a crew can complete per day. For instance, a concrete crew placing 2.5–3.5 cubic yards (CY) per hour for a 50 CY pour would need 14–20 hours, or about 1.5–2 days, assuming a four-person crew working 8-hour shifts.
Consider site-specific constraints like limited staging areas, restricted work hours, or long travel times. For distant job sites, calculate mobilization time separately using the formula: drive time × crew size × loaded rate. This ensures non-productive hours don’t eat into your profit. If the project involves unfamiliar materials or methods, expect slower production early on as crews get up to speed.
External factors also influence your timeline. Weather conditions, seasonal adjustments, and subcontractor availability can all impact scheduling. Subcontractor timelines, especially for trades like electrical and plumbing, must align with your project plan. Keep in mind that overhead costs – like site supervision, temporary facilities, and equipment rentals – are tied to project duration. An inaccurate timeline could lead to underestimating these indirect expenses.
Step 6: Calculate All Direct and Indirect Costs
Step 6 wraps up your estimate by turning detailed work components into total project costs. With labor and schedules already outlined in Step 5, this step ensures you account for every expense. Overlooking even small items can lead to a 5–10% gap in your estimate, which could seriously impact your project’s profitability.
Break Down Direct and Indirect Costs
Start by separating direct costs – materials (25–40%), labor (25–35%), and subcontractors (15–30%) – to keep track of each category and avoid unexpected overruns. Pricing materials and labor individually helps ensure accuracy.
When estimating materials, remember to include waste factors to cover material losses. Double-check that supplier quotes are current (no older than 30–60 days), and for items like lumber or steel, include escalation clauses to manage price fluctuations.
For labor, be sure to use fully burdened rates as outlined in Step 5. Skipping this detail can understate labor costs by 20–30% or more.
Indirect costs, while not tied to specific tasks, are vital to the project’s support structure. These fall into two categories:
- Job-specific overhead: Costs like permits, site trailers, temporary fencing, and job-specific insurance.
- Company overhead: Expenses such as office rent, administrative salaries, software subscriptions, and general insurance.
To calculate your company overhead rate, divide your total annual general and administrative (G&A) expenses by your total annual revenue. For example, if your G&A expenses are $600,000 and your revenue is $10,000,000, your overhead rate is 6%. Apply this percentage to your project’s direct costs for a more complete estimate.
With both direct and indirect costs calculated, the next step is to account for risks by including contingencies and overhead.
Include Contingencies and Overhead
Once direct expenses are in place, it’s essential to set aside funds for unexpected challenges. This is where contingencies come in. Contingency isn’t just extra padding – it’s a calculated reserve for potential risks, like unforeseen site conditions or incomplete design details. Adjust your contingency based on project risk levels:
- 5% for low-risk projects with complete plans (e.g., new builds).
- 8–12% for medium-risk remodels with standard complexity.
- 15–25% for high-risk projects, such as historic renovations or storm damage repairs where surprises are likely.
Job overhead also varies depending on the project. Simpler projects may need 5–8%, while standard commercial work typically requires 8–12%. For complex renovations, especially in occupied spaces, overhead can climb to 15–20%. For duration-based costs like site trailers or supervision, multiply the monthly cost by the project timeline. For example, a $1,200/month job trailer for a four-month project adds $4,800 to your estimate.
"Overhead costs can make or break your construction bids. Too high, and you’re not competitive. Too low, and you’re losing money on every job you win." – ConstructionBids.ai
After the project wraps up, compare your estimated overhead and contingency against actual spending. This post-project analysis sharpens your bidding process and improves accuracy for future estimates. Thoroughly assessing these costs now lays the groundwork for determining your profit margin in the next step.
Step 7: Apply Profit Margin and Submit Your Bid
Now that you’ve nailed down your costs, it’s time to add your profit margin and finalize your bid. This step ensures your bid not only covers all expenses but also positions you competitively in the market.
Determine an Appropriate Profit Margin
Profit isn’t an afterthought – it’s a critical part of your estimate. Choosing the right profit margin can make or break your bid. Keep in mind the difference between markup and margin. For example, a 20% markup results in only a 16.7% profit margin. To calculate your profit margin correctly, use this formula:
Selling Price = Total Costs / (1 – Desired Margin %).
Profit margins differ depending on the type of project. Here’s a quick breakdown:
- General contractors typically aim for 3% to 6%.
- Specialty trades like electrical or HVAC often range between 5% and 10%.
- Design-build and negotiated work can command 8% to 15%.
- Service or maintenance jobs may achieve 10% to 20%.
Several factors influence your margin, including project risk, market competition, your current workload, and the client’s strategic value.
"Most contractors who go broke do not lose money because they cannot build. They lose money because they cannot price." – ToolGrit
If you’re winning more than 70% of your bids, it’s a sign you might be pricing too low. For competitive work, a healthy bid-hit ratio usually falls between 15% and 25%. Always establish a minimum profit margin, and if you can’t meet it, walk away from the bid.
Once you’ve determined the right margin, you’re ready to finalize your bid.
Review and Finalize the Bid
Before submitting your bid, implement a thorough three-tier review process:
- Initial check: Verify all drawing sheets, taxes, bonds, and measurement units.
- Peer review: Have a colleague review the five highest-value line items and any item exceeding $50,000.
- Senior management review: Ensure strategic alignment, proper risk allocation, and that your profit margin fits the project.
This method significantly reduces errors – catching 94% of major estimating mistakes compared to just 67% with a single review.
Run a sanity check by comparing your total estimate to industry benchmarks, such as cost-per-square-foot or cost-per-unit. If your bid is 30% higher or lower than these benchmarks, dig into the numbers to find out why before submitting.
Finally, assemble a professional bid package. Include:
- An itemized scope of work
- A realistic project schedule
- Proof of insurance and bonding
- A clear list of assumptions or exclusions to avoid scope creep
Make sure your estimate includes a detailed cost breakdown. This level of transparency not only makes your bid easier to defend but also builds trust with your client.
Conclusion
Accurate estimating is the backbone of protecting your profit and keeping your business running smoothly. The seven-step process shared in this guide offers a repeatable way to bring down the industry’s average estimate variance of 12–18% to a much tighter range of 3–5%. By adopting these steps, you can turn your estimating process into a dependable and competitive advantage.
"Construction estimating accuracy determines whether your company builds wealth or bleeds cash."
– David Martinez, CB
Research shows that a structured review process catches 94% of major errors, compared to just 67% with a single review. On top of that, systematic workflows can boost bid win rates by 23% and reduce cost overruns by 40%. In competitive public bids, where the winning contractor is often within 2% of the second-place bidder, even small improvements make a big difference.
One of the most impactful changes you can make is to track actual costs against your estimates for every project. Over time, this turns your historical data into a goldmine of insights – far more useful than any generic cost guide – because it reflects your unique crews, market conditions, and performance.
These findings make one thing clear: disciplined estimating is key to success. Start by adopting digital takeoffs, calculating fully burdened labor rates, and conducting structured peer reviews. Each step strengthens your process and builds a foundation for long-term profitability.
FAQs
What should I do when the plans and specs don’t match?
When plans and specifications don’t match up, it’s crucial to address these inconsistencies before diving into an estimate. Take the time to review the discrepancies and seek clarification. Collaborate with the project team – this might include architects or engineers – to resolve any conflicts. Make sure to document any changes or assumptions you make during this process. Doing so ensures your estimate aligns with the actual scope of work, reducing errors, improving precision, and helping to avoid unexpected costs due to mismatched details.
How do I set a contingency percentage for my project?
To determine a contingency percentage, evaluate the project’s risks and complexity. Typically, contingencies fall between 5% and 10% of the total budget, influenced by elements like project scope, location, and potential risks.
Make sure to include this as a dedicated budget line item. This allocation helps cover unexpected expenses, such as design revisions or unforeseen site conditions, and should be adjusted based on the specific challenges your project might face.
How can I build job-cost history to improve future estimates?
Building a reliable job-cost history can make your project estimates much more accurate. By using actual data from completed projects – like labor, materials, equipment, and overhead – you gain a clearer picture of what things truly cost. Start by recording and organizing these details for every project. Then, compare them to your initial estimates to identify trends or areas where adjustments might be needed.
Consistently tracking and analyzing costs is key. Tools designed for cost management can help you stay organized and ensure your future estimates reflect both your processes and local market conditions. This approach not only sharpens accuracy but also builds confidence in your projections.